
User Manual


4
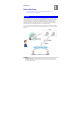
Rear Panel
Antenna Attach the supplied antenna here. The antenna is adjustable; best
results are usually obtained with the antenna positioned vertically.
Power Input
Connect the supplied power adapter here.
MIC In If required, an external microphone can be attached here. Attaching
a microphone here will disable the built-in microphone on the front.
Microphones designed to be used with PCs are usually compatible
with this microphone input.
LAN port Use a standard LAN cable to connect your Wireless/Ethernet
Network Camera to a 10/100BaseT hub or switch.
Note:
On the Wireless Network Camera, attaching the LAN cable will
disable the Wireless interface. Only 1 interface can be active at any
time.
Reset Button
This button has two (2) functions:
• Restore Default IP Address. When pressed and released, the
Wireless/Ethernet Network Camera will reset its IP address to
the default value of 192.168.0.99.
• Restore Default IP Address, Administrator ID, and
Administrator password. When pressed and held or 3
seconds, the IP address, Administrator ID, and Administrator
Password settings will be set to their default values.
• IP address: 192.168.0.99
• Administrator ID: administrator
• Administrator Password: null (no password)
Note:
After this procedure is completed, the Ready LED will blink three
times to confirm that the reset was completed successfully.