802.
TABLE OF CONTENTS CHAPTER 1 INTRODUCTION ............................................................................................. 1 Features of your Wireless Access Point........................................................................... 1 Package Contents .............................................................................................................. 3 Physical Details.................................................................................................................
Checking TCP/IP Settings - Windows 9x/ME: ............................................................. 78 Checking TCP/IP Settings - Windows NT4.0 ............................................................... 80 Checking TCP/IP Settings - Windows 2000.................................................................. 82 Checking TCP/IP Settings - Windows XP .................................................................... 84 Checking TCP/IP Settings - Windows Vista .....................................
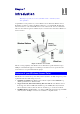
Chapter 1 Introduction 1 This Chapter provides an overview of the Wireless Access Point's features and capabilities. Congratulations on the purchase of your new Wireless Access Point. The Wireless Access Point links your 802.11a or 802.11b/g Wireless Stations to your wired LAN. The Wireless stations and devices on the wired LAN are then on the same network, and can communicate with each other without regard for whether they are connected to the network via a Wireless or wired connection.
Wireless Access Point User Guide • Bridge Mode Support. The Wireless Access Point can operate in Bridge Mode, connecting to another Access Point. Both PTP (Point to Point) and PTMP (Point to MultiPoint) Bridge modes are supported. And you can even use both Bridge Mode and Access Point Mode simultaneously! • DHCP Client Support. Dynamic Host Configuration Protocol provides a dynamic IP address to PCs and other devices upon request.
Introduction Package Contents The following items should be included: • Wireless Access Point • Power Adapter • Quick Start Guide • CD-ROM containing the on-line manual and setup utility. If any of the above items are damaged or missing, please contact your dealer immediately.
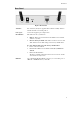
Wireless Access Point User Guide Physical Details Front Panel LEDs Figure 2: Front Panel Power On - Normal operation. Off - No power Status On - Error condition. Off - Normal operation. Blinking - During start up, and when the Firmware is being upgraded. LAN • • WLAN 5G GHZ 100 Link/Act • On - Corresponding LAN (hub) port is using 100BaseT. • Off - No active connection on the corresponding LAN (hub) port. • Flashing - Data is being transmitted or received via the corresponding LAN (hub) port.
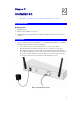
Introduction Rear Panel Figure 3 Rear Panel Antennae Two antennae (aerial) are supplied. Best results are usually obtained with the antenna in a vertical position. Power port Connect the supplied power adapter here. Reset Button This button has two (2) functions: • Reboot. When pressed and released, the Wireless Access Point will reboot (restart). • Reset to Factory Defaults. This button can also be used to clear ALL data and restore ALL settings to the factory default values.
Chapter 2 Installation 2 This Chapter covers the physical installation of the Wireless Access Point. Requirements Requirements: • TCP/IP network • Ethernet cable with RJ-45 connectors • Installed Wireless network adapter for each PC that will be wirelessly connected to the network Procedure 1. Select a suitable location for the installation of your Wireless Access Point.
Installation 2. 3. 4. Use a standard LAN cable to connect the “Ethernet” port on the Wireless Access Point to a 10/100BaseT hub on your LAN. Connect the supplied power adapter to the Wireless Access Point and a convenient power outlet, and power up. Check the LEDs: • The Status LED should flash, then turn OFF. • The Power, WLAN, and LAN LED should be ON. For more information, refer to Front Panel LEDs in Chapter 1.
Chapter 3 Access Point Setup 3 This Chapter provides details of the Setup process for Basic Operation of your Wireless Access Point. Overview This chapter describes the setup procedure to make the Wireless Access Point a valid device on your LAN, and to function as an Access Point for your Wireless Stations. Wireless Stations may also require configuration. For details, see Chapter 4 - Wireless Station Configuration.
Wireless Access Point User Guide Figure 6: Management utility Screen Wireless Access Points The main panel displays a list of all Wireless Access Points found on the network. For each Access Point, the following data is shown: Name The Name is shown on a sticker on the base of the device. IP address The IP address for the Wireless Access Point. MAC Address The hardware or physical address of the Wireless Access Point.
Access Point Setup Setup Procedure 1. 2. 3. Select the desired Wireless Access Point. Click the Set IP Address button. If prompted, enter the user name and password. The default values are admin for the User Name, and password for the Password. 4. Ensure the IP address, Network Mask, and Gateway are correct for your LAN. Save any changes. Click the Web Management button to connect to the selected Wireless Access Point using your Web Browser. If prompted, enter the User Name and Password again.
Wireless Access Point User Guide Setup using a Web Browser Your Browser must support JavaScript. The configuration program has been tested on the following browsers: • Netscape V4.08 or later • Internet Explorer V4 or later Setup Procedure Before commencing, install the Wireless Access Point in your LAN, as described previously. 1. Check the Wireless Access Point to determine its Default Name.
Access Point Setup 7. From the menu, check the following screens, and configure as necessary for your environment. Details of these screens and settings are described in the following sections of this chapter. • General • Setup • • • • 8.
Wireless Access Point User Guide General Screen When you first connect, you will see the General screen. This displays the current settings and status of the Wireless Access Point. No data can be input on this screen. Figure 8: General Screen For further details of this screen, refer to General Screen in Chapter 5.
Access Point Setup Basic Screen Click Basic Settings on the menu to view a screen like the following. Figure 9: Basic Settings Screen Data - Basic Settings Screen Basic Access Point Name Enter a suitable name for this Access Point.
Wireless Access Point User Guide Country/Region Select the country or domain matching your current location. TCP/IP DHCP Client Enable this option if you have a DHCP Server on your LAN, and you wish the Access Point to obtain an IP address automatically. If disable is selected, the following data must be entered. • IP Address - The IP Address of this device. Enter an unused IP address from the address range on your LAN. • IP Subnet Mask - The Network Mask associated with the IP Address above.
Access Point Setup Wireless Settings 11a Screen The settings on this screen must match the settings used by Wireless Stations. Click Wireless Settings 11a on the menu to view a screen like the following. Figure 10: Wireless Settings 11a Screen Data - Wireless Settings 11a Screen Wireless LAN Turn Radio On Use this checkbox to Enable or Disable this feature as desired. Operating Mode Select the desired option: • Channel/Freque ncy 802.11a Only - this is the default, and will allow connections by 802.
Wireless Access Point User Guide Wireless Settings 11b/g Screen The settings on this screen must match the settings used by Wireless Stations. Click Wireless Settings 11b/g on the menu to view a screen like the following. Figure 11: Wireless Settings 11b/g Screen Data - Wireless Settings 11b/g Screen Wireless LAN Turn Radio On Use this checkbox to Enable or Disable this feature as desired. Operating Mode Select the desired option: Channel/Freque ncy • Auto (802.11g/802.
Access Point Setup Security Profile Settings 11a Screen Clicking the Security Profile Settings 11a link on the menu will result in a screen like the following. Figure 12: Security Profile Settings 11a Screen Data - Security Profile Settings 11a Screen Profile Name The current Profile name is displayed. SSID The current SSID associated with this Profile. Security The current security system (e.g. WPA-PSK) is displayed. Enable Enable the selected Profile.
Wireless Access Point User Guide Security Profile Settings 11b/g Screen Clicking the Security Profile Settings 11b/g link on the menu will result in a screen like the following. Figure 13: Security Profile Settings 11b/g Screen Data - Security Profile Settings 11b/g Screen Profile Name The current Profile name is displayed. SSID The current SSID associated with this Profile. Security The current security system (e.g. WPA-PSK) is displayed. Enable Enable the selected Profile.
Access Point Setup Security Profile Configuration Screen This screen is displayed when you select a Profile on the Security Profile Settings screen, and click the Edit button. Figure 14: Security Profile Configuration Screen Profile Data Enter the desired settings for each of the following: Security Profile Name Enter a suitable name for this Profile. Wireless Network Name (SSID) Enter the desired SSID. Each Profile must have a unique SSID.
Wireless Access Point User Guide Wireless Client Security Separation If enabled, then each Wireless station using the Access Point is invisible to other Wireless stations. In most business stations, this setting should be Disabled. Security Settings Select the desired option, and then enter the settings for the selected method. The available options are: • WEP - The 802.11b standard. Data is encrypted before transmission, but the encryption system is not very strong.
Access Point Setup • Each user must authenticate on the Radius Server. This is usually done using digital certificates. • Each user's wireless client must support 802.1x and provide the Radius authentication data when required. • All data transmission is encrypted using EITHER WPA or WPA2 standard. Keys are automatically generated, so no key input is required. Security Settings - WEP This is the 802.11b standard. Data is encrypted before transmission, but the encryption system is not very strong.
Wireless Access Point User Guide Data - WEP Screen WEP Data Encryption Select the desired option, and ensure your Wireless stations have the same setting: • None - No security is used. Anyone using the correct SSID can connect to your network. • 64 bits WEP - Keys are 10 Hex (5 ASCII) characters. • 128 bits WEP - Keys are 26 Hex (13 ASCII) characters. • 152 bits WEP - Keys are 32 Hex (16 ASCII) characters. Passphrase Use this to generate a key or keys, instead of entering them directly.
Access Point Setup Security Settings - WPA-PSK Like WEP, data is encrypted before transmission. WPA is more secure than WEP, and should be used if possible. The PSK (Pre-shared Key) must be entered on each Wireless station. The 256Bit encryption key is derived from the PSK, and changes frequently. Figure 16: WPA-PSK Wireless Security Data - WPA-PSK Screen WPA-PSK Data Encryption Select the desired option. Other Wireless Stations must use the same method.
Wireless Access Point User Guide Security Settings - WPA2-PSK This is a further development of WPA-PSK, and offers even greater security, using the AES (Advanced Encryption Standard) method of encryption. Figure 17: WPA2-PSK Wireless Security Screen Data - WPA2-PSK Screen WPA2-PSK Data Encryption The encryption method is AES. Wireless Stations must also use AES. WPA Passphrase Enter the key value. Data is encrypted using a 256Bit key derived from this key.
Access Point Setup Security Settings - WPA-PSK and WPA2-PSK This method, sometimes called "Mixed Mode", allows clients to use EITHER WPA-PSK (with TKIP) OR WPA2-PSK (with AES). Figure 18: WPA-PSK and WPA2-PSK Wireless Security Screen Data - WPA-PSK and WPA2-PSK Screen WPA-PSK and WPA2-PSK Data Encryption The encryption method is TKIP for WPA-PSK, and AES for WPA2-PSK. WPA Passphrase Enter the key value. Data is encrypted using this key. Other Wireless Stations must use the same key.
Wireless Access Point User Guide Security Settings - WPA with Radius This version of WPA requires a Radius Server on your LAN to provide the client authentication according to the 802.1x standard. Data transmissions are encrypted using the WPA standard. Figure 19: WPA with Radius Wireless Security Screen Data - WPA with Radius Screen WPA with Radius Data Encryption Select the desired option. Other Wireless Stations must use the same method.
Access Point Setup Security Settings - WPA2 with Radius This version of WPA2 requires a Radius Server on your LAN to provide the client authentication according to the 802.1x standard. Data transmissions are encrypted using the WPA2 standard. Figure 20: WPA2 with Radius Wireless Security Screen Data - WPA2 with Radius Screen WPA2 with Radius Data Encryption The encryption method is AES. Wireless Stations must also use AES.
Wireless Access Point User Guide Security Settings - WPA and WPA2 with Radius EITHER WPA or WPA2 require a Radius Server on your LAN to provide the client authentication according to the 802.1x standard. Data transmissions are encrypted using EITHER WPA or WPA2 standard. Figure 21: WPA and WPA2 with Radius Wireless Security Screen Data - WPA and WPA2 with Radius Screen WPA and WPA2 with Radius Data Encryption The encryption method is TKIP for WPA, and AES for WPA2.
Access Point Setup Radius Server Settings Clicking the Radius Server Settings link on the menu will result in a screen like the following.
Wireless Access Point User Guide Data - Radius Server Settings Screen Primary/Secondary Authentication Server IP Address Enter the IP address of the Radius Server on your network. Port Number Enter the port number used for connections to the Radius Server. Shared Secret Enter the key value to match the Radius Server. Secondary Authentication Server The Backup Authentication Server will be used when the Primary Authentication Server is not available.
Access Point Setup Access Control This feature can be used to block access to your LAN by unknown or untrusted wireless stations. Click Access Control on the menu to view a screen like the following. Figure 23: Access Control Screen Data - Access Control Screen Turn Access Control On Use this checkbox to Enable or Disable this feature as desired. Select Access Control Database Select the desired option as required.
Wireless Access Point User Guide MAC Address Enter the required data and click Add button if you want to add a Wireless Station manually. Buttons Delete Delete a Trusted Wireless Station from the list Add To add a Trusted Station which is not in the "Available Trusted Wireless Stations" list, enter the required data and click this button.
Access Point Setup Hotspot Settings Clicking the Hotspot Settings link on the Advanced menu will result in a screen like the following. Figure 24: Hotspot Settings Data - Hotspot Settings Screen Hotspot Enable HTTP Redirect Enable this if you want HTTP requests to be "captured" and redirected to the URL you specify URL Enter the URLwhich you want HTTP requests to redirect to.
Wireless Access Point User Guide Advanced Wireless Settings Clicking the Wireless Settings link on the Advanced menu will result in a screen like the following. Figure 25: Advanced Wireless Settings Data - Advanced Wireless Settings Screen Wireless LAN Parameters Super-A Mode Check this to enable Super-A mode as required. Enable WMM Support Check this to enable WMM (Wi-Fi Multimedia) support in the Access Point.
Access Point Setup Advanced Access Point Settings Clicking the Access Point Settings link on the Advanced menu will result in a screen like the following.
Wireless Access Point User Guide Data - Advanced Access Point Settings Screen Access Point Mode Enable Wireless Bridging and… Check this and select the option as required. • Wireless Point-to-Point Bridge (PTP) - Bridge to a single AP. You must provide the MAC address of the other AP in the Remote MAC Address field. • Wireless Point to Multi-Point Bridge (PTMP) - Select this only if this AP is the "Master" for a group of Bridgemode APs.
Chapter 4 PC and Server Configuration 4 This Chapter details the PC Configuration required for each PC on the local LAN. Overview All Wireless Stations need to have settings which match the Wireless Access Point. These settings depend on the mode in which the Access Point is being used. • If using WEP or WPA-PSK, it is only necessary to ensure that each Wireless station's settings match those of the Wireless Access Point, as described below. • For 802.1x mode, configuration is much more complex.
Wireless Access Point User Guide Using WPA-PSK/WPA2-PSK For each of the following items, each Wireless Station must have the same settings as the Wireless Access Point. Mode On each PC, the mode must be set to Infrastructure. SSID (ESSID) This must match the value used on the Wireless Access Point. The default value is wireless Note! The SSID is case sensitive. Wireless Security On each client, Wireless security must be set to WPA-PSK.
PC and Server Configuration Using WPA-Enterprise This is the most secure and most complex system. WPA-Enterprise provides greater security and centralized management, but it is more complex to configure. Wireless Station Configuration For each of the following items, each Wireless Station must have the same settings as the Wireless Access Point. SSID (ESSID) This must match the value used on the Wireless Access Point. Note! The SSID is case sensitive. 802.
Wireless Access Point User Guide 802.1x Server Setup (Windows 2000 Server) This section describes using Microsoft Internet Authentication Server as the Radius Server, since it is the most common Radius Server available that supports the EAP-TLS authentication method.
PC and Server Configuration Figure 27: Components Screen 4. 5. Click Next. Select the Enterprise root CA, and click Next. Figure 28: Certification Screen 6. Enter the information for the Certificate Authority, and click Next.
Wireless Access Point User Guide Figure 29: CA Screen 7. 8. Click Next if you don't want to change the CA's configuration data. Installation will warn you that Internet Information Services are running, and must be stopped before continuing. Click Ok, then Finish. DHCP server configuration 1. 2. Click on the Start - Programs - Administrative Tools - DHCP Right-click on the server entry as shown, and select New Scope. Figure 30: DHCP Screen 3. 4. 5. Click Next when the New Scope Wizard Begins.
PC and Server Configuration Figure 31:IP Address Screen 6. Add exclusions in the address fields if required. If no exclusions are required, leave it blank. Click Next. 7. Change the Lease Duration time if preferred. Click Next. 8. Select Yes, I want to configure these options now, and click Next. 9. Enter the router address for the current subnet. The router address may be left blank if there is no router. Click Next. 10.
Wireless Access Point User Guide Certificate Authority Setup 1. 2. Select Start - Programs - Administrative Tools - Certification Authority. Right-click Policy Settings, and select New - Certificate to Issue. Figure 33: Certificate Authority Screen 3. Select Authenticated Session and Smartcard Logon (select more than one by holding down the Ctrl key). Click OK. Figure 34: Template Screen 4. 5. Select Start - Programs - Administrative Tools - Active Directory Users and Computers.