CPE User Manual CPE 操作手册 CPE User Manual Version: 2.1 Author: Samson Sun Time: 2018/9/7 Copyright © 2018 Sercomm Corporation. All Rights Reserved. Sercomm Corporation reserves the right to make changes to this document without notice. Sercomm Corporation makes no warranty, representation or guarantee regarding the suitability of its products for any particular purpose. Sercomm Corporation assumes no liability arising out of the application or use of any product or circuit.
CPE User Manual 文件变更履历表 Document Revision History 版次 version 修订日期 date 修订作者 author 修订理由及内容摘要 reasons and contents 1.0 2017/05/08 孙朝阳 Samson Sun 1.1 2017/05/18 左琪 Zack Zuo 1.2 2017/05/19 Samson Sun 1. Modify some expression . 1. Update LED spec 2. Update snapshot base on new style . 3. Add multi PDN configuration 4. Add KPI analysis Initial Version 1.Translate to English 2.Add Senior maintenance 1.3 2017/07/03 Samson Sun 1.4 2017/07/18 Leanshaw Zhao 1.5 2017/08/10 Phoebe Ge 1.
CPE User Manual 目录 Index 文件变更履历表............................................................................................................................... 2 Document Revision History .............................................................................................................. 2 目录 .................................................................................................................................................. 3 Index ....................................................
CPE User Manual 3.2.ARM1 升级方法....................................................................................................... 18 CPE ARM1 Upgrade Method ......................................................................................... 18 Get CPE Logs ......................................................................................................................... 20 4.1.通过页面查看 CPE 日志 .........................................................................................
CPE User Manual 2.1. 如何登入到板子里面 ..................................................................................................... 36 2.2. SAS 怎么测 ..................................................................................................................... 36 2.3. 查看 sasd 的 log.............................................................................................................. 36 2.4. sasd 的 log 分析...........................................................................................
CPE User Manual 初级维护 Primary Maintenance 1.检查 CPE 的设备状态 CPE Status Check 本章节主要指导用户检查 CPE 的设备状态,包括检查外部环境、USIM 卡指示、如何 获取 CPE 网络状态信息、检查 LED 状态这 4 部分的内容。 This chapter guides users to check the status of CPE, which includes environment check, USIM card check, network status check and LED check. 1.1.CPE 外部环境确认 Environment check 在 CPE 运行之前,需要确认附近是否有 B42、43 或者 B48 小区覆盖。 There should be B42,B43 or B48 Cells nearby . 1.2.
CPE User Manual Enter the PIN Code in PIN Management (4)点击 Verify Click the Verify button. (5)点击 Disable Click the Disable button. 1.4.获取 CPE 的网络状态信息 Network information 在定位问题之前,需要获取 CPE 的状态信息以帮助调查问题。通过网页获取 CPE 的网 络状态信息,步骤如下: CPE status information would be helpful to investigate issue . You can get basic information from GUI, steps as follow: (1)PC 需要 fix IP:10.10.2.2; Fix 10.10.2.2 to PC. (2)PC 通过浏览器访问 HTTPS://10.10.2.254(用户名:admin; 密码 admin); Log-in to device by web browser , URL is https://10.10.2.
CPE User Manual (3)进入【Status】页面。如 fig 1-1 所示,在该图中可以看到 CPE 的网络状态信息: Click [Status] on the left menu. As shown in fig1-1, it contains CPE basic network information.
CPE User Manual Fig1-1 CPE network information 1.5.查看 CPE 版本号 CPE Version CPE 版本号如图 fig 1-2 的红色方框中所示: CPE version is shown in the red area in fig 1-2.
CPE User Manual Fig 1-2 CPE and Module version 1.6.LED LED STATUS POWER LED SIGNAL LED GREEN RED BLUE Power On ON OFF OFF OFF OFF Power Off OFF OFF OFF OFF OFF No USIM Card OFF ON OFF OFF OFF SIM PIN ON Blink 2 times in 6.4 seconds OFF OFF OFF No Available Cell ON Blink 3 times in 6.4 seconds OFF OFF OFF Attach Fail ON Blink 4 times in 6.4 seconds OFF OFF OFF Invalid APN Name ON Blink 5 times in 6.
CPE User Manual 2.修改 CPE 的配置 Configure CPE 本章节主要描述如何通过 UI 对 CPE 进行配置,包括基本配置和高级配置,其中基本配 置描述了通过 UI 能够对 CPE 的哪些内容进行配置,高级配置描述了具体功能的配置。 This chapter guides users to configure CPE, includes basic and advanced configuration, basic describes how to configure on GUI and the advanced describes how to configure specific function. 2.1.APN 名称配置 Configure APN Name (1)PC 需要 fix IP:10.10.2.2; Fix 10.10.2.2 to PC. (2)PC 通过浏览器访问 HTTPS://10.10.2.254(用户名:admin; 密码:admin); Log-in to device by web browser URL:https://10.10.2.
CPE User Manual 注意: 1. 本系统支持多 PDN 设定,不同的 PDN 工作在不同的网络分享模式,请勿修改当前 的 PDN 启用参数,以免设备无法正常提供服务。 Notice: CPE supports multiple PDN, each PDN works in different mode, double confirm current network mode and only enables related PDN to protect CPE not in service . 2. 各种 APN 的使用场景说明 a) APN(NAT) -- 接在其后的主机通过 DHCP 获取私有 IP,CPE 为所有接在其后的 主机通过 NAT 技术提供共享上网服务,支持多主机接入。 Notice: CPE works as NAT mode. b) APN(Bridge) -- 接在其后的主机通过 DHCP 获取“合法 IP”,CPE 作为 Bridge 将主机的以太网络和 LTE 网络对接,主机独享并完全拥有该“合法 IP”。 i.
CPE User Manual Click [LTE] on the left menu, the method is shown in fig2-2: Search List: 设置优选频点,如何设置,页面上有说明 Refer to examples on GUI. Fig 2-2 Configure Search List 2.3.将 log 存入 Flash Save PM log into Flash (1)PC 需要 fix IP:10.10.2.2,不要指定网关地址; Fix 10.10.2.2/24 to PC , no Gateway address be assigned . (2)PC 通过浏览器访问 HTTPS://10.10.2.254(用户名:admin; 密码:admin); Open your web browser and visit device. (3)进入【Settings】→【ADVANCE】页面,选中 PM log save to Flash.
CPE User Manual 2.4.开启/关闭 Host_cm Host_cm Enable/Disable (1)PC 需要 fix IP:10.10.2.2,不要指定网关地址; Fix 10.10.2.2/24 to PC , no Gateway address be assigned . (2)PC 通过浏览器访问 HTTPS://10.10.2.254(用户名:admin; 密码:admin); Open your web browser and visit device. (3)进入【Settings】→【ADVANCE】页面,选中 Host CM Enable. Click [Settings] on the left menu, get into the ADVAANCE page, click on Host CM Enable. 2.5.
CPE User Manual (1)PC 需要 fix IP:10.10.2.2/24,不要指定网关地址; Fix 10.10.2.2/24 to PC , no Gateway address be assigned . (2)PC 通过浏览器访问 HTTPS://10.10.2.254(用户名:admin; 密码:admin); Open your web browser and visit device . (3)请进入【Administration】页面,按照 fig 2-3 配置: Click [Administration] on the left menu, steps are shown in fig2-3 : Fig 2-3 Factory Default 2.6.配置工作频段 Configure working band (1) PC 需要 fix IP:10.10.2.2/24,不要指定网关地址; Fix 10.10.2.2/24 to PC , no Gateway address be assigned . (2) 通过 telnet 访问 CPE:telnet 10.10.
CPE User Manual Input “kern reboot” to reboot CPE. 完整示例如下: Following is a detailed example: 1. telnet 10.10.2.254, root/gct 2. #lted_cli 3. DM>nvm bcfgr 49 0 4. DM>nvm bcfgw 49 0 48 5. DM>nvm bcfgsv 1 6. DM>kern reboot 2.7 SAS 相关参数配置 SAS parameter configure (1)PC 需要 fix IP:10.10.2.2/24,不要指定网关地址; Fix 10.10.2.2/24 to PC , no Gateway address be assigned . (2)PC 通过浏览器访问 HTTPS://10.10.2.254(用户名:admin; 密码:admin); Open your web browser and visit device .
CPE User Manual Fig 2-4 SAS parameter configure 第 17 页
CPE User Manual 3.CPE 升级 CPE Upgrade 3.1.CPE 升级方法 CPE Upgrade Method (2)(1)PC 需要 fix IP: 10.10.2.2,不要指定网关地址; Fix 10.10.2.2/24 to PC , no Gateway address be assigned . (2)登录到 CPE 的页面: HTTPS://10.10.2.254 (用户名: admin 密码: admin); Open your web browser and visit device . (3)点击 Administration 按钮; Click the Administration. (4)点击 Upgrade 按钮; Click the Upgrade. (5)选择要升级的文件(例如: SERCOMM_CPE_101A.bin); Choose the file you want to upgrade (e.g: SERCOMM_CPE_101A.bin). (6)点击 Upload 按钮升级.
CPE User Manual Fix 10.10.2.2/24 to PC , no Gateway address be assigned . (2)登录到 CPE 的页面: HTTP://10.10.2.254:8080; Open your web browser and visit device . (3)点击 System 按钮; Click the System. (4)点击 Firmware Update 按钮; Click the Firmware Update. (5)选择要升级的文件(例如: tk.gz); Choose the file you want to upgrade (e.g: tk.gz). (6)选择 RAW Format; Choose RAW Format. (7)点击 Update 按钮升级. Click the Update button to upgrade.
CPE User Manual 4.获取 CPE 日志 Get CPE Logs 4.1.通过页面查看 CPE 日志 Check CPE Logs by GUI 页面查看 CPE 的日志方法: Steps to check logs as follow: (3)PC 需要 fix IP:10.10.2.2,不要指定网关地址; Fix 10.10.2.2/24 to PC , no Gateway address be assigned . (2)页面登陆到 CPE,地址:HTTPS://10.10.2.254(用户名:admin 密码:admin); Open your web browser and visit device . (3)点击页面左侧 LOG 按钮; Click [LOG] on the left menu, as shown in fig4-1. (4)在 LOG 页面中包含五个子页面,分别显示不同类型的 LOG: There are five sub pages, each shows different kind of CPE logs.
CPE User Manual Fig 4-1 CPE Logs 4.2.通过页面下载 CPE 全部日志 Download CPE logs by GUI (4)(1)PC 需要 fix IP: 10.10.2.2,不要指定网关地址; Fix 10.10.2.2/24 to PC , no Gateway address be assigned . (2)登录到 CPE 的页面: HTTPS://10.10.2.254 (用户名: admin 密码: admin); Open your web browser and visit device . (3)点击 LOG 按钮; Click the Administration. (4)点击 Download Log 按钮下载日志; Click the Download Log to download log. (5)运行批处理文件解压解密日志,生成日志。 Run win_unpackage.bat on Windows OS to generate unzip logs.
CPE User Manual Fix 4-2 Download CPE Logs 第 22 页
CPE User Manual 5.故障定位与处理 Troubleshooting and Handling 本章主要阐述如何对 CPE 进行故障处理,可以从两个方面对 CPE 进行故障问题定位, 分别是通过 LTE 连接状态定位问题和通过日志分析定位问题。 This chapter mainly described how to troubleshooting, we can get the suspicious point from LTE connection status and log analysis . 5.1.LTE 连接状态分析 Check LTE Connection Status 当 CPE 发生上线故障时,可以通过获取健康节点的值来分析 CPE 上线故障,1.
CPE User Manual 扫网失败,失败的原因主要有以下两类,其他的根据提供的错误码直接参考附录 A: The are two mainly cases which may cause the network searching failure , and please get the right reason by searching the error code in appendix A .: A.设置了主辅频点,但是设定频点的小区在环境中并不存在。 A. A frequency is set but any cell in such frequency be broadcast nearby in the environment. 这个问题需要检查是否配置主辅频点,若有设置,请确定设置的主辅频点环境中是 否存在。 In this case , please double confirm you've set with a right frequency . B.
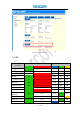
CPE User Manual 的信息。 Bad radio quality can cause the high drop rate , low data rate etc. We can get the radio quality of the environment by analysis PM log. You can refer to chapter 4.2 to get PM log, and as shown in fig 5-1 is a full cycle of PM logs. The following three chapter simply describe how to get KPI information through a full PM cycle. Fig 5-1 a full cycle of PM logs 5.2.
CPE User Manual - 确保设备的天线对准了宏基站 - make sure the antenna is aligned with the Cell - 确认设备到宏基站之间尽量是无阻挡,特别是没有金属遮挡,必要的时候需要调 整设备位置,确保设备满足的 RSRP 满足要求。 - confirm there is no barrier between the device and Cell, especially no metal barrier. To ensure the device meet the RSRP requirements , adjusting the location is necessary sometimes .
CPE User Manual P2: CW0 信道上总的码块数 P2: the total number of blocks on the CW0 channel P3: CW1 信道上的坏块数 P3: the number of bad blocks on the CW1 channel P4: CW1 信道上总的码块数 P4: the total number of blocks on the CW1 channel P5: 上行信道上的坏块数 P5: the number of bad blocks on the upload channel P6: 上行信道上总的码块数 P6: the total number of blocks on the upload channel 上行误码率和下行误码率的计算方法如下: The calculation of DL BLER and UL BLER as follows: 下行误码率: (P1 + P3)/(P2 + P4) * 100% DL BLER: (P1 + P3)/(P2 + P4) * 100% 上行误码率:P5 / P6 * 100% UL
CPE User Manual 验经一步的定位当下环境中可能存在的问题。 该设备提供三类趋势分析,分别是无线环境(environment),流量(throughput)以及 误码率(BLER) 在使用近端指标趋势分析的时候,需要先配置更新周期以及采样周期。一般更新周期设 定为 6 即可,采样周期设备为 1 或者 3。 Web page in CPE supports LTE signal related parameters for connection quality analysis.
CPE User Manual 5.3.LTE 信令分析 LTE signaling 5.3.
CPE User Manual analyze the signaling in the context of the issue point to find out the cause of the exception, if the info log is not sufficient to find out the cause of the exception occurs, will need to set log to debug level. RRC 信令主要有以下过程: The RRC signaling mainly has the following procedures: (1)Attach 流程 The Attach process EMM_ATTACH_REQUEST EMM_ATTACH_ACCEPT EMM_ATTACH_COMPLETE EMM_ATTACH_REJECT (2)业务请求流程 Business request process EMM_SERVICE_REQUEST EMM_SERVICE_REJECT 5.3.
CPE User Manual RRC 信令主要有以下过程: The RRC signaling mainly has the following procedures: (1)RRC 建立流程 RRC Establishment Process rrcConnectionRequest rrcConnectionSetup rrcConnectionSetupComplete (2)RRC 重配流程 RRC Reconfiguration Process rrcConnectionReconfiguration rrcConnectionReconfigurationComplete (3)RRC 重建流程 RRC Reestablishment Process rrcConnectionReestablishmentRequest rrcConnectionReestablishment rrcConnectionReestablishmentComplete rrcConnectionReestablishmentReject 第 31 页
CPE User Manual 高级维护 Advanced Management 6.测试 Test 6.1.iperf 下行测试 iperf download test (1)PC 通过 dhcp 的方式获取 IP (假设拿到了 10.10.2.10 的 IP); The PC gets the IP via DHCP (assuming the IP is 10.10.2.10). (2)telnet/console 的方式登录 10.10.2.254; Telnet to 10.10.2.254. (3)执行 iptables -t nat -I PREROUTING -i lte0pdn0 ! -p icmp -j DNAT --to 10.10.2.10; Perform iptables -t nat -I PREROUTING -i lte0pdn0 ! -p icmp -j DNAT --to 10.10.2.10. (4)执行 iptables -A FORWARD -d 10.10.2.10 -j ACCEPT; Perform iptables -A FORWARD -d 10.
CPE User Manual 获取参数值有两种,分别是 femto 板子内通过 femto_cli 获得,和网管获取。 TestMethod femto_cli get Device.X_SCM_CPE.Status.Hardware.IMEI Test Result 成功获取 IMEI TestMethod 1.在网管上找到设备 ID,右击选择 configuration 2.在 Device Method 一栏,进入 GetParameterValues 页面,在页面的右侧输入所要 获取的参数节点名 Device.X_SCM_CPE.Status.Hardware.
CPE User Manual 1.1.2 SSL File Agent (一)Download/Upload Config ① Upload Config to Femto TestMethod 1.在网管上找到设备 ID,右击选择 configuration 2.在 Device Method 一栏,进入 Upload CFG File 页面,在页面的右侧点击 Upload, 等待一段时间后 refresh 页面 Test Result 可以在当前页面看到获取的 configuration file,文件名为 device id ② Download Config to CPE TestMethod 1.找到设备 ID,右击选择 configuration 2.
CPE User Manual 127.0.0.1 -p 8888 & ※ 如果 cmld 及 act_mod 没有被修改过且进程存在,则不需要再重新起该进程。 在起 ssl_agent 时,client 与 server 可使用同一个证书,即-c -l 参数可带可不带。 下面附上各个参数的含义,如下: ssl 成功建立后,进行接下来的测试,如果 ssl 连接成功,日志如下: 16:40:57 I SSLAGNT> Conection from 127.0.0.
CPE User Manual -c /etc/.ssl_certs/client.cert -l /etc/.ssl_certs/client.key -f /tmp/ftp/cpe_cfg.zip -e 2 Test Result 在/tmp/ftp 路径下存在配置文件 cpe_cfg.zip (三)Upload Config to Femto TestMethod ./ssl_test -d 127.0.0.1 -a /etc/.ssl_certs/ca.cert -c /etc/.ssl_certs/client.cert -l /etc/.ssl_certs/client.key -f /tmp/ftp/cpe_cfg.zip -e 1 Test Result 在/tmp/ftp 路径下存在配置文件 cpe_cfg.zip (四)Upload log TestMethod LD_LIBRARY_PATH=. ./ssl_test -d 127.0.0.1 -a /etc/.ssl_certs/ca.cert -c /etc/.ssl_certs/client.cert -l /etc/.
CPE User Manual 对 SAS 相关参数的配置有两种方法:通过 GUI 进行配置或者登入到板子里面,通过命令的方式进行设 置。 通过 GUI 进行配置的方法,可参考 2.7 节“SAS 相关参数配置”。 登入到板子里面,在命令行中可使用 cmld_client 命令进行设置或查看。 2.4.1. 查看 sasd 相关参数的值 查看当前所有 sasd 参数的值,可使用以下命令: cmld_client show | grep 'sas' -i 2.4.2. SAS 调试阶段/SAS IoT a) 设置 sasd 的 Register 状态和 State 状态 cmld_client set Device.X_SCM_CPE.SAS.Registered=0 cmld_client set Device.X_SCM_CPE.SAS.State="Unknown" b) 改变 eirpCapability 的值 通过如下命令增加或减小 MaxTxPower 的值: cmld_client set Device.X_SCM_CPE.ModuleConfigMgmt.
CPE User Manual 第 38 页
CPE User Manual 附录 Appendix 附录 A:PLMN Search 结果定义 Appendix A: PLMN Search Result Result Cause Display String 0 LAPI_PLMN_SELECT_RESULT_SUCCESS LAPI_PLMN_SELECT_RESULT_FAILURE LAPI_PLMN_SELECT_RESULT_ABORTED LAPI_PLMN_SELECT_RESULT_INVALID_USIM LAPI_PLMN_SELECT_RESULT_ALREADY_IN_PROGRESS LAPI_MISMATCH_FREQ_BAND LAPI_FREQ_LIST_NOT_EXIST LAPI_PLMN_BAND_INVALID_PARAMETER Success NoNetwork InternalError InvalidUSIM InProgress FreqBandMisatch FreqListNotFind FreqError 1 2 3 4 5 6 7 第 39 页
CPE User Manual 附录 B:ATTACH Response 结果定义 Appendix B: ATTACH Response Result regResult regResultOrg 0 : LAPI_REG_RESULT_SUCCESS 0 :LAPI_REG_RESULT_SUCCESS Success 3: Illegal UE 1:ATT_FAIL_SERVICE_NOT_ALLOWED_U NTIL_POWER_CYCLE_OR_UICC_REPLACE 6: Illegal ME ServiceLimit-NeedCycl 7: EPS services not allowed e(3GPP EMM Cause:) 8: EPS services and non-EPS services not allowed 2:ATT_FAIL_SERVICE_NOT_ALLOWED_C URRENT_PLMN 11: PLMN not allowed ServiceLimit(3GPP 14: EPS services not allowed in EMM Ca
CPE User Manual 附录 C:CMEError Appendix C: CMEError Refer to 3GPP 24.007:section9.
CPE User Manual 49 EAP method not supported 50 Incorrect parameters 51 command implemented but currently disabled 52 command aborted by user 53 not attached to network due to MT functionality restrictions 54 modem not allowed - MT restricted to emergency calls only 55 operation not allowed because of MT functionality restrictions 56 fixed dial number only allowed - called number is not a fixed dial number (refer 3GPP TS 22.
CPE User Manual 附录 D:ESM Cause Appendix D: ESM Cause 第 43 页
CPE User Manual 附录 E:EMM Cause Result Cause 8 ESM_OPERATOR_DETERMINED_BARRING ESM_INSUFFICIENT_RESOURCES ESM_UNKNOWN_OR_MISSING_APN ESM_UNKNOWN_PDN_TYPE ESM_USER_AUTHENTICATION_FAILED ESM_REQUEST_REJECTED_BY_SGWORPGW ESM_REQUEST_REJECTED_UNSPECIFIED ESM_SERVICE_OPTION_NOT_SUPPORTED ESM_REQUESTED_SERVICE_OPTION_NOT_SUBSCRIBED ESM_SERVICE_OPTION_TEMPORARILY_OUT_OF_ORDER ESM_PTI_ALREADY_IN_USE ESM_REGULAR_DEACTIVATION ESM_EPS_QOS_NOT_ACCEPTED ESM_NETWORK_FAILURE ESM_REACTIVATION_REQ ESM_FEATURE_NOT_SUPPORT
CPE User Manual Appendix E: EMM Cause Original REGISTRATION RESULT 0 : LAPI_REG_RESULT_SUCCESS /* 3GPP EMM Cause \*/ 2 : LAPI_REG_RESULT_REJECT_2_IMSI_UNKNOWN_IN_HSS 3 : LAPI_REG_RESULT_REJECT_3_ILLEGAL_UE 5: LAPI_REG_RESULT_REJECT_5_IMEI_NOT_ACCEPTED 6 : LAPI_REG_RESULT_REJECT_6_ILLEGAL_ME 7 :LAPI_REG_RESULT_REJECT_7_EPS_SERVICES_NOT_ALLOWED 8 :LAPI_REG_RESULT_REJECT_8_EPS_AND_NON_EPS_SERVICES_NOT_ALLOWED 9 : LAPI_REG_RESULT_REJECT_9_UE_ID_CANNOT_BE_DERIVED 10 : LAPI_REG_RESULT_REJECT_10_IMPLICITLY_DETAC
CPE User Manual /* defined registration cause */ 128 : LAPI_REG_RESULT_FAILURE_NO_USIM 129 : LAPI_REG_RESULT_FAILURE_INVALID_USIM 130 :LAPI_REG_RESULT_FAILURE_NETWORK_INIT_DETACH_TRIGGERED 131 :LAPI_REG_RESULT_FAILURE_DEFALULT_BEARER_SETUP_FAILURE 132 : LAPI_REG_RESULT_FAILURE_MAX_ATTACH_ATTEPT 133 : LAPI_REG_RESULT_ATTACH_IS_ALREADY_IN_PROGRESS 134 :LAPI_REG_RESULT_FAILURE_PDNCONNECT_APN_VERIFICATION_FAIL 137 :LAPI_REG_RESULT_FAILURE_START_USIM_REFRESH_MODE_4_5_6 138 : LAPI_REG_RESULT_FAILURE_LOWER_LAYER_F
Federal Communication Commission Interference Statement This device complies with Part 15 of the FCC Rules. Operation is subject to the following two conditions: (1) This device may not cause harmful interference, and (2) this device must accept any interference received, including interference that may cause undesired operation. This equipment has been tested and found to comply with the limits for a Class B digital device, pursuant to Part 15 of the FCC Rules.