Wireless ADSL Router User Guide Dynamic DNS (Domain Name Server) This free service is very useful when combined with the Virtual Server feature. It allows Internet users to connect to your Virtual Servers using a URL, rather than an IP Address. This also solves the problem of having a dynamic IP address. With a dynamic IP address, your IP address may change whenever you connect, which makes it difficult to connect to you. The DynDNS Service works as follows: 1.
Advanced Features have more than one name, enter the name you wish to use. DDNS Status • This message is returned by the DDNS Server • Normally, this message should be "Update successful" • If the message is "No host", this indicates the host name entered was not allocated to you. You need to connect to DDNS Service provider and correct this problem. Firewall Rules The Firewall Rules screen allows you to define "Firewall Rules" which can allow or prevent certain traffic.
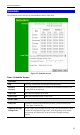
Wireless ADSL Router User Guide Enable Indicates whether or not the rule is currently enabled. For rules you have added, this column will contain a checkbox, allowing you to easily enable or disable the rule. (Click "Save" after making any changes.) Service Name The Service covered by this rule. Action The action performed on connections which are covered by this rule. LAN Server The PC or Server on your LAN to which traffic covered by this rule will be sent.
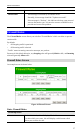
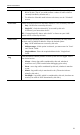
Advanced Features Incoming Rules (Inbound Services) This screen is displayed when the "Add" or "Edit" button for Incoming Rules is clicked. Figure 50: Inbound Services Screen Data - Incoming Rules Screen Inbound Services Service Select the desired Service. This determines which packets are covered by this rule. If necessary, you can define a new Service on the "Services" screen, by defining the protocols and port numbers used by the Service.
Wireless ADSL Router User Guide fields. Log This determines whether packets covered by this rule are logged. Select the desired action. • Always - always log traffic considered by this rule, whether it matches or not. (This is useful when debugging your rules.) • Never - never log traffic considered by this rule, whether it matches or not. • Match - Log traffic only it matches this rule. (The action is determined by this rule.
Advanced Features LAN Users • ALLOW rules are only useful if the traffic is already covered by a BLOCK rule. (That is, you wish to allow a subset of traffic which is currently blocked by another rule.) • To define the Schedule used in these selections, use the "Schedule" screen. Select the desired option to determine which PCs are covered by this rule: • Any - All PCs are covered by this rule. • Single PC - Only the selected PC is covered by this rule. If selected, you must select the PC.
Wireless ADSL Router User Guide User-defined Services Services are used when creating Firewall Rules. If you wish to create a firewall rule, but the required service is not listed in the "Service" list, you can use this feature to define the required service or services. Once created, these services will be listed in the "Service" list, and can be used when creating Firewall Rules.
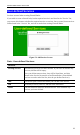
Advanced Features Add/Edit Service This screen is displayed when the Add or Edit button on the Services screen is clicked. Figure 53 : Add/Edit Service Data - Add/Edit Service Services Name If editing, this shows the current name of the Service. If adding a new service, this will be blank, and you should enter a suitable name. Type Select the protocol used by the Service. Start Port Enter the beginning of the port range used by the Service.
Wireless ADSL Router User Guide Options This screen allows advanced users to enter or change a number of settings. For normal operation, there is no need to use this screen or change any settings. An example Options screen is shown below. Figure 54: Options Screen Data - Options Screen Internet Respond to Ping MTU Size • If checked, the Wireless Router will repond to Ping (ICMP) packets received from the Internet. • If not checked, Ping (ICMP) packets from the Internet will be ignored.
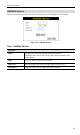
Advanced Features Schedule This Schedule can be used for the Firewall Rules and the URL filter. Figure 55: Schedule Screen Data - Schedule Screen Schedule Day Each day of the week can scheduled independently. Ses sion 1 Session 2 Two (2) separate sessions or periods can be defined. Session 2 can be left blank if not required. Start Time Enter the start using a 24 hr clock. Finish Time Enter the finish time using a 24 hr clock.
Wireless ADSL Router User Guide Use this NTP Server If you prefer to use a particular NTP server as the primary server, check the checkbox "Use this NTP Server" and enter the Server's IP address in the fields provided.. If this setting is not enabled, the default NTP Servers are used. Current Time This displays the current time on the Wireless ADSL Router.
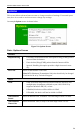
Advanced Features Virtual Servers This feature, sometimes called Port Forwarding, allows you to make Servers on your LAN accessible to Internet users. Normally, Internet users would not be able to access a server on your LAN because: • Your Server does not have a valid external IP Address. • Attempts to connect to devices on your LAN are blocked by the firewall in this device. The "Virtual Server" feature solves these problems and allows Internet users to connect to your servers, as illustrated below.
Wireless ADSL Router User Guide Figure 57: Virtual Servers Screen Data - Virtual Servers Screen Servers Servers This lists a number of common Server types. If the desired Server type is not listed, you can create a Firewall Rule to achieve the same effect as the Virtual Server function. Properties Enable Use this to Enable or Disable support for this Server, as required. If Enabled, you must select the PC to which this traffic will be sent. PC (Server) Select the PC for this Server.
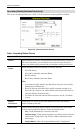
Advanced Features VPN Setup The VPN (Virtual Private Network) feature in the Wireless ADSL Router allows you to create a VPN connection between 2 Wireless ADSL Routers, or a remote PC to establish a VPN connection to the Wireless ADSL Router. To establish a VPN connection from a remote PC to the Wireless ADSL Router, you need suitable (IPSec) VPN client software on your PC. For more information about VPNs, please refer to Appendix C - About VPNs.
Wireless ADSL Router User Guide VPN Policies Screen This screen is displayed when you select VPN on the Advanced menu. It allows you to create, modify and manage your VPN Policies. If you have not created any policies, the Policy Table will be empty. Figure 58: VPN Policies Screen Data - VPN Policies Screen Policy Table The Policy Table contains the following data • Enable - Use this checkbox to Enable or Disable a Policy as required. Click "Save" after making any changes.
Advanced Features Add Manual Policy Change to the input screen for an "Manual" policy. See the following section for details. When the new policy is saved, it will appear in the bottom row of the Policy Table. VPN Status View details of each current VPN Tunnel (connection) in a subwindow. You also have the option of viewing the VPN Log. VPN Auto Policy Screen This screen is displayed when you click the Add Auto Policy button on the VPN Policies screen, or when you edit an existing Auto Policy.
Wireless ADSL Router User Guide Data - VPN-Auto Policy Screen General Policy Name Enter a unique name to identify this policy. This name is not supplied to the remote VPN endpoint. It is used only to help you manage the policies. Remote VPN Endpoint If the remote endpoint has a dynamic IP address, select "Dynamic IP address". No "Address Data" input is required. Otherwise, select the desired option (IP address or Domain Name) and enter the address of the remote VPN endpoint you wish to connect to.
Advanced Features IKE Direction This setting is used when determining if the IKE policy matches the current traffic. Select the desired option. • Responder only - Incoming connections are allowed, but outgoing connections will be blocked. • Initiator and Responder - Both incoming and outgoing connections are allowed. Exchange Mode IPSec has 2 possibilities - "Main Mode" and "Aggressive Mode". Currently, only "Main Mode" is supported. Ensure the remote VPN endpoint is set to use "Main Mode".
Wireless ADSL Router User Guide IPSec PFS (Perfect Forward Secrecy) If enabled, security is enhanced by ensuring that the key is changed at regular intervals. Also, even if one key is broken, subsequent keys are no easier to break. (Each key has no relationship to the previous key.) This setting applies to both IKE and IPSec SAs. When configuring the remote endpoint to match this setting, you may have to specify the "Key Group" used.
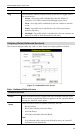
Advanced Features VPN- Manual Policy Screen This screen is displayed when you click the Add Manual Policy button on the VPN Policies screen, or when you edit an existing Manual Policy. It allows you to define or edit a "Manual" VPN policy. An "Manual" VPN policy requires that you enter all data on both VPN endpoints. There is no negotiation between the 2 VPN endpoints. Figure 60: VPN-Manual Policy Screen Data - VPN-Manual Policy Screen General Policy Name Enter a unique name to identify this policy.
Wireless ADSL Router User Guide Local LAN Local LAN This identifies which PCs on your LAN are covered by this policy. For each selection, data must be provided as follows: • Single address Enter an IP address in the "IP address" field. Typically, this setting is used when you wish to make a single Server on your LAN available to remote users. • Subnet address Enter an IP address in the "IP address" field, and the desired network mask in the "Subnet Mask" field.
Advanced Features VPN Status Screen This screen is displayed when you click the VPN Log button on the VPN Policies screen, or on the Status screen. This screen allows you to view details of each current VPN Tunnel (connection). If there are no current connections, the status table will be empty. Figure 61: VPN-Status Screen Data - VPN Status Screen Tunnel Table This table contains the following data about each current connection. • Policy Name - The name of the policy.
Chapter 7 Advanced Administration 7 This Chapter explains the settings available via the "Administration" section of the menu. Overview Normally, it is not necessary to use these screens, or change any settings. These screens and settings are provided to deal with non-standard situations, or to provide additional options for advanced users. The available settings and features are: PC Database This is the list of PCs shown when you select the "DMZ PC" or a "Virtual Server".
Advanced Features PC Database The PC Database is used whenever you need to select a PC (e.g. for the "DMZ" PC). • It eliminates the need to enter IP addresses. • Also, you do not need to use fixed IP addresses on your LAN. However, if you do use a fixed IP address on some devices on your LAN, you should enter details of each such device into the PC database, using the PC Database screen. PC Database Screen An example PC Database screen is shown below.
Wireless ADSL Router User Guide Data - PC Database Screen Known PCs This lists all current entries. Data displayed is name (IP Address) type. The "type" indicates whether the PC is connected to the LAN. Name If adding a new PC to the list, enter its name here. It is best if this matches the PC's "hostname". IP Address Enter the IP Address of the PC. The PC will be sent a "ping" to determine its hardware address.
Advanced Features PC Database - Advanced This screen is displayed if the "Advanced Administration" button on the PC Database is clicked. It provides more control than the standard PC Database screen. Figure 63: PC Database (Admin) Data - Advanced PC Database Known PCs This lists all current entries. Data displayed is name (IP Address) type. The "type" indicates whether the PC is connected to the LAN. PC Properties Name If adding a new PC to the list, enter its name here.
Wireless ADSL Router User Guide MAC Address Select the appropriate option • Automatic discovery - Select this to have the Wireless ADSL Router contact the PC and find its MAC address. This is only possible if the PC is connected to the LAN and powered On. • MAC address is - Enter the MAC address on the PC. The MAC address is also called the "Hardware Address", "Physical Address", or "Network Adapter Address". The Wireless ADSL Router uses this to provide a unique identifier for each PC.
Advanced Features Config File This feature allows you to download the current settings from the Wireless ADSL Router, and save them to a file on your PC. You can restore a previously-downloaded configuration file to the Wireless ADSL Router, by uploading it to the Wireless ADSL Router. This screen also allows you to set the Wireless ADSL Router back to its factory default configuration. Any existing settings will be deleted. An example Config File screen is shown below.
Wireless ADSL Router User Guide Logging The Logs record various types of activity on the Wireless ADSL Router. This data is useful for troubleshooting, but enabling all logs will generate a large amount of data and adversely affect performance. Since only a limited amount of log data can be stored in the Wireless ADSL Router, log data can also be E-mailed to your PC. Use the E-mail screen to configure this feature.
Advanced Features Logs Include (Checkboxes) Use these checkboxes to determine which events are included in the log. Checking all options will increase the size of the log, so it is good practice to disable any events which are not really required. • Attempted access to blocked sites - If checked, attempted Internet accesses which were blocked are logged.
Wireless ADSL Router User Guide E-mail This screen allows you to E-mail Logs and Alerts. A sample screen is shown below. Figure 66: E-mail Screen Data - E-mail Screen E-Mail Notification Turn E-mail Notification on Check this box to enable this feature. If enabled, the E-mail address information (below) must be provided. Send to this E-mail address Enter the E-mail address the Log is to be sent to. The E-mail will also show this address as the Sender's address.
Advanced Features E-mail Alerts Send E-mail alerts immediately You can choose to have alerts E-mailed to you, by checking the desired checkboxes. The Broadband ADSL Router can send an immediate alert when it detects a significant security incident such as • A known hacker attack is directed at your IP address • A computer on the Internet scans your IP address for open ports • Someone on your LAN (Local Area Network) tries to visit a blocked site.
Wireless ADSL Router User Guide Diagnostics This screen allows you to perform a "Ping" or a "DNS lookup". These activities can be useful in solving network problems. An example Network Diagnostics screen is shown below. Figure 67: Network Diagnostics Screen Data - Network Diagnostics Screen Ping Ping this IP Address Enter the IP address you wish to ping. The IP address can be on your LAN, or on the Internet.
Advanced Features Remote Administration If enabled, this feature allows you to manage the Wireless ADSL Router via the Internet. Figure 68: Remote Administration Screen Data - Remote Administration Screen Remote Administration Enable Remote Management Check to allow administration/management via the Internet. (To connect, see below). If Disabled, this device will ignore Administration connection attemp ts from the Internet.
Wireless ADSL Router User Guide To connect from a remote PC via the Internet 1. Ensure your Internet connection is established, and start your Web Browser. 2. In the "Address" bar, enter "HTTP://" followed by the Internet IP Address of the Wireless ADSL Router. If the port number is not 80, the port number is also required. (After the IP Address, enter ":" followed by the port number.) e.g. HTTP://123.123.123.123:8080 This example assumes the WAN IP Address is 123.123.123.
Advanced Features Routing Overview • If you don't have other Routers or Gateways on your LAN, you can ignore the "Routing" page completely. • If the Wireless ADSL Router is only acting as a Gateway for the local LAN segment, ignore the "Routing" page even if your LAN has other Routers. • If your LAN has a standard Router (e.g. Cisco) on your LAN, and the Wireless ADSL Router is to act as a Gateway for all LAN segments, enable RIP (Routing Information Protocol) and ignore the Static Routing table.
Wireless ADSL Router User Guide Figure 69: Routing Screen Data - Routing Screen RIP RIP Direction Select the desired RIP Direction. RIP Version Choose the RIP Version for the Server. Static Routing Static Routing Table Entries This list shows all entries in the Routing Table. • This area shows details of the selected item in the list. • Change any the properties as required, then click the "Edit" button to save the changes to the selected entry.
Advanced Features Local Router The local router is the Router installed on the same LAN segment as the Wireless ADSL Router. This router requires that the Default Route is the Wireless ADSL Router itself. Typically, routers have a special entry for the Default Route. It should be configured as follows. Destination IP Address Normally 0.0.0.0, but check your router documentation. Network Mask Normally 0.0.0.0, but check your router documentation.
Wireless ADSL Router User Guide Gateway IP Address 192.168.0.100 (Wireless ADSL Router's local Router) Metric 2 Entry 2 (Segment 2) Destination IP Address 192.168.2.0 Network Mask 255.255.255.0 (Standard Class C) Gateway IP Address 192.168.0.100 Metric 3 For Router A's Default Route Destination IP Address 0.0.0.0 Network Mask 0.0.0.0 Gateway IP Address 192.168.0.1 (Wireless ADSL Router's IP Address) For Router B's Default Route Destination IP Address 0.0.0.0 Network Mask 0.0.0.
Advanced Features Upgrade Firmware The firmware (software) in the Wireless ADSL Router can be upgraded using your Web Browser. You must first download the upgrade file, then select Upgrade Firmware on the Administration menu. You will see a screen like the following. Figure 71: Router Upgrade Screen To perform the Firmware Upgrade: 1. Click the Browse button and navigate to the location of the upgrade file. 2. Select the upgrade file. Its name will appear in the Upgrade File field. 3.
Chapter 8 Modem Mode 8 This Chapter explains configuration and operation when in "Modem" or "Bridge" mode.. Overview There are two modes available on the Mode screen. • Router - Both the ADSL Modem and the Router features are operational. In this mode, this device can provide shared Internet Access to all your LAN users. Also, by default, it acts a DHCP Server, providing an IP address and related information to all Wireless and LAN users. • Modem - Only the ADSL Modem component is operational.
Advanced Administration Home Screen If in Modem mode, the home screen will look like the example below. Figure 72: Home Screen - Modem Mode Note that the menu has changed, many of the options in Router mode are not available. The screens available are: • Mode - change back to Router mode, if desired. • LAN - set IP address, mask and gateway. This is the same as in Router mode, except that the DHCP server is not available while in Modem mode.
Wireless ADSL Router User Guide Mode Screen This screen is change back to Router mode, if desired. Figure 73: Mode Screen Data - Mode Screen Device Name This field displays the current name of this device. Device Mode Select the desired device mode for the router: • Router - Both the ADSL Modem and the Router features are operational. In this mode, this device can provide shared Internet Access to all your LAN users.
Advanced Administration Status Screen In Modem mode, the Status screen looks like the example below. Figure 74: Status Screen - Bridg e Mode Data - Status Screen (Bridge Mode) System Device Name The current name of the Router. This name is also the "hostname" for users with an "@Home" type connection. Firmware Version The version of the current firmware installed. ADSL Modem Status This indicates the status of the ADSL modem comp onent.
Wireless ADSL Router User Guide VC 1 Status VC 2 Status VC 3 Status VC 4 Status For each VC (Virtual Circuit), the current status is displayed. This will be either "Enabled" or "Disabled". ADSL Details Click this button to open a sub-window and view the details of each VC (Virtual Circuit). LAN IP Address The IP Address of the Wireless ADSL Router. Network Mask The Network Mask (Subnet Mask) for the IP Address above.
Appendix A Troubleshooting A This Appendix covers the most likely problems and their solutions. Overview This chapter covers some common problems that may be encountered while using the Wireless ADSL Router and some possible solutions to them. If you follow the suggested steps and the Wireless ADSL Router still does not function properly, contact your dealer for further advice. General Problems Problem 1: Can't connect to the Wireless ADSL Router to configure it.
Wireless ADSL Router User Guide Solution 2: The Wireless ADSL Router processes the data passing through it, so it is not transparent. For incoming connections, you must use the Virtual Server or Firewall Rules to specify the PC which will receive the incoming traffic. You can also use the DMZ function. This should work with almost every application, but: • It is a security risk, since the firewall is disabled. • Only one (1) PC can use this feature.
Appendix B About Wireless LANs B This Appendix provides some background information about using Wireless LANs (WLANs). Modes Wireless LANs can work in either of two (2) modes: • Ad-hoc • Infrastructure Ad-hoc Mode Ad-hoc mode does not require an Access Point or a wired (Ethernet) LAN. Wireless Stations (e.g. notebook PCs with wireless cards) communicate directly with each other. Infrastructure Mode In Infrastructure Mode, one or more Access Points are used to connect Wireless Stations (e.g.
Wireless ADSL Router User Guide Channels The Wireless Channel sets the radio frequency used for communication. • Access Points use a fixed Channel. You can select the Channel used. This allows you to choose a Channel which provides the least interference and best performance. In the USA and Canada, 11 channel are available. If using multiple Access Points, it is better if adjacent Access Points use different Channels to reduce interference.
Appendix B - About Wireless LANs Wireless LAN Configuration To allow Wireless Stations to use the Access Point, the Wireless Stations and the Access Point must use the same settings, as follows: Mode On client Wireless Stations, the mode must be set to "Infrastructure". (The Access Point is always in "Infrastructure" mode.) SSID (ESSID) Wireless Stations should use the same SSID (ESSID) as the Access Point they wish to connect to.
Appendix C About VPNs C Overview A VPN (Virtual Private Network) provides a secure connection between 2 points, over an insecure network - typically the Internet. This secure connection is called a VPN Tunnel. There are many standards and protocols for VPNs. The standard implemented in the Wireless ADSL Router is IPSec. IPSec IPSec is a near-ubiquitous VPN security standard, designed for use with TCP/IP networks.
Appendix C - VPNs Because the IKE and IPsec connections are separate, they have different SAs (security associations). Policies VPN configuration settings are stored in Policies. Note that different vendors use different terms. Generally, the terms "VPN Policy", "IPSec Policy", and "IPSec Proposal" have the same meaning. However, some vendors separate IKE Policies (Phase 1 parameters) from IPSec Policies (Phase 2 parameters).
Wireless ADSL Router User Guide Common VPN Situations VPN Pass-through Figure 75: VPN Pass-through Here, a PC on the LAN behind the Router/Gateway is using VPN software, but the Router/Gateway is NOT acting as a VPN endpoint. It is only allowing the VPN connection. • The PC software can use any VPN protocol supported by the remote VPN. • The remote VPN Server must support client PCs which are behind a NAT router, and so have an IP address which is not valid on the Internet.
Appendix C - VPNs Connecting 2 LANs via VPN Figure 77: Connecting 2 VPN Gateways This allows two (2) LANs to be connected. PCs on each endpoint gain secure access to the remote LAN. • The 2 LANs MUST use different IP address ranges. • The VPN Policies at each end determine when a VPN tunnel will be established, and what systems on the remote LAN can be accessed once the VPN connection is established. • It is possible to have simultaneous VPN connections to many remote sites.
Wireless ADSL Router User Guide Configuration Settings - Gateway A Gateway A should be configured as shown below.
Appendix C - VPNs Configuration Settings - Gateway B Gateway B should be configured as shown below. Figure 80: Gateway B Configuration Settings Setting LAN A Gateway LAN B Gateway Notes Policy Name Example Example Name does not affect operation. Select a meaningful name. Remote VPN Endpoint Fixed IP Address 205.17.11.43 Fixed IP Address 202.11.13.211 Other endpoint's WAN (Internet) IP address.
Wireless ADSL Router User Guide NetBIOS Enable Enable Disable if not required. Local LAN IP address Mask 192.168.0.0 255.255.255.0 192.168.1.0 255.255.255.0 Local Address subnet. Use a more restrictive definition if possible. Remote LAN IP address Mask 192.168.1.0 255.255.255.0 192.168.0.0 255.255.255.0 Remote Address subnet. Use a more restrictive definition if possible. Direction Initiator & responder Initiator & responder Does not have to match. Either endpoint can block 1 direction.
Appendix D Specifications D Multi-Function Wireless ADSL Router Model Wireless ADSL Router ADSL Interface T1.413, G.DMT, G.lite, multi-mode Dimensions 189mm(W) * 122mm(D) * 33mm(H) Operating Temperature 0° C to 40° C Storage Temperature -10° C to 70° C Network Protocol: TCP/IP Network Interface: 4 * 10/100BaseT (RJ45) LAN connection 1 * RJ11 for ADSL line LEDs 12 Power Adapter 12 V DC External Wireless Interface Standards IEEE802.11b, IEEE802.11g WLAN, Frequency 2.4 to 2.
Wireless ADSL Router User Guide Regulatory Approvals FCC Statement This equipment has been tested and found to comply with the limits for a Class B digital device, pursuant to Part 15 of the FCC Rules. These limits are designed to provide reasonable protection against harmful interference in a residential installation.