
User's Manual Part 2


Wireless ADSL Router User Guide
70
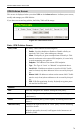
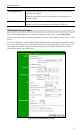
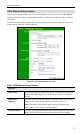
VPN Policies Screen
This screen is displayed when you select VPN on the Advanced menu. It allows you to create,
modify and manage your VPN Policies.
If you have not created any policies, the Policy Table will be empty.
Figure 58: VPN Policies Screen
Data - VPN Policies Screen
Policy Table The Policy Table contains the following data
• Enable - Use this checkbox to Enable or Disable a Policy as
required. Click "Save" after making any changes.
• Name - Each policy is given a unique name to identify it. This
name is not known to the remote VPN endpoint; it is used only
to assist managing your policies.
• Endpoint - The address of the remote VPN endpoint.
• Type - The Type is "Auto" or "Manual" as explained above.
• Local LAN - IP address or subnet on your local LAN. Traffic
must be from (or to) these addresses to be covered by this pol-
icy.
• Remote LAN - IP address or subnet on the remote LAN. Traffic
must be to (or from) these addresses to be covered by this pol-
icy.
• ESP - ESP (Encapsulating Security Payload) encryption proto-
col used for the VPN data.
Buttons
Save Save any changes to the "Enable" setting for each policy.
Edit Edit (modify) the selected policy. (Select a policy by clicking on the
radio button.)
Delete Delete the selected policy. (Select a policy by clicking on the radio
button.)
Add Auto Policy Change to the input screen for an "Auto" policy. See the following
section for details.
When the new policy is saved, it will appear in the bottom row of
the Policy Table.