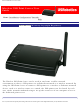
Wireless USB Print Server User Guide Wireless USB Print Server User Guide Home Installation Configuration Tutorials Help Introduction Warranty Copyright Regulatory The Wireless USB Print Server can be used in any home or office network environment to share a USB printer via an Ethernet network or a wireless network.
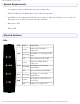
Wireless USB Print Server User Guide System Requirements ● A computer with an Ethernet internet connection ● The Installation CD-ROM that came with your printer ● An HTML 4.01-compliant Web Browser (such as Internet Explorer 5.5 or later or Netscape 8.0 or later) with JavaScript enabled ● Ethernet cable ● USB cable Physical Features LEDs LED LAN WAN ACT ERR State Function Solid Ethernet LAN link is achieved. Flashing Sending or receiving LAN data. Off Not connected to LAN.
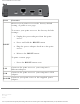
Wireless USB Print Server User Guide Back Item Function Restores your print server to the factory default setting, or prints a test page. To restore your print server to the factory default settings: 1. Unplug the power adapter from the print server. RESET 2. Press and hold the RESET button 3. Plug the power adapter back in to the print server. 4. Release the RESET button. To print a status page: ● Press the RESET button once. LAN Connects the print server to your computer’s Ethernet adapter.
Wireless USB Print Server User Guide Wireless USB Print Server User Guide Home Installation Configuration Tutorials Help Introduction Warranty Copyright Regulatory U.S. Robotics Corporation Two (2) Year Limited Warranty 1.0 GENERAL TERMS: 1.1 This Limited Warranty is extended only to the original end-user purchaser (CUSTOMER) and is not transferable. 1.2 No agent, reseller, or business partner of U.S. Robotics Corporation (U.S.
Wireless USB Print Server User Guide 1.7 U.S. ROBOTICS warrants any replacement product or part for NINETY (90) DAYS from the date the product or part is shipped to Customer. 1.8 U.S. ROBOTICS makes no warranty or representation that this product will meet CUSTOMER requirements or work in combination with any hardware or software products provided by third parties. 1.9 U.S.
Wireless USB Print Server User Guide authorised U.S. ROBOTICS Service Centre, please see the U.S ROBOTICS corporate Web site at: www.usr.com 3.4 CUSTOMER should have the following information / items readily available when contacting U.S. ROBOTICS Technical Support: ● Product Model Number ● Product Serial Number ● Dated Proof of Purchase ● CUSTOMER contact name & telephone number ● CUSTOMER Computer Operating System version ● U.S. ROBOTICS Installation CD-ROM ● U.S.
Wireless USB Print Server User Guide 4.5 Authorised CUSTOMER returns will be unpacked, visually inspected, and matched to the Product Model Number and Product Serial Number for which the RMA was authorised. The enclosed Proof of Purchase will be inspected for date of purchase and place of purchase. U.S. ROBOTICS may deny warranty service if visual inspection of the returned product or part does not match the CUSTOMER supplied information for which the RMA was issued. 4.
Wireless USB Print Server User Guide damage cause by moisture, corrosive environments, high voltage surges, shipping, abnormal working conditions; or the use of the product outside the borders of the country or territory intended for use (As indicated by the Product Model Number and any local telecommunication approval stickers affixed to the product). 5.
Wireless USB Print Server User Guide This Limited Warranty shall be governed by the laws of the State of Illinois, U.S.A. excluding its conflicts of laws principles and excluding the United Nations Convention on Contracts for the International Sale of Goods. U.S. Robotics Corporation 935 National Parkway Schaumburg, IL, 60173 U.S.A © 2004-2006 U.S. Robotics Corporation. file:///G|/CSO/T-Writer Repository/Networking/5436A Wireless Gutenberg/User Guide/English/warranty.
Wireless USB Print Server User Guide Wireless USB Print Server User Guide Home Installation Configuration Tutorials Help Introduction Warranty Copyright Regulatory Copyright Information U.S. Robotics Corporation 935 National Parkway Schaumburg, Illinois 60173-5157 USA No part of this documentation may be reproduced in any form or by any means or used to make any derivative work (such as a translation, transformation, or adaptation) without written permission from U.S. Robotics Corporation. U.S.
Wireless USB Print Server User Guide in, or delivered to you in conjunction with, this Quick Installation Guide. Copyright © 2006 U.S. Robotics Corporation. All rights reserved. U.S. Robotics and the U.S. Robotics logo are registered trademarks of U.S. Robotics Corporation. Other product names are for identification purposes only and may be trademarks of their respective companies. Product specifications subject to change without notice. © 2004-2006 U.S. Robotics Corporation.
Wireless USB Print Server User Guide Wireless USB Print Server User Guide Home Installation Configuration Tutorials Help Introduction Warranty Copyright Regulatory Regulatory Information Manufacturer’s Declaration of Conformity U.S. Robotics Corporation 935 National Parkway Schaumburg, IL 60173 U.S.A.
Wireless USB Print Server User Guide This equipment complies with FCC radiation exposure limits set forth for an uncontrolled environment. This equipment should be installed and operated with minimum distance 20 cm between the radiator and your body. Radio and Television Interference: This equipment has been tested and found to comply with the limits for a Class B digital device, pursuant to Part 15 of the FCC Rules.
Wireless USB Print Server User Guide Industry Canada (IC) This equipment complies with the Industry Canada Spectrum Management and Telecommunications policy, RSS-210, standard Low Power License-Exempt Radio Communication Devices. Operation is subject to the following two conditions: 1. This device may cause interference. 2. This device must accept any interference, including interference that may cause undesired operation of the device.
Wireless USB Print Server User Guide EN300 328 EN301 489-1 EN301 489-17 EN60950 EN61000-3-2 EN61000-3-3 EN50392 We, U.S. Robotics Corporation, hereby declare the above named product is in compliance and conformity with the essential requirements and other relevant provisions of Directive 1999/5/EC. The conformity assessment procedure referred to in Article 10 and detailed in Annex IV of Directive 1999/5/EC has been followed.
Wireless USB Print Server User Guide In Guyana and Reunion Islands, outdoor use is forbidden within 2400MHz – 2420MHz frequency band Regulatory Channel Frequency Channel Frequency (MHz) 1 2412 X X X 2 2417 X X X 3 2422 X X X 4 2427 X X X 5 2432 X X X 6 2437 X X X 7 2442 X X X 8 2447 X X X 9 2452 X X X 10 2457 X X X 11 2462 X X X 12 2467 X 13 2472 X Operating Channels : FCC Canada ETSI ● IEEE 802.
Wireless USB Print Server User Guide electromagnetic radiation. This equipment should be installed and operated with minimum distance 20 cm between the radiator and your body. This wireless device is a transmitter/receiver and has been designed and manufactured to comply with the exposure limits recommended by the Council of the European Union and the International Commission on Non-Ionizing Radiation Protection (ICNIRP, 1999) for the entire population.
Wireless USB Print Server User Guide Wireless USB Print Server User Guide Home Installation Configuration Tutorials Help Wireless USB Print Server Installation Client Installation Macintosh Installation Unix Installation Netware Installation Windows Server Installation Step One: Connect the Wireless USB Print Server Note: The Wireless USB Print Server must be connected using an Ethernet cable for the initial configuration.
Wireless USB Print Server User Guide North America UK Europe 5. Connect the included power adapter to the POWER port on the Wireless USB Print Server and plug the power adapter into a standard power outlet. Step Two: Configure the Wireless USB Print Server 1. Verify you are logged on to your computer as an administrator. You must be logged on as an administrator to ensure the software will be properly installed. 2. Insert the U.S. Robotics Installation CD-ROM. 2. Click Setup Wizard and then click Next.
Wireless USB Print Server User Guide 3. The Wireless USB Print Server will be shown in the list. Select the print server in the list and click Next. If it does not appear in the list, check your physical connections and click Refresh. 4. You can change the Device Name, if you want, and enter a Domain Name. When finished, file:///G|/CSO/T-Writer Repository/Networking/5436A Wireless Gutenberg/User Guide/English/install.
Wireless USB Print Server User Guide click Next. 5. If you have connected the Wireless USB Print Server to a network device that has DHCP capabilities, you can select Obtain IP Address automatically. If your network device does not have DHCP capabilities, you can select Fixed IP Address and add the IP address information. When finished, click Next. file:///G|/CSO/T-Writer Repository/Networking/5436A Wireless Gutenberg/User Guide/English/install.
Wireless USB Print Server User Guide 6. Next you can select the Region or Domain where you will be using the Wireless USB Print Server. 7. You can then select your Network Type as either Infrastructure or Ad Hoc, depending on if you are using a wireless router or access point or not in your wireless network. file:///G|/CSO/T-Writer Repository/Networking/5436A Wireless Gutenberg/User Guide/English/install.
Wireless USB Print Server User Guide Note: The Wireless USB Print Server is initially set in Infrastructure mode, which is used to connect to an wireless router or access point. If you will be establishing a connection to other wireless clients without using a wireless router or access point, select Ad-hoc as the Network type. 8. In the SSID field, you should enter the SSID of the wireless router or access point to which you will be connecting the wireless print server.
Wireless USB Print Server User Guide Note: The only security that the print server supports is WEP or WPA-PSK. You may need to modify the security settings of your wireless network accordingly. A. If you select WEP, you will need to select either Open System or Shared Key for your Authentication and then click Next. file:///G|/CSO/T-Writer Repository/Networking/5436A Wireless Gutenberg/User Guide/English/install.
Wireless USB Print Server User Guide B. You will then need to select your WEP Key Length, either 64 bit Hex, 64 bits ASCII, 12 bits Hex, or 128 bits ASCII. Click Next. file:///G|/CSO/T-Writer Repository/Networking/5436A Wireless Gutenberg/User Guide/English/install.
Wireless USB Print Server User Guide C. You will then need to enter your Key and select the Default Key number. Click Next when finished. Hex ASCII 64-bit 10 characters 5 characters 128-bit 26 characters 13 characters WEP Key: 64 bits (ASCII): WEP Key: 64 bits (Hex): file:///G|/CSO/T-Writer Repository/Networking/5436A Wireless Gutenberg/User Guide/English/install.
Wireless USB Print Server User Guide WEP Key: 128 bits (ASCII): file:///G|/CSO/T-Writer Repository/Networking/5436A Wireless Gutenberg/User Guide/English/install.
Wireless USB Print Server User Guide WEP Key: 128 bits (Hex): D. If you select WPA-PSK, you will need to enter the WPA Key on the next screen. This Key should match what you already have in your wireless network. file:///G|/CSO/T-Writer Repository/Networking/5436A Wireless Gutenberg/User Guide/English/install.
Wireless USB Print Server User Guide 8. After selecting your Security type and entering any necessary information, your initial configuration is complete and you should click Finish. 9. You will then be prompted to install the PTP (Peer-to-Peer) driver. Click Yes and follow the on- file:///G|/CSO/T-Writer Repository/Networking/5436A Wireless Gutenberg/User Guide/English/install.
Wireless USB Print Server User Guide screen instructions. 10. When that is completed, make sure the Configure Print Driver now checkbox is selected and click Finish. 11. Click OK in the Information screen that appears. It may be necessary to minimize the Print Server Utility screen in order to see the Information screen. 12. In the Printer Port Setup, select the port and click Next. file:///G|/CSO/T-Writer Repository/Networking/5436A Wireless Gutenberg/User Guide/English/install.
Wireless USB Print Server User Guide If you do not see the printer, click Refresh until the port name appears. 13. Click OK on the message that appears. 14. Select the printer from the Existing Printers list. file:///G|/CSO/T-Writer Repository/Networking/5436A Wireless Gutenberg/User Guide/English/install.
Wireless USB Print Server User Guide If the printer doesn’t appear, click Add New Printer and follow the onscreen instructions. 15. Click Connect. If you do not see an asterisk next to the port name in the Printer Port Setup screen, click Refresh. If it still doesn’t appear, see Troubleshooting. 16. Click Close. file:///G|/CSO/T-Writer Repository/Networking/5436A Wireless Gutenberg/User Guide/English/install.
Wireless USB Print Server User Guide Step Three: Print a Test Page. 1. Windows XP, 2000, and NT Users: ❍ Click Windows Start > Printers and Faxes. Windows Me, 98, and 95 Users: A. Click Windows Start > Settings > Control Panel. B. Within Control Panel, click Printers and Faxes. 2. Right-click the printer you just installed and select Properties. 3. Click Print Test Page. Your printer should successfully print a test page.
Wireless USB Print Server User Guide 2. Reconnect the power adapter to restart the print server. The print server should now establish a wireless connection to your wireless router or access point. 3. Repeat the instructions from Step Three: Print a Test Page. If you are able to print, your wireless connection is working correctly. If you are not able to print the test page, there is a problem with your wireless connection, see Troubleshooting.
Wireless USB Print Server User Guide Wireless USB Print Server User Guide Home Installation Configuration Tutorials Help Wireless USB Print Server Installation Client Installation Macintosh Installation Unix Installation Netware Installation Windows Server Installation Before performing client configuration, the Wireless USB Print Server must be installed on your LAN, and configured as described in the Wireless USB Print Server Installation section.
Wireless USB Print Server User Guide 3. You will need to select the type of user that this computer will be: User, Administrator, Custom, or IPP Client. file:///G|/CSO/T-Writer Repository/Networking/5436A Wireless Gutenberg/User Guide/English/install_client.
Wireless USB Print Server User Guide 2. Follow the on-screen instructions to complete the client installation. User User is the most common option that the majority of network clients will want to choose. This should be selected if the Wireless USB Print Server has already been configured and you just need printing capabilities on this computer. 1. Click User and then click Next and follow the on-screen instructions. 2. You will then be prompted to install the PTP (Peer-to-Peer) driver. Click Yes.
Wireless USB Print Server User Guide 3. Follow the on-screen instructions to select the location and install the PTP (Peerto-Peer) driver. 4. When that is completed, make sure the Configure Print Driver now checkbox is selected and click Finish. 5. Click OK in the Information screen that appears. It may be necessary to minimize the Print Server Utility screen in order to see the Information screen. file:///G|/CSO/T-Writer Repository/Networking/5436A Wireless Gutenberg/User Guide/English/install_client.
Wireless USB Print Server User Guide 6. In the Printer Port Setup, select the port and click Next. If you do not see the printer, click Refresh until the port name appears. 7. Click OK on the message that appears. file:///G|/CSO/T-Writer Repository/Networking/5436A Wireless Gutenberg/User Guide/English/install_client.
Wireless USB Print Server User Guide 8. Select the printer from the Existing Printers list. file:///G|/CSO/T-Writer Repository/Networking/5436A Wireless Gutenberg/User Guide/English/install_client.
Wireless USB Print Server User Guide If the printer doesn’t appear, click Add New Printer and follow the onscreen instructions. 9. Click Connect. If you do not see an asterisk next to the port name in the Printer Port Setup screen, click Refresh. If it still doesn’t appear, see Troubleshooting. 10. Click Close. file:///G|/CSO/T-Writer Repository/Networking/5436A Wireless Gutenberg/User Guide/English/install_client.
Wireless USB Print Server User Guide 11. Repeat this step on each computer. You will now be able to use your USB printer from this computer. To validate your setup, you can print a test page. Administrator Administrator will install the necessary tools for initial configuration, as well as the BiAdmin Management Utility. This should only be chosen by more advanced network clients. 1. Select Administrator from the list and click Next. 2. Click Next.
Wireless USB Print Server User Guide 3. Click Next and then Finish. file:///G|/CSO/T-Writer Repository/Networking/5436A Wireless Gutenberg/User Guide/English/install_client.
Wireless USB Print Server User Guide This will add the BiAdmin Management Utility to your computer. Click the icon on your desktop or the program menu link to launch the BiAdmin Management Utility. You can use the BiAdmin Management Utility to configure the settings of the Wireless USB Print Server. Custom Custom allows the network client to select the options that will be installed from any combination of the BiAdmin Management Utility, the Setup Wizard, and the Peer-toPeer Print Port driver.
Wireless USB Print Server User Guide 3. Click Next. file:///G|/CSO/T-Writer Repository/Networking/5436A Wireless Gutenberg/User Guide/English/install_client.
Wireless USB Print Server User Guide 4. Click Next and then Finish. file:///G|/CSO/T-Writer Repository/Networking/5436A Wireless Gutenberg/User Guide/English/install_client.
Wireless USB Print Server User Guide The selected options are now installed. IPP Client IPP (Internet Printing Protocol) Client is required if you want to print to any IPP servers, either on the local network or accessed remotely over the Internet. This should only be chosen by more advanced network clients. For these platforms, IPP Client software is supplied on the CD-ROM. You can also distribute the setup program (IPP_CLIENT.EXE) to users vial E-mail. Installing from the Installation CD-ROM 1.
Wireless USB Print Server User Guide 3. Click Next. file:///G|/CSO/T-Writer Repository/Networking/5436A Wireless Gutenberg/User Guide/English/install_client.
Wireless USB Print Server User Guide 4. Click Next and then Finish. file:///G|/CSO/T-Writer Repository/Networking/5436A Wireless Gutenberg/User Guide/English/install_client.
Wireless USB Print Server User Guide Installing using IPP_CLIENT.EXE 1. Run this program to unzip the included files. 2. The IPP Setup program will then run. 3. Follow the prompts to complete the installation. © 2004-2006 U.S. Robotics Corporation. file:///G|/CSO/T-Writer Repository/Networking/5436A Wireless Gutenberg/User Guide/English/install_client.
Wireless USB Print Server User Guide Wireless USB Print Server User Guide Home Installation Configuration Tutorials Help Wireless USB Print Server Installation Client Installation Macintosh Installation Unix Installation Netware Installation Windows Server Installation Macintosh (AppleTalk) The Wireless USB Print Server supports AppleTalk (EtherTalk), PAP, ATP, NBP, ZIP and DDP protocols, enabling Macintosh computers on the network to view and use the Wireless USB Print Server as a regular AppleTalk print
Wireless USB Print Server User Guide 5. Choose a PostScript printer from the list. 6. Click Create and it will search PPD automatically. 7. Select a printer description from the list. 8. Click Select. 9. Configuration is now complete. Printing Printing with the Wireless USB Print Server installed in an AppleTalk network is identical to normal printing. Select File and then Print and choose the desired printer.
Wireless USB Print Server User Guide 2. Click Add Printer. 3. Select LPR Printers Using IP. 4. Enter the IP address of the Print Server in the LPR Printer's Address field, and enter the Queue Name (L1 for port 1, L2 for port 2 if the Wireless USB Print Server has 2 printer ports.). 5. Select the Printer Model from the drop-down list. 6. Click Add. 7. Configuration is now complete. file:///G|/CSO/T-Writer Repository/Networking/5436A Wireless Gutenberg/User Guide/English/install_mac.
Wireless USB Print Server User Guide © 2004-2006 U.S. Robotics Corporation. file:///G|/CSO/T-Writer Repository/Networking/5436A Wireless Gutenberg/User Guide/English/install_mac.
Wireless USB Print Server User Guide Wireless USB Print Server User Guide Home Installation Configuration Tutorials Help Wireless USB Print Server Installation Client Installation Macintosh Installation Unix Installation Netware Installation Windows Server Installation Unix Overview Your Wireless USB Print Server supports the LPD Unix printing method, which is supported by all common Unix systems.
Wireless USB Print Server User Guide arp -s IP_Address 00:c0:02:xx:xx:xx Where: IP_Address is the IP Address you wish to assign to the Wireless USB Print Server. 00:c0:02:xx:xx:xx is the hardware address of the Wireless USB Print Server. Example: arp -s 192.168.0.21 00:c0:02:12:34:56 You should then assign this IP address to the Wireless USB Print Server using your Web Browser. Launch the Web User Interface and go to the TCP/IP section. Select Fixed IP Address and then enter the appropriate information.
Wireless USB Print Server User Guide Address. To setup your AIX system for LPD printing, perform the following steps. 1. Add the Wireless USB Print Server to /etc/hosts.lpd, using the name you assigned to the Wireless USB Print Server. 2. Start the LPD daemon if it is not running, using the following command: start src -s qdaemon 3. Start the system administration tool smit and select Print Spooling. 4.
Wireless USB Print Server User Guide ● The remote host name is the name of the Wireless USB Print Server. ● The remote printer name is the print queue name for the Logical Printer. ● Logical printers also need to be configured on the Wireless USB Print Server itself. ● If your UNIX asks for the LPD type, be sure to identify the service type as BSD. ● The Wireless USB Print Server’s LPD protocol meets BSD system standards.
Wireless USB Print Server User Guide Note: The entry is really one line, but can be entered as shown. Use a TAB character where shown. Printer_name|Remote_Printer_Alias:\ [Tab] :lp=:\ [Tab] :rm=PS_NAME:\ [Tab] :rp=Logical_Printer_name:\ [Tab] :sd=Spooler_directory:\ [Tab] :mx#0: Example: Marketing|RP1_PS123456:\ [Tab] :lp=:\ [Tab] :rm=PS_Rm203:\ [Tab] :rp=L1:\ [Tab] :sd=/usr/spool/Marketing:\ [Tab] :mx#0: Repeat this process for each Logical Printer/Print Queue combination that you wish to create.
Wireless USB Print Server User Guide Spool Directory: /var/spool/lpd/name_of_printer File Limit: 0 (no limit) Remote Host: Name or IP Address of Wireless USB Print Server, e. g. SC3000014 Note: host file entry is required to use the name instead of IP Address Remote Queue: Ln Where n is the Logical Printer number. By default, L1 is port 1, and L2 is port 2 if the Print Server has 2 ports. 5. Save this data and exit the Printer Configuration.
Wireless USB Print Server User Guide ● Give permissions to LPD processes: chgrp daemon /usr/spool/Spooler_dir ● Start lcomputer print mechanism: lcomputer start printer_name Adding Remote Printers A remote printer is added by inserting the following line in the /etc/printcap file. Note: The entry is really one line, but can be entered as shown. Use a TAB character where shown. Printer_name|Remote_Printer_Alias:\ [Tab] :lp=:\ [Tab] :rm=PS_NAME:\ [Tab] :rp=Logical_Printer_name:\ [Tab] :sd=Spooler_directo
Wireless USB Print Server User Guide For LPD printing instructions, refer to your UNIX manual. The following example is for a BSD system: lpr -P printer_name filename Where: printer_name is the name of the Print Queue defined on the Unix host. filename is the name of the file you wish to print. Example: lpr -P Marketing /etc/hosts In the above example, the /etc/hosts file is sent to the printer queue Marketing. It will then be sent to the logical printer associated with this queue. © 2004-2006 U.S.
Wireless USB Print Server User Guide Wireless USB Print Server User Guide Home Installation Configuration Tutorials Help Wireless USB Print Server Installation Client Installation Macintosh Installation Unix Installation Netware Installation Windows Server Installation Netware Overview The Print Server must be configured as a valid device on your TCP/IP network. This printing method uses LPR over TCP/IP, not the Netware protocol.
Wireless USB Print Server User Guide 4. Select NDPS Manager as the object to create. The Create NDPS Manager Object window shown below will appear. 5. Type a name in the NDPS Manager Name.(e.g. SerMGR, as shown above) 6. Browse the Resident Server and select where you want the NDPS Manager object to be assigned. (e.g. TECH_50.TeSupp, as shown above) 7. Browse the Database Volume and select where you want the NDPS Manager database to be assigned. (e.g. TECH_50_SYS.TeSupp, as shown above) 8. Click Create.
Wireless USB Print Server User Guide 1. Start the NDPS Manager object you will be using to control the Printer Agent. 2. At the Identification page, click Printer Agent List. 3. Click New to see the Create Printer Agent window, as shown below. 4. Enter the desired name for the Printer Agent (PA) Name. 5. Normally, the NDPS Manager will be the NDPS Manger object you are using. 6. Select Novell Printer Gateway in the Gateway Type. 7. Click OK and then select the available printer. 8.
Wireless USB Print Server User Guide 10. In the Host address IP field, enter the IP Address previously assigned to the Print Server device. 11. In the Printer Name field, enter the Logical Port name on the Print Server. (L1 for Port 1, L2 for port 2). 12. Click Finish, then select appropriate drivers for Windows 98 etc as required. The new Printer Agent will now appear in the Printer Agent List window.
Wireless USB Print Server User Guide Wireless USB Print Server User Guide Home Installation Configuration Tutorials Help Wireless USB Print Server Installation Client Installation Macintosh Installation Unix Installation Netware Installation Windows Server Installation Windows Server Windows NT4.0 Server If using Windows NT 4.0, Microsoft TCP/IP Printing Support must be installed. ● ● If it is already installed, add a TCP/IP Remote Printer, as described below.
Wireless USB Print Server User Guide effect. Adding a TCP/IP Remote Printer 1. Windows XP, 2000, and NT Users: ❍ Click Windows Start > Printers and Faxes. Windows Me, 98, and 95 Users: A. Click Windows Start > Settings > Control Panel. B. Within Control Panel, click Printers and Faxes. 2. Launch the Add Printer wizard. 3. When prompted with This printer will be managed by, select My Computer and click Next. 4. Select Add Port… and then select LPR Port. Click New Port. 5.
Wireless USB Print Server User Guide Windows 2000/2003 Server 1. Launch the Add Printer Wizard, select Network Printer, then click Next to browse for the Wireless USB Print Server. 2. Locate and double-click the Wireless USB Print Server, select the desired port, and click Next. A message like the following will be displayed: 3. Click OK and select the correct Manufacturer and Model for this printer. 4. Follow the prompts to complete the installation. 5.
Wireless USB Print Server User Guide Wireless USB Print Server User Guide Home Installation Configuration Tutorials Help Web User Interface Management Utility The following section describes the various functions of the Web User Interface. This utility provides quick access to all the settings of the Wireless USB Print Server. To access the Web User Interface: 1. Start you Web browser. 2. In the location or address line, type the IP address of the Wireless USB Print Server and press ENTER.
Wireless USB Print Server User Guide Wireless Security Apple Talk NetBEUI TCP/IP © 2004-2006 U.S. Robotics Corporation. file:///G|/CSO/T-Writer Repository/Networking/5436A Wireless Gutenberg/User Guide/English/wui.
Wireless USB Print Server User Guide Wireless USB Print Server User Guide Home Installation Configuration Tutorials Help Web User Interface Management Utility The BiAdmin Management Utility can be used to configure the settings of the Wireless USB Print Server. This utility is for advanced users or for users on a network with multiple Wireless USB Print Servers.
Wireless USB Print Server User Guide 3. Select Custom. file:///G|/CSO/T-Writer Repository/Networking/5436A Wireless Gutenberg/User Guide/English/management.
Wireless USB Print Server User Guide 4. Verify sure BiAdmin is selected. file:///G|/CSO/T-Writer Repository/Networking/5436A Wireless Gutenberg/User Guide/English/management.
Wireless USB Print Server User Guide 4. Follow the on-screen instructions to complete the installation. Using the BiAdmin Management Utility You can launch the BiAdmin Management Utility by using the link in the Programs menu. When it is launched, the BiAdmin Management Utility will search your network for all the Wireless USB Print Servers that are attached and running. The Wireless USB Print Servers will then be shown in the device list of the BiAdmin Management Utility.
Wireless USB Print Server User Guide On the left side of the screen, you will see each Wireless USB Print Server that is attached to the network. If you select a Wireless USB Print Server, you will see the settings information on the right side of the screen. If the desired Wireless USB Print Server is not listed, try performing the following steps: ● Make sure that the Wireless USB Print Server is installed and receiving power, then click ● in the WUI to refresh the list.
Wireless USB Print Server User Guide Main: From this menu, you can select the following: ● Device Status ● Printer Status ● Configure ● Upgrade ● Refresh ● Exit InitDevice: From this menu, you can select and perform the following: ● ● ● ● Reset Device: This will cause the Wireless USB Print Server to reboot. To reboot the print server, click Yes. This should be done after making any configuration changes or if the Wireless USB Print Server stops responding.
Wireless USB Print Server User Guide Once a Wireless USB Print Server has been selected, the icons can be used. The icons provide status information as well as access to the selected Wireless USB Print Server settings. If an icon is grayed out, that option or protocol is unavailable. Device Information Printer Status Configuration Wizard Firmware Upgrade Refresh Exit © 2004-2006 U.S. Robotics Corporation.
Wireless USB Print Server User Guide Wireless USB Print Server User Guide Home Installation Configuration Tutorials Help Printing Methods IPP Printing Methods The Wireless USB Print Server supports a number of printing methods: ● ● ● ● Peer-to-peer Printing means that the print jobs are stored (queued) on your computer, and sent directly to the Wireless USB Print Server when it is available. Windows SMB Printing is a Microsoft standard for using a Network Printer.
Wireless USB Print Server User Guide Printing. ● If your LAN has Network Servers (e.g. Windows NT, Windows 2000 Server), use the method advised by your Network Administrator. The Wireless USB Print Server can print via a queue located on a Network server, if desired. ● Unix users ● Macintosh users Checking your Network Protocols (Windows 9x) Your computer must have either the TCP/IP or NetBEUI protocols installed. (All versions of Windows after Windows 95 have TCP/IP installed by default.
Wireless USB Print Server User Guide 2. If neither line is present, you will need to install the NetBEUI protocol. Click Add, Protocol, and then Microsoft. Click NetBEUI and then OK. You may be prompted for your Windows CD-ROM. This protocol requires no configuration. If required, you can also install TCP/IP. However, depending on your LAN environment, TCP/IP may require further configuration. 3. If either protocol is already installed, proceed with installation.
Wireless USB Print Server User Guide 4. On the Add Standard TCP/IP Printer Port screen above, enter the IP Address of the Print Server in the Printer Name or IP Address field and then click Next. file:///G|/CSO/T-Writer Repository/Networking/5436A Wireless Gutenberg/User Guide/English/printing.
Wireless USB Print Server User Guide 5. On this screen, select Custom and click Settings. 6. On the Port Settings screen, select LPR in the Protocol section. Enter a Queue name (L1 for the USB Port). Ensure the LPR Byte Counting Enabled setting is Enabled. Click OK to confirm your changes and close this screen. file:///G|/CSO/T-Writer Repository/Networking/5436A Wireless Gutenberg/User Guide/English/printing.
Wireless USB Print Server User Guide 7. Follow the prompts to complete the Wizard. Windows 9x/ME Setup Before performing the following procedure, the Wireless USB Print Server must be installed on your LAN, and configured as described in Installation. Both the Wireless USB Print Server and the attached printer should be powered ON. 1. Insert the U.S. Robotics Installation CD-ROM into your CD-ROM drive. 2. Click Additional Installs and then select the User. 3.
Wireless USB Print Server User Guide 1. The program will search for Printer Servers on the network, and a screen like the following will be displayed. If desired, click Refresh to update the list. The name of the attached printer will be displayed if possible. If No printer is displayed, make sure that the printer is properly connected and powered on. If your Wireless USB Print Server is not listed, perform the following: ❍ ❍ ❍ ❍ Click the Refresh button.
Wireless USB Print Server User Guide If you see the following error message, either install Internet Explorer 4 or later or go to Troubleshooting. 3. The printer port will be created, then a screen similar to the one below will be displayed. 4. Select the correct Windows printer in the Existing Printers list and click Connect. If the correct printer type is not listed, click Add New Printer to run the Windows Add Printer wizard.
Wireless USB Print Server User Guide be slightly different depending on your version of Windows). Click Print Server Utility and then Print Driver Setup. Note: If using the Epson Spooler Manager, this program must be disabled, as follows: 1. Run the Epson Spooler Manager. 2. Select Queue Setup from the menu. 3. Click Use Print Manager for this port. 4. Click OK to exit. PTP (Peer-to-Peer) Printer Port Management Print jobs can be managed like any Windows printer.
Wireless USB Print Server User Guide Items shown on this screen are as follows: Port: If desired, click Browse to select a different Wireless USB Print Server. If the selected device has multiple ports, the Select Device Port button can be used to select the port. The Port Name can not be changed after installation. This name is shown in the Printer's Properties. Banner: Check this option to print a banner page before each print job. ● If using a PostScript Printer, select the PostScript checkbox.
Wireless USB Print Server User Guide This method requires no additional software to be installed, but the NetBEUI or TCP/IP protocol must be installed on your computer. Use the following procedure to install the Wireless USB Print Server's printer as a Windows SMB network printer: 1. Double-click the Network Neighborhood icon on the desktop. 2. On the View menu, click Details. 3.
Wireless USB Print Server User Guide 6. Follow the on-screen prompts to complete the installation. 7. Select the Printer Manufacturer and Model to match the printer connected to this port on the Wireless USB Print Server and complete the Wizard. 8. This printer will now appear in your Printers folder and can be used like any other printer. However, SMB printing is not suitable for large complex print jobs; you should use the Peer-to-peer Printing instead.
Wireless USB Print Server User Guide Windows XP: 4. Browse the network, and locate the Server and Printer (or Print Queue) which your Network Administrator advised you to use. 5. Click OK and then Next. 6. Select the correct printer Manufacturer and Model, as advised by your Network Administrator, and click Next. 7. Follow the prompts to complete the Wizard. The new printer will be listed with any other installed printers, and may be selected when printing from any Windows application.
Wireless USB Print Server User Guide © 2004-2006 U.S. Robotics Corporation. file:///G|/CSO/T-Writer Repository/Networking/5436A Wireless Gutenberg/User Guide/English/printing.
Wireless USB Print Server User Guide Wireless USB Print Server User Guide Home Installation Configuration Tutorials Help Printing Methods IPP IPP (Internet Printing Protocol) IPP (Internet Printing Protocol) is a standards-based system to allow remote printing from a computer to any accessible printer. Normally, the printer will be attached to a computer or other device which functions as an IPP Server. Client computers need a compatible IPP Client program.
Wireless USB Print Server User Guide IPP Client Configuration 1. Run the Add IPP Port program entry created by the installation. A screen like the following will be displayed. 2. If Internet access from your location is via a Proxy Server, select Access IPP Server via Proxy Server and enter the details of your Proxy Server. (This will be the same as your Browser configuration.) 3. Enter the IP Address or URL of the IPP Server. 4.
Wireless USB Print Server User Guide 6. Perform one of the following options: ● Select an existing printer to use the new port and click OK. OR ● Click Add New Printer to create a new printer to use the IPP port. This will start the Add Printer wizard. Follow the prompts to complete the process. Ensure that the new printer uses the IPP port. Installation is now complete. To create additional IPP Ports, repeat the entire procedure.
Wireless USB Print Server User Guide There are 2 settings - Retry Interval and Retry Count - which can be adjusted if you have problems connecting to the IPP Server. ● ● Retry Interval sets the time interval (in seconds) between connection attempts. Increase this number if you have a poor connection, or the remote server is very busy. Retry Count sets how many connection attempts will be made. Increase this number if you have a poor connection, or the remote server is very busy.
Wireless USB Print Server User Guide 3. Select Connect to a printer on the Internet or on your Intranet and enter the URL of the IPP Server as follows, where ip_address represents the IP Address of the IPP Server and 631 is the port number. Port 1 ip_address:631/ipp/P1 These entries are case sensitive. They must be entered as shown, with ipp in lower case, and P1 in UPPER case. 4. If the connection can be established and the printer on that port is online, the following dialog will be displayed: 5.
Wireless USB Print Server User Guide ● Network congestion causes the connection attempt to time out. If using the supplied IPP Client software, there are 2 settings - Retry Interval and Retry Count - which can be adjusted if you have problems connecting to the IPP Server. See the Changing the IPP Port Settings section on this page for details. © 2004-2006 U.S. Robotics Corporation. file:///G|/CSO/T-Writer Repository/Networking/5436A Wireless Gutenberg/User Guide/English/ipp.
Wireless USB Print Server User Guide Wireless USB Print Server User Guide Home Installation Configuration Tutorials Help Troubleshooting Support Basic Troubleshooting Procedure This procedure addresses a number of symptoms that you might experience with your print server: 1. Verify the physical cable connections between the print server, the printer, your router, and your power outlet. 2. Ensure that the power outlet to which the print server is connected is a live outlet. 3.
Wireless USB Print Server User Guide Windows Troubleshooting My Setup Wizard can’t detect the Wireless USB Print Server. At the end of the Setup Wizard, I receive a message that says “Network busy, or device not found”. My Wireless USB Print Server is not appearing in the Printer Port Setup screen. I am unable to add my printer in the Add Printer Wizard screen. I am unable to print a test page.
Wireless USB Print Server User Guide My document doesn't use the correct fonts when printing. My EPS file doesn't use the correct fonts when printing. I can't select the Remaining from: item in the Print Dialog box. A cover page prints either on the first or the last page of the document. I am having trouble printing with the LaserWriter 8. The colors on my printed output do not match the colors on my computer screen. When I send a print job, I get a PostScript Command error or nothing is printed.
Wireless USB Print Server User Guide Wireless USB Print Server User Guide Home Installation Configuration Tutorials Help Troubleshooting Support Support 1. Know your model and serial number. Your model number is 5436A. You can find your serial number on the side of the package and on the bottom of the router. 2. Go to the Support section of the USRobotics Web site at www.usr.
Wireless USB Print Server User Guide Denmark www.usr.com/emailsupport/ea 38323011 Finland www.usr.com/emailsupport/ea 08 0091 3100 France www.usr.com/emailsupport/fr 0825 070 693 Germany www.usr.com/emailsupport/de 0180 567 1548 Greece www.usr.com/emailsupport/gr Hungary www.usr.com/emailsupport/hu 0180 567 1548 Ireland www.usr.com/emailsupport/uk 1890 252 130 Italy www.usr.com/emailsupport/it 800 979 266 Luxembourg www.usr.com/emailsupport/be 342 080 8318 Middle East/Africa www.