
User's Manual


5
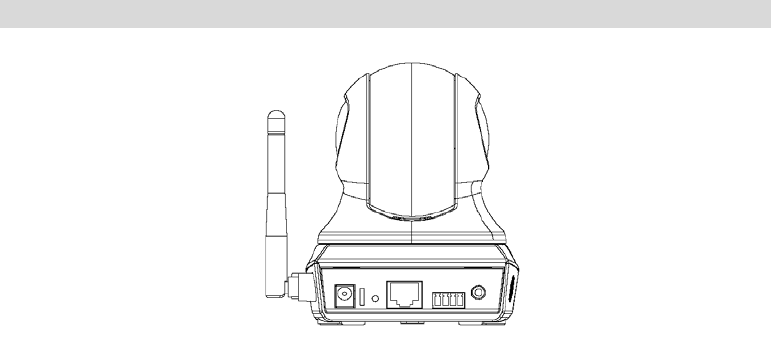
Rear - Network Camera
Figure 3: Rear Panel
Antenna
Attach the supplied antenna here. The antenna is adjustable; best
results are usually obtained with the antenna positioned vertically.
Power Input
Connect the supplied 12V power adapter here. Do not use other
power adapters; doing so may damage the camera.
Reset Button
This button is recessed; you need a pin or paper clip can be used to
depress it. It can be activated at any time the camera is in the
"ready" mode.
Reset to manufacturer default valued and reboot. When
pressed and held over 10 seconds, the settings of Network
Camera will be set to their default values.
Note:
After this procedure is completed, all LEDs will blink three times to
confirm that the reset was completed successfully.
WPS Button
Push the WPS button on the device and on your other wireless
device to perform WPS function that easily creates an encryption-
secured wireless connection automatically.
WPS PBC Mode. When pressed and released (less then 3
seconds), the Network Camera will be in the WPS PBC mode
(Auto link mode).
WPS Pin Code Mode. When pressed and held for over 3
seconds (less than 10 seconds), the Network Camera will be in
the WPS Pin Code mode.
Note: WPS function is only available either in WPA or WPA2
Personal encryption mode.
LAN port
Use a standard LAN cable to connect your Network Camera to a
10/100BaseT hub or switch.
Note:
Plugging in the LAN cable will disable the Wireless interface.
Only 1 interface can be active at any time.
The LAN cable should only be connected or disconnected when
the camera is powered OFF. Attaching or detaching the LAN
cable while the camera is powered on does NOT switch the
interface between wired and wireless.