
User's Manual


67
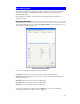
Main Screen
You can view live video in the main screen. The built-in software can let you view up to 16
cameras on a single computer screen at one central location.
The Icons allow you to control the cameras and video streams.
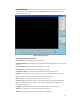
Channel (Camera) Selection.
Use this to select the desired Channel (Camera) by clicking on the top row. This
panel also indicates the status of the camera.
• The first column indicates if the camera is available.
Green indicates the camera is available.
Gray indicates that the camera is currently unavailable.
• The second column indicates if a recording is in progress.
Gray indicates no recording.
Red indicates recording is in progress.
• The third column indicates if Motion Detection is in progress.
Gray indicates this feature is not enabled.
Yellow indicates Motion Detection is in progress.
• The forth and fifth columns indicate if I/O port 1/2 is in On or Off mode.
Gray indicates this feature is not enabled.
Yellow indicates I/O port is in On mode.
Alert Log List.
It displays the list of alert logs, if any.
Refresh. Update the Preset position list. This has no effect unless during the
viewing session, another user or the Camera Administrator has renamed one or
more of the Preset positions.
Create Preset Points. Define (or re-define) a Preset position. The Camera
Administrator can choose whether or not this option is available.
Camera Patrol. Move through the Preset positions in the sequence defined by
the Camera Administrator.
Setup. Click this button to open the Setup Window.
Playback. Click this button to open the Playback, which allows you to browse
through the previously saved files.
Move Control. Use this to move the camera to the desired position. There may
a short delay after clicking the desired icon. You should wait a couple of seconds
rather than click again.
Channel Indicator. This indicates the current channel (camera).
Screen Layout. Use this to select the number of Channels (Cameras) to be
displayed on screen. Up to 9 cameras can be displayed.
Play. Use this to re-start viewing, after using the Stop or Pause button.
Pause. Use this to temporarily stop the connection to the camera