
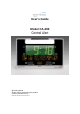
User's Manual


6.
Set the Alarm Time
:
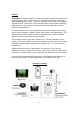
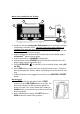
1. Slide
SET
switch (on right side of unit) to
Alarm
-1 (AL 1) position and set
alarm time using
HR
and
MIN
buttons. Holding in HR/MIN switch to forward
the hours will not work. Push button repeatedly.
2. After completing the setting, slide
SET
switch to
RUN
position for normal
clock operation.
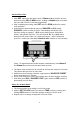
3. Select the front panel wake-up option on
SHAKER
or
ALL
setting.
SHAKER
means to wake-up via the “bed-shaking and flasher only”
functions (using no speaker).
ALL
means waking-up via “bed-shaker,
flasher, and speaker functions.” The unit will read “AL 1” (or AL 2) when
alarm goes off. (Note: Alarm 1 & 2 lights will stay on – even if the alarms
aren’t set – unless you slide ALL / SHAKER / OFF switches to “Off” position)
(Note: To activate both bed shaker outputs simultaneously, both
Alarm-1
and
Alarm-2
must be set to the same wake-up time.)
4. The alarm clock activates for 30-seconds at set time then stops for 5 minutes.
This pattern will repeat for an entire hour.
5. While alarm clock is being activated, a quick press of
SNOOZE /
RESET
button stops alarm for 5 minutes.
6. A long (3-second) press of the same button turns off alarm until the next day.
7. Slide front panel
ALL / SHAKER / OFF
option switch to
OFF
position to
permanently turn off alarm.
Select 12 / 24 Hour Mode:
1. The factory default clock setting is on 12-hour mode.
2. While in
SET CLOCK
mode (set switch to
TIME
position), pressing and
holding
SOS
button for 5 seconds changes setting to 24-hour mode.
3. Repeat Step 2 to change setting back to 12-hour mode.
3