
Operating instructions


Burner Removal/Servicing Guide
CAUTION: BEFORE STARTING REMOVAL OF PARTS TURN OFF GAS SUPPLY AND DISCONNECT
ALL ELECTRICAL SUPPLIES.
ALL WORK SHOULD BE PERFORMED BY A QUALIFIED AND CERTIFIED TECHNICIAN
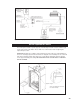
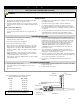
1. Remove Glass Door, Logs, Rocks, and Embers. Remove the Grate Bar Assembly by remov-
ing the screws located at G1 and G2. Remove the Burner Tube by removing the hold-downs
located at B1 and B2. (See Figure 20.)
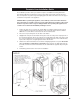
2. Remove the nine [9] screws mounting the Burner Pan assembly to the firebox. Tilt the pan for-
ward and remove it from the unit.
3. Installation is the reverse of these steps.
NOTE: Before reinstallation, ensure that all old sealant material is scraped off and removed from the fire-
box bottom and burner pan. Verify that the sealing area is clean, and free of any grease and debris. Apply
a fresh bead of high temperature sealant (e.g. Mil Pac) to the sealing area and ensure that there is a prop-
er seal after the reinstallation.
WARNING:
FAILURE TO PROPERLY SEAL THE FIREBOX WILL RESULT IN IMPROPER
COMBUSTION AND/OR LEAKAGE OF TOXIC COMBUSTION GASES.
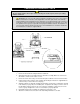
Figure 20 - Burner removal diagram.
WARNING:
FAILURE TO POSITION THE PARTS IN ACCORDANCE WITH THESE
DIAGRAMS OR FAILURE TO USE ONLY PARTS SPECIFICALLY APPROVED WITH
THIS APPLIANCE MAY RESULT IN PROPERTY DAMAGE OR PERSONAL INJURY.
24