
Operating instructions


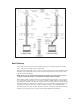


Figure 28 - a) Straight-through roof support configuration; b) Flex bend configuration; c) Termination mounting.
Roof Flashing
Ensure that you have the proper roof flashing by checking your roof pitch using a level and two
rulers, or by using a roof pitch card (see Figure 28a).
Slide a Roof Flashing suitable to your roof slope over the vent. Place the edge of the flashing plate
that will be on the higher part of the roof slope under the shingles. Both the sides and the lower
edge lay on top of the shingles.
NOTE: At the top edge of the flashing plate, lift the shingles and nail the plate to the roof
deck, then cement the shingles to the plate with a suitable waterproof mastic.
Ensure that the chimney is plumb. Square up the flashing plate and nail in place to the roof deck.
Use 12 nails with neoprene washers or cover the heads with a suitable waterproof mastic. Wrap
the storm collar around the vent above the flashing. Secure the ends together loosely with nut and
bolt supplied. Slide the collar down the vent until it comes in contact with the flashing. Tighten the
bolt and seal the Storm Collar to the vent with a suitable waterproof non-combustible mastic.
The flashing and storm collar should be painted to match the roof shingles. This will extend its life
and improve the appearance. Clean, prime and paint with suitable painting products.
44