
Datasheet


Painting and Drawing 97
4. Select an outline color from the drop-down list. The Foreground
option sets the currently set foreground color; Background sets the
current background color. (See Choosing colors on p. 67). For a
Custom color, click the Color swatch, and select a color from the
displayed Adjust Color dialog.
5. (Optional) From the Mode drop-down menu, pick a blend mode,
which controls how the outline color and underlying pixels blend to
make a combined resulting color. Select the percentage Opacity for
the outline when blending, and check Preserve Transparency to make
transparent areas resist the flood color; otherwise, everything in the
selection or layer will be equally washed with the fill.
6. Click OK. The outline appears around the selection area.
Once applied, selection outlines no longer remain editable, although if you're
not happy with your outline you can still Undo.
To create outlines on a layer (as a layer effect):
1. From the Layers tab, select a layer to which outlines will be applied.
Note that all objects (Shapes, Text, or lines) on the layer will be
affected.
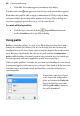
2. Click the
Layer Effects button on the Layers tab and check
Outline in the Layer Effects dialog.
3. (Optional) From the Blend Mode drop-down menu, pick a blend
mode, which controls how the outline color and underlying pixels
blend to make a combined resulting color. Select the percentage
Opacity for the outline when blending.
4. Choose a Width for the outline, and whether the outline Alignment is
"Outside" or "Inside" the object's edge (or placed in the "Center").
5. To set a fill for your outline, pick from the Fill type drop-down menu,
one of: Solid, Linear, Radial, Conical, Square, Contour, or Pattern.
Choosing Solid will display a color swatch which, when clicked, shows
the Adjust Color dialog. For other fills, click the gradient fill swatch
and apply/edit your gradient fill accordingly (see Editing a gradient fill
in PhotoPlus help for details). Pattern fills can be applied via a
clickable Pattern swatch (see Using patterns on p. 78 for details).