
User guide

Working with Text 143
• For an individual column or row, click its header's button,
choosing Autofit Row to Contents or Autofit Column to Contents,
respectively.
• To delete multiple rows or columns, select them (or cell text), then
choose Delete from the Table menu, then either Row(s) or Column(s)
from the submenu. For an individual column or row, click the header's
button and choose Delete.
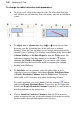
• To insert/remove columns in an existing table, click and drag
left/right on the header after the end of the last table column; columns
are added or removed as you drag. For insertion of rows, drag
up/down on the header at the end of the last row.
Alternatively, select one or more cells, then choose Insert from the
Table menu (Table>Insert from the right-click menu), then either
Rows... or Columns... from the submenu. In the dialog, specify how
many to add, and whether to add them before or after the selected
cells.
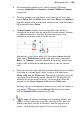
• To merge cells into larger cells that span more than one row or column
(for example, a column head), select a range of cells and choose
Merge Cells from the Table menu. The merged cell displays only the
text originally visible in the top left selected cell. The original cells
and their text are preserved, however—to restore them, select the
merged cell and choose Separate Cells from the Table menu.
To merge all cells in an individual column or row, click the column or
row header's
button, choosing Merge Cells. Do the equivalent
with the Separate Cells command to split cells.
• To copy cell contents (including text, formatting, borders, and
colours) to a new cell in the same table, select the cell(s), press the
Ctrl key and hover over the cell border(s) until the copy cursor is
shown—click and drag the copied cell to its new cell location.