
User guide


82 Working with Objects
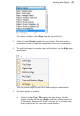
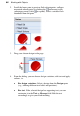
• Select an Alignment setting to fit the border to the Outside,
Inside, or Middle of the object's bounding box.
• If Behind contents is checked, the inner half of the border
extends behind the object. If unchecked, the whole border
appears in front (the wider the border, the more it encroaches on
the filled region).
• If Scale with object is checked, both border and object change
together when you resize the object. If unchecked, the border
weight remains constant during resizing.
• If Draw centre is unchecked (the default), the inside areas of a
framed picture (used to create your new border) will be left
empty, so you won't need to manually remove unwanted image
centres. When checked, the area inside a populated custom frame
is repeated.
6. Click OK when you're done.
Use the
button to base your borders on your own bordered
picture design.
Once you've optimized the design of your new border, you might like to save it
for future use. The border is stored globally so you can make use of it in other
publications.
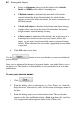
To save your custom border:
1. Click
.
2. From the dialog, select a subcategory (e.g. Fun, Fabric, etc.) from the
drop-down list; alternatively, enter a new custom subcategory name in
the box.
3. From the dialog, enter your custom border name. The new border
appears in the Line and Border dialog's Style drop-down list (and also
as a categorized bordered picture frame in the Gallery tab).