PagePlus X7 ® Quick Start Guide Simple steps for creating great-looking publications.
In this guide, we will refer to specific tools, toolbars, tabs, or menus. Use this visual reference to help locate them on the PagePlus workspace.
This Quick Start Guide will walk you through the key stages in getting started with page design in PagePlus, creating a brochure and business card along the way, and explain how to publish your finished project. To install PagePlus X7, insert the PagePlus X7 program disc into your disc drive. The AutoRun feature automatically starts the setup process. Simply answer the on-screen questions to install the program.
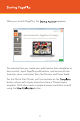
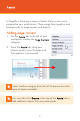
When you launch PagePlus, the appears. The assistant lets you create new publications from templates or from scratch, open PagePlus publications, and access articles (tutorials, news, and more) from Serif's Learn and News feeds. For this Quick Start Guide, we'll concentrate on the button, where we'll create a brochure from a Theme Layout template. We'll also create a simple business card from scratch using the button.
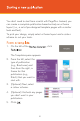
You don't need to start from scratch with PagePlus. Instead, you can create a complete publication based entirely on a theme layout (i.e., a set of pre-designed template pages with a similar look and feel). To pick your design, simply select a theme layout and a colour scheme to suit your taste. 1. On the left of the . , click The Templates pane appears. 2. From the left, select the type of publication (e.g., Brochures) and then from the right, a theme for that publication (e.g.
The first time you create a publication from a design template, you may be prompted to update your user details (Name, Company, Address, etc). PagePlus will use these details to personalize your publication and then store them for you to use in future publications. 1. In the displayed dialog, enter your user details. This information will be used to populate the contact details on the back page. 2. Click . * Names and addresses are fictitious; for example use only.
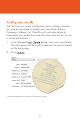
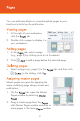
You can add extra blank or unused template pages to your brochure to build up the publication. 1. At the right of your workspace, tab. click the 2. Double-click a page to display it in your workspace. 1. In the tab, select a page (e.g., page 3) by clicking once on its thumbnail. 2. Click Ÿ to add a page before the selected page. Select a page (e.g., page 5) in the . In the dialog, click . Master pages are great for applying the same underlying page design across your publication. 1.
In PagePlus, there are a range of assets that you can use to personalize your publications. These range from graphics and backgrounds, to page content and layouts. 1. On the tab to the left of your workspace, choose the category. tab, drag your 2. From the chosen content onto the page and then position it as required. Select another category from the left to browse the other types of assets available. You can also click at the top of the add additional assets from any asset packs.
With PagePlus templates, you can overwrite placeholder text with your own text to make new publications. 1. On the tab, double-click the first page to display it in your workspace. 2. Double-click on the main heading. 3. Type your text. 1. Navigate to page 2 and then triple-click on a text frame to select a paragraph. You can replace this placeholder text with your own text. 2. Type your text. For further editing, click to set an insertion point to begin typing.
Add your own pictures to your publication via the 1. On the category. 2. Click tab. tab, select the at the bottom of the category. 3. Navigate to, then select your pictures (try -click to select multiple pictures), and click . The pictures are added to the tab category. 4. Drag your chosen picture onto the page. 5. Resize and/or rotate your picture using the corner or rotate handles, respectively. You can add stylish effects to your pictures from the tab 1.
3. Adjust the effect by moving the sliders. Add more effects via of the tab. at the top right Your brochure is based on a themed layout so empty picture frames (shown as envelope placeholders) can be filled with your pictures. tab's Ÿ Drag from the category onto an empty picture frame. 1. Above your selected picture, on the context toolbar, click 2. In the studio, use the circular cursor to paint over areas you would like to be discarded from your picture. 3.
You can also create new publications from scratch which gives you more design freedom. 1. On the left of the Startup Assistant, . click The pane appears. 2. Scroll down the pane and select a publication type (e.g., Small Publications Business Cards) and a page orientation that you want to start with (e.g., Wide Business Cards). The blank page is displayed in the workspace. You can add food-related “clipart” to start your business card design. 1. From the tab, click . 2.
4. From the category on the chosen graphic onto the page. tab, drag your 5. Repeat for other graphics. To add backgrounds, pictures or other assets to your publication, simply choose a category from the left of the . No business card would be complete without contact details. If you entered your user details when creating the brochure, you can insert these now. This saves you typing them twice and allows you to add your full contact details to any publication in just a few clicks. 1.
5. Repeat this process to add the remaining user details. You can then format them to match your design as required. If you haven't already entered your user details, you can do this by clicking on the Page context toolbar. Arguably, the most important information on your business card is your company's name. Therefore, it's important to make this eye-catching and easy to read. 1. Select the left. from the toolbar on the 2. Click on your page where you want the text to start. 3.
Key point! Up to now you’ve been working on a PagePlus project (.ppp file). To share your finished publication, you’ll need to publish it as a screen-ready PDF (for web/electronic distribution) or hi-res PDF (for printing). 1. Click on the Print / PDF Preview window is displayed. toolbar. The 2. You may be prompted to change your printer's sheet orientation to match that of the brochure (i.e., Landscape). . Click 3. Select your page. from the toolbar above 4. Within Print / PDF Preview, click toolbar.
: Store. ● A voucher for you to spend in the Serif ● Inclusion in future promotions and discount offers. To register PagePlus, run the software and, when prompted by the registration screen, follow the on-screen instructions. To manually start registration, click Help > Registration Wizard from within the software. Visit community.serif.com to have your questions answered by the Serif community. Serif Support Visit www.serif.com/support for Serif Account and Customer Service information.