PRODUCT GUIDE & ASSEMBLY INSTRUCTIONS Rolled Arm Sofa So comfortable, you’ll feel the difference the moment you sit down.
Should you prefer to speak with a customer service representative, you may call toll free: 1-855-372-2315 2
Guidelines FAILURE TO FOLLOW THESE WARNINGS WHEN IN USE COULD RESULT IN INJURY • Do not stand on the item or use as a step ladder • Do not use this item unless all bolts and screws are firmly secured and fastened. • Check all bolts and screws every 90 days. As necessary tighten if any are loose. • Lift up then move. Pushing over or dragging this product can result in an injury or cause damage to the floor and piece.
WARNING: DO NOT LET CHILDREN PLAY IN OR AROUND THE UNIT DUE TO THE POSSIBLE RISK OF INJURY. Pre-Assembly Preparation: Please read through this instruction booklet before beginning assembly of this item. Two adults are recommended for assembly. • Clear out the space for assembly and lay out all parts on Parts List, extra room will allow you to easily determine if all the pieces are present. • Save all packing materials until assembly is complete to avoid accidentally discarding smaller parts or hardware.
Parts List 1 Arm and Seat Frame with “L” Label (1) 2 Arm and Seat Frame with “R” Label (1) 3 Back Frame with “L” Label (1) 4 Back Frame with “R” Label (1) 5 Seat Cushions (Left & Right) (2) 6 Seat Covers (Left & Right) (2) 7 Back Cushions (Left & Right) (2) 8 Back Covers (Left & Right) (2) 5
Parts List 6 A Thumb Bolts (5) 5/16*60mm B Side Legs (4) D Flat Washers (4) E T-Nuts (2) C MIddle Legs (2)
Step 1 Remove all parts from the carton and place them on a protected surface or carpet. Place the Arm and Seat Frames (1 & 2) upside down and open the bottom flap. Take the Back Cushions (7), Side Legs (B), Middle Legs (C), Flat Washers (D), T-Nuts (E), Back Frames (3 & 4) and Thumb Bolts (A) out of the seat box.
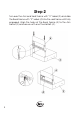
Step 2 Turn over the Arm and Seat Frame with “R” Label (2) and slide the Back Frame with “R” Label (4) into the seat frame until fully engaged. Align the holes of the Back Frame (4) to the Arm Frame (2) and secure with one Thumb Bolt (A).
Step 3 Turn over the Arm and Seat Frame with “L” Label (1) and slide the Back Frame with “L” Label (3) into the seat frame until fully engaged. Align the holes of the Back Frame (3) to the Arm Frame (1) and secure with one Thumb Bolt (A).
Step 4 Move the two assembled parts together. Align the holes of Seat Frames (1 & 2) and Back Frames (3 & 4) to the other side and secure with one Thumb Bolt (A) to the back frames. Thumb Bolts (A), Flat Washers (D) and T-Nuts (E). Ensure all Thumb Bolts (A) are completely tightened.
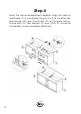
Step 5 Secure the bottom and back flaps with hook and loop tape. Remove the plastic caps on the threaded bolts of each leg. Attach the Side Legs (B) to the corners of the sofa. Then screw the middle legs(C)in the frame as the sketch shown.
Step 6 Open the vacuum packed Seat Cushions (5) by carefully cutting the bags with a pair of scissors. Insert the Back Cushions (7) into the appropriate Back Covers (8). Insert the Seat Cushions (5) into the appropriate Seat Covers (6). Remember to keep the top side of the Seat Cushions (5) with the top side of the Seat Covers (6). Fluff all cushions to allow them to expand. Lastly, position all cushions on the sofa.
Limited Warranty The manufacturers products are warrantied against defects in material and workmanship while owned by the “Original Purchaser”. The term “Original Purchaser” is defined as the party or entity which purchases this manufacturer’s furniture from an authorized retailer as shown by the original sales receipt. This warranty does not apply to “as is” or previously owned products.