APRIL 2002 Interconnect LOCAL Brightness Focus Interconnect REMOTE ACU1001A ACU1009A ACU1049A REGULAR-1M5 Customer Support Information: FREE tech support 24 hours a day, 7 days a week: Call 724-746-5500 or fax 724-746-0746. Mailing address: Black Box Corporation, 1000 Park Dr., Lawrence, PA 15055-1018 World-Wide Web: www.blackbox.com • E-mail: info@blackbox.com © Copyright 2002. Black Box Corporation. All rights reserved.
THE SERVSWITCH™ FAMILY Welcome to the ServSwitch Family! ™ Thank you for purchasing a BLACK BOX® ServSwitch™ Brand CAT5 KVM Extender model! We appreciate your business, and we think you’ll appreciate the many ways that your enhanced keyboard/video/mouse system will save you money, time, and effort. That’s because our ServSwitch family is all about breaking away from the traditional, expensive model of computer management.
SERVSWITCH™ BRAND CAT5 KVM EXTENDER TRADEMARKS USED IN THIS MANUAL BLACK BOX and the logo are registered trademarks, and ServSwitch, Matrix ServSwitch, ServSwitch Affinity, ServSwitch Duo, ServSwitch Multi, ServSwitch Ultra, ServSwitch Wizard, ServSwitch Wizard Pro, ServManager, ServSelect, and ServShare are trademarks, of Black Box Corporation. Apple and Macintosh are registered trademarks of Apple Computer, Inc. AT&T is a registered trademark of AT&T.
FCC/IC STATEMENTS FEDERAL COMMUNICATIONS COMMISSION AND INDUSTRY CANADA RADIO-FREQUENCY INTERFERENCE STATEMENTS This equipment generates, uses, and can radiate radio-frequency energy, and if not installed and used properly, that is, in strict accordance with the manufacturer’s instructions, may cause interference to radio communication.
SERVSWITCH™ BRAND CAT5 KVM EXTENDER EUROPEAN UNION DECLARATION OF CONFORMITY WARNING! This is a class A product. In a domestic environment, this product might cause radio interference, in which case the user might be required to take adequate remedial measures.
NOM STATEMENT NORMAS OFICIALES MEXICANAS (NOM) ELECTRICAL SAFETY STATEMENT INSTRUCCIONES DE SEGURIDAD 1. Todas las instrucciones de seguridad y operación deberán ser leídas antes de que el aparato eléctrico sea operado. 2. Las instrucciones de seguridad y operación deberán ser guardadas para referencia futura. 3. Todas las advertencias en el aparato eléctrico y en sus instrucciones de operación deben ser respetadas. 4. Todas las instrucciones de operación y uso deben ser seguidas. 5.
SERVSWITCH™ BRAND CAT5 KVM EXTENDER 12. Precaución debe ser tomada de tal manera que la tierra fisica y la polarización del equipo no sea eliminada. 13. Los cables de la fuente de poder deben ser guiados de tal manera que no sean pisados ni pellizcados por objetos colocados sobre o contra ellos, poniendo particular atención a los contactos y receptáculos donde salen del aparato. 14. El equipo eléctrico debe ser limpiado únicamente de acuerdo a las recomendaciones del fabricante. 15.
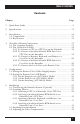
TABLE OF CONTENTS Contents Chapter Page 1. Quick Start Guide ...................................................................................... 9 2. Specifications ........................................................................................... 11 3. Introduction ............................................................................................. 14 3.1 Compatibility ..................................................................................... 15 3.2 Key Features ....
SERVSWITCH™ BRAND CAT5 KVM EXTENDER Contents (continued) Chapter 7. 8. Page Operation ................................................................................................. 7.1 Keyboard and Mouse Emulation ..................................................... 7.2 Normal Operation and Keyboard Typematic Rate ......................... 7.3 Keyboard Commands and Related Functions ................................. 7.3.1 Resetting the Keyboard and Mouse ....................................... 7.3.
CHAPTER 1: Quick Start Guide 1. Quick Start Guide Configuring the Extender Configuring the ServSwitch™ Brand CAT5 KVM Extender involves setting some internal controls. Read the next couple of paragraphs, and if you find that you’ll need to change configuration settings, follow the procedure that’s listed afterward. (If you're not certain which Extender model you’re working with, refer to Chapter 3.
SERVSWITCH™ BRAND CAT5 KVM EXTENDER Installing the Extender To install your Extender system, refer to the illustration below. (A Switching model is shown; the Dual-Access model won’t have the remote CPU, and the Single-Access model won’t have the remote CPU or the local user station.) Take these steps: 1. Use the included three-to-three extension cables to attach the CPU to the Local Unit. 2. Dual-Access and Switching models: Plug the local keyboard, monitor, and mouse directly into the Local Unit. 3.
CHAPTER 2: Specifications 2.
SERVSWITCH™ BRAND CAT5 KVM EXTENDER Video Coupling: Maximum Distance: DC 5 m (16 ft.) from the Local Unit to the attached CPU or KVM-switch user port; 5 m (16 ft.) from the Remote Unit to the attached monitor, keyboard, and mouse or KVM-switch CPU port; 300 m (1000 ft.) between Local and Remote Units; ACU1009A only: 5 m (16 ft.) from the Local Unit to the attached keyboard and mouse or KVM-switch CPU port; 30 m (100 ft.) to the attached monitor; ACU1049A only: 5 m (16 ft.
CHAPTER 2: Specifications Connectors (continued): On Remote Unit: (1) Front-mounted RJ-45 female for local/remote interconnection; Rear-mounted: (2) 6-pin mini-DIN female for input from keyboard and mouse; (1) 2.
SERVSWITCH™ BRAND CAT5 KVM EXTENDER 3. Introduction By using the Local and Remote Units that together make up the ServSwitch™ Brand CAT5 KVM Extender, you can place your VGA monitor, keyboard, and mouse as far as 300 meters (1000 ft.) from a PC CPU. The Local and Remote Units are interconnected with a single industry-standard Category 5 UTP or STP 4-pair cable. All keyboard, mouse, and video signals are fully buffered to ensure consistent remote operation of your PC.
CHAPTER 3: Introduction 3.1 Compatibility The Extender is designed to operate in various environments and with a mix of hardware from different manufacturers. During development, this product was extensively tested with a wide variety of hardware.
SERVSWITCH™ BRAND CAT5 KVM EXTENDER 3.2 Key Features The Extender has a number of useful features which contribute to the transparent remote operation of your PC. Some of the more important ones are: • Distance up to 300 m (1000 ft.) Operate your PC from almost anywhere in the same building. • Fully adjustable video equalization Compensates for the loss of image quality caused by the signal passing through such a long run of cable.
CHAPTER 4: Checklist of System Components 4. Checklist of System Components 4.1 The Complete Package These items should be included with your ServSwitch™ Brand CAT5 KVM Extender package. Please contact Black Box if any are missing or damaged. • (1) Extender Local Unit. • (1) Extender Remote Unit. • (1) 9-VDC 1-amp power-supply transformer and output cord. • (1) Power-supply input cord suitable for your country or region. • (1) Copy of this manual.
SERVSWITCH™ BRAND CAT5 KVM EXTENDER 4.2 The Cables You’ll Need If you are using the Extender to get greater distance between a CPU and a VGA monitor, PS/2 keyboard, and PS/2 mouse, your Extender package should have included everything you’ll need except for your CAT5 cable, which you’ll have to order separately. Read Sections 4.2.1, 4.2.3, and 4.2.5 carefully, then proceed with Chapter 5.
CHAPTER 4: Checklist of System Components 4.2.2.A Switches Whose User Ports Are a Set of Separate Interfaces The user ports of some ServSwitch family KVM switches are a set of separate interfaces: Each user port consists of separate interfaces/connectors for video, keyboard, and mouse communication. At the time of this writing, some of the important ServSwitch family models in this category are: • ServSwitch™ Duo • ServSwitch™ Wizard, Wizard LP, Wizard Pro • ServSwitch™ Jr.
SERVSWITCH™ BRAND CAT5 KVM EXTENDER 4.2.3 TO CONNECT A MONITOR, KEYBOARD, AND MOUSE TO A USER PORT ON THE EXTENDER You can plug the monitor, keyboard, and mouse directly into the user port on these Units. 4.2.4 TO CONNECT A SERVSWITCH FAMILY KVM SWITCH TO A USER PORT ON THE EXTENDER You would do this to extend the distance you can run from the KVM switch to a CPU.
CHAPTER 4: Checklist of System Components 4.2.4.B Switches with Regular ServSwitch Style DB25 Composite CPU Ports The CPU ports of the regular ServSwitch and several other ServSwitch family KVM switches are specially pinned DB25 connectors that function as composite (all-inone) interfaces. At the time of this writing, some of the other important ServSwitch family models in this category are: • ServSwitch Ultra • Matrix ServSwitch • ServSwitch Affinity • ServSwitch Jr.
SERVSWITCH™ BRAND CAT5 KVM EXTENDER 4.2.5 TO CONNECT THE LOCAL UNIT TO THE REMOTE UNIT To interconnect the Extender’s Local and Remote Units, you’ll need industrystandard structured cabling (Category 5 UTP or STP, 4-pair) terminated with RJ-45 plugs. This cable is not included with the Extender. Order CAT5 patch cables such as our product code EYN737MS or CAT5 bulk cable such as our EYN840A. The bulk cable should be terminated with high-quality RJ-45 plugs such as those included in our FM732 25-pack.
CHAPTER 5: Configuration 5. Configuration The configuration controls for the ServSwitch Brand CAT5 KVM Extender are internal, but should only need to be set once. To get at them, first open the Unit by unscrewing the four screws on its case and lifting off the top half of the case. When you’ve finished setting them, close the Unit by replacing the top half of the case and screwing the screws back in.
SERVSWITCH™ BRAND CAT5 KVM EXTENDER If you are conducting a same-room test prior to your final installation, as we recommend—see Section 6.1—set the jumpers as appropriate for the length of the test cable first; then, if the Units pass the test, reset the jumpers for your actual installation length. MOUSE POWER KEYBOARD CPU (ACU1049A only) MONITOR ON 1234 Cable-Length Jumpers DIP-Switch SW1 JP3 JP4 JP5 INTERCONNECT BRIGHT- FOCUS NESS For cable lengths of 0 to 100 m (0 to 330 ft.
CHAPTER 5: Configuration 5.2 Setting the Remote Unit’s DIP Switch You’ll also find a four-position DIP switch labeled SW1 on the circuit board inside the Extender’s Remote Unit. The functions of this DIP switch are different for each Extender model. (For directions on opening and closing the Remote Unit’s case, including the static-electricity precautions you should take, see the start of Chapter 5.) 5.2.
SERVSWITCH™ BRAND CAT5 KVM EXTENDER • Position 4: When position 4 (the bottom one, or the rightmost one if you hold the Remote Unit by its left end) is in its factory-default ON setting, the Extender resets the keyboard and mouse (see Section 7.3.1) when you press Scroll Lock. But if you need the Scroll Lock key for some other function, you can force the Extender to pass Scroll Lock through to the PC (disabling the reset function) by setting position 4 to OFF.
CHAPTER 6: Installation 6. Installation To install your ServSwitch™ Brand CAT5 KVM Extender, first test-place it (if you want to) as described in Section 6.1, attach devices as described in Section 6.2, then finish your installation as described in Section 6.3. Finally, adjust the video compensation as described in Section 6.4. 6.
SERVSWITCH™ BRAND CAT5 KVM EXTENDER • Dual-Access and Switching Local Units: Remember that the CPU port is labeled “TO CPU” and the user port is labeled “LOCAL USER.” • Use caution if you plan to run an Extender from one KVM switch to another: Different ServSwitch family KVM-switch models use different proprietary signaling between cascaded switches.
CHAPTER 6: Installation 6.2.1 ATTACHING A CPU TO AN EXTENDER UNIT’S CPU PORT Run the included extension cabling from the PC’s video, keyboard, and mouse ports to the matching connectors of the Extender Unit’s CPU port. Figure 6-1 shows a connection to a Local Unit; Figure 6-2 shows a connection to a Switching Remote Unit with its three-to-one CPU cable. Local Unit Mouse cable or strand CPU Keyboard cable or strand KVM-extension cabling, included with all models Video cable or strand Figure 6-1.
SERVSWITCH™ BRAND CAT5 KVM EXTENDER 6.2.2 ATTACHING A SERVSWITCH FAMILY KVM SWITCH TO AN EXTENDER UNIT’S CPU PORT The way you’ll do this will depend on what kind of user ports the KVM switch has: multiple connectors (see Section 6.2.2.A) or single connectors (see Section 6.2.2.B). (Refer to the listings in Section 4.2.2 for which ServSwitch family models are in which category.) 6.2.2.
CHAPTER 6: Installation 6.2.2.B Attaching a Switch with a Single Composite User-Port Connector If you’re attaching a switch with DB25 user ports to a Switching Remote Unit’s CPU port, run a ServSwitch to ServSwitch Expansion Cable (EHN284) from the Remote Unit’s CPU port to the switch’s user port. Regular ServSwitch (KV3108SA-R4) ServSwitch to ServSwitch Expansion Cable (EHN284) Switching Remote Unit Figure 6-5.
SERVSWITCH™ BRAND CAT5 KVM EXTENDER ServSwitch Multi EXP (KV160A-R2) User cable KV2505 (plugs into User Card) Local Unit KVM-extension cabling, included with all models Figure 6-7. Attaching a ServSwitch Multi to the Local Unit’s CPU port (Single-Access model shown). ServSwitch Multi EXP (KV160A-R2) User cable KV2505 (plugs into User Card) CPU cable, included with Switching Extender Switching Remote Unit Figure 6-8. Attaching a ServSwitch Multi to the Switching Remote Unit’s CPU port.
CHAPTER 6: Installation 6.2.3 ATTACHING A MONITOR, KEYBOARD, AND MOUSE TO AN EXTENDER UNIT’S USER PORT Plug the monitor, keyboard, and mouse directly into the matching connectors in the Extender Unit’s user port. Figure 6-9. Attaching a monitor, keyboard, and mouse to the user port on an Extender Unit (Dual-Access Local Unit shown).
SERVSWITCH™ BRAND CAT5 KVM EXTENDER 6.2.4 ATTACHING A SERVSWITCH FAMILY KVM SWITCH TO AN EXTENDER UNIT’S USER PORT The way you’ll do this will depend on whether the switch’s CPU ports are multiple connectors (see Section 6.2.4.A) or single connectors (see Section 6.2.4.B). (Refer to the listings in Section 4.2.4 for which switch models are in which category.) 6.2.4.A Attaching a Switch with Multiple CPU-Port Connectors Attach one end of the included extension cabling (or equivalent cabling—see Section 4.2.
CHAPTER 6: Installation 6.2.4.B Attaching a Switch with Single Composite CPU-Port Connectors Run a CPU cable designed for the KVM switch—refer to Sections 4.2.4.B and 4.2.4.C for product codes—from one of the switch’s CPU ports to the user-port connectors on the Extender Unit, as shown in Figure 6-11. Regular ServSwitch (KV3108SA-R4) ServSwitch CPU Cable (EHN051B) ServSwitch Multi EXP (KV160A-R2) ServSwitch Multi CPU Cable (KV2020-R2) Figure 6-11.
SERVSWITCH™ BRAND CAT5 KVM EXTENDER 6.3 Finishing Your Installation To finish installing an Extender after attaching devices to it as described in Section 6.2, take these steps: 1. Interconnect the Local and Remote Units by running CAT5 cable between their front-panel modular “Interconnect” jacks. Refer to the guidelines for this cable in Section 4.2.5.
CHAPTER 6: Installation 5. Power ON the monitor or KVM switch attached to the Remote Unit’s user port. Dual-Access systems: Power ON any monitor or switch attached to the Local Unit’s user ports. 6. Make sure that the remote keyboard functions and that you’re getting video at the remote site.
SERVSWITCH™ BRAND CAT5 KVM EXTENDER CAT5 interconnect cable Local Unit Remote Unit Extension cabling (included) Power supply Remote monitor, keyboard, and mouse PC CPU Figure 6-13. A Single-Access Extender-system installation, rear view. CAT5 interconnect cable Remote Unit Local Unit Power supply Remote monitor, keyboard, and mouse Extension cabling (included) PC CPU Local monitor, keyboard, and mouse Figure 6-14. A Dual-Access Extender-system installation, rear view.
CHAPTER 6: Installation 6.4 Adjusting the Video Compensation You should only need to take the steps in this section if the interconnect cable between your Local and Remote Units is longer than 25 m (80 ft.). If it isn’t that long, but the video at the remote site still looks awful, first try adjusting the Remote Unit’s Brightness and Focus dials. If the video looks bad no matter how you set these dials, the problem is almost certainly being caused by bad wiring in your interconnect cable.
SERVSWITCH™ BRAND CAT5 KVM EXTENDER 7. Operation 7.1 Keyboard and Mouse Emulation The ServSwitch™ Brand CAT5 KVM Extender uses a microprocessor to emulate the presence of a directly connected keyboard and mouse for any attached PC. This means that you don’t have to connect a keyboard or mouse to the PC in order for it to boot; in fact, the PC will boot with only an Extender Unit connected.
CHAPTER 7: Operation 7.3 Keyboard Commands and Related Functions This section describes Extender functions that can be controlled with commands that users can type in at the user-station keyboards, as well as some related functions.
SERVSWITCH™ BRAND CAT5 KVM EXTENDER 7.3.2 CORRECTING THE PS/2 MOUSE IF IT GETS OUT OF SYNC On rare occasions, you might notice that, instead of behaving normally, your mouse pointer is moving and jumping erratically all over the screen (and possibly selecting things at random). This is usually a sign that the PS/2 mouse has gotten “out of sync” with the Extender or that the Extender has gotten out of sync with the CPU’s PS/2 mouse port. PS/2 mice send mouse data in 3- or 4-byte packets.
CHAPTER 7: Operation recommend that you install a Microsoft IntelliMouse driver on your PC, regardless of whether you’re actually using an IntelliMouse or not. The Extender will translate the mouse signals for this driver, and the driver will auto-correct the synching problem if you let go of the mouse for a second or two. 7.3.
SERVSWITCH™ BRAND CAT5 KVM EXTENDER 7.3.4 PRIVATE MODE (DUAL-ACCESS AND SWITCHING EXTENDERS ONLY) CAUTION! Do not use private mode if you have a Switching (ACU1049A) Remote Unit attached to a Single-Access (ACU1001A) or Dual-Access (ACU1009A) Local Unit with firmware version lower than S5.0. See the first Caution notice in Section 6.3.
CHAPTER 7: Operation will remain in effect: The local user will still not have access to the local PC, and the remote keyboard’s Scroll Lock LED will resume flashing as soon as the remote user selects the local PC again. To exit Private Mode, the remote user must select the local PC, press and release the hotkey, then press and release Scroll Lock.
SERVSWITCH™ BRAND CAT5 KVM EXTENDER 8. Troubleshooting 8.1 Common Problems This section discusses difficulties that people sometimes have with the ServSwitch™ Brand CAT5 KVM Extender, and suggests possible remedies. If the recommended actions don’t help, if you don’t see your problem here, or if your problem keeps recurring, call Black Box Technical Support as directed in Section 8.3. 8.1.1 KEYBOARD The PC boots correctly with no error messages, but the keyboard does not work at all. 1.
CHAPTER 8: Troubleshooting When I don’t use a keyboard, the Extender doesn’t work at all. See Section 8.1.5. 8.1.2 MOUSE There is a mouse cursor on the screen, but the mouse does not work. 1. Reset the mouse as described in Section 7.3.1. 2.
SERVSWITCH™ BRAND CAT5 KVM EXTENDER The mouse is behaving erratically. 1. Reset the mouse as described in Section 7.3.1. 2. Issue the Null Mouse Command up to three times (see Section 7.3.2). 3. If your PC is running Windows 95/98/2000, Windows Me, Windows NT, or Windows XP, regardless of what type of mouse you have, install the latest Microsoft driver for a standard mouse or (even if you have a standard mouse) the IntelliMouse.
CHAPTER 8: Troubleshooting 8.1.4 VIDEO The picture is not sharp, or is badly smeared. 1. The video compensation might not be set correctly. See Section 6.4. 2. Check the interconnect cable between the Extender’s Local and Remote Units. Is it solid-core cable, rated as Category 5? (It might be possible to use CAT5e at distances up to 120 m [400 ft.], but video will degrade if it’s run across lengths of CAT5e greater than that.
SERVSWITCH™ BRAND CAT5 KVM EXTENDER I only need video—not keyboard or mouse control—but I can’t get a picture. Even if you are only using the Extender for video extension—to drive video to a remote monitor—the Extender’s Local Unit must still be attached to the keyboard port of a PC or KVM switch, because that’s where it gets its power.
CHAPTER 8: Troubleshooting 8.1.5 POWER I don’t need to use a keyboard in my application, but the Extender doesn’t work at all unless I have a keyboard line running from the Local Unit to the PC. The Extender’s Local Unit normally operates using the 5 volts of DC power that the attached CPU or KVM switch supplies on its keyboard port.
SERVSWITCH™ BRAND CAT5 KVM EXTENDER 8.2 General Questions About the Extender Is it possible to use an interconnection cable longer than 300 meters (1000 feet)? The Extender has been designed to produce acceptable results with SVGA resolutions at the maximum cable length of 300 m (1000 ft.). Therefore, it might be possible for you to run as far as 500 m (1640 ft.) at the standard VGA resolution, 640 x 480. However, we do not recommend doing this and cannot guarantee that it will work.
CHAPTER 8: Troubleshooting Can the Extender be used with RGB video? As long as the video has sync on green (the composite sync signal superimposed on the green color signal), there should be no problem. Which cable type is better: UTP (unshielded twisted pair) or STP (shielded twisted pair)? In electrically quiet environments, UTP cable will give the best quality video over long distances because it has less capacitance per unit length.
SERVSWITCH™ BRAND CAT5 KVM EXTENDER 8.3 Calling Black Box If you determine that your Extender is malfunctioning, do not attempt to alter or repair it. It contains no user-serviceable parts. Contact Black Box Technical Support at 724-746-5500. Before you do, make a record of the history of the problem.
APPENDIX A: Cable Pinning/Pairing Appendix A: Cable Pinning/Pairing The cable you will use to interconnect the Local and Remote Units of your ServSwitch™ Brand CAT5 KVM Extender should be terminated with RJ-45 plugs and should be wired according to the EIA/TIA-568 standard (preferably 568B rather than 568A). See Section 4.2.5 for a more complete set of cable recommendations.
SERVSWITCH™ BRAND CAT5 KVM EXTENDER Appendix B: Rackmounting If you’d like to mount any of your ServSwitch™ Brand CAT5 KVM Extender system’s Local or Remote Units in a 19" rack, use a two-bracket Rackmount Kit like the one shown here (product code RMK19U). To use a Kit to mount an Extender Unit, take these steps, referring to the illustration below: 1. Unscrew and keep the two screws on each side of the Unit’s case. 2.
APPENDIX C: Keyboard-Command Summary Appendix C: Keyboard-Command Summary Here is a brief list of the keyboard commands you can use to control your ServSwitch™ Brand CAT5 KVM Extender. For detailed descriptions of the commands and the effects they have on the system (including their effects on the keyboard LEDs), refer to Section 7.3.
SERVSWITCH™ BRAND CAT5 KVM EXTENDER DISCLAIMERS While every precaution has been taken in the preparation of this manual, the manufacturer assumes no responsibility for errors or omissions. Neither does the manufacturer assume any liability for damages resulting from the use of the information contained herein. They reserve the right to change the specifications, functions, or circuitry of the product without notice.
NOTES
NOTES
APRIL 2002 Interconnect LOCAL Brightness Focus Interconnect REMOTE ACU1001A ACU1009A ACU1049A REGULAR-1M5 Customer Support Information: FREE tech support 24 hours a day, 7 days a week: Call 724-746-5500 or fax 724-746-0746. Mailing address: Black Box Corporation, 1000 Park Dr., Lawrence, PA 15055-1018 World-Wide Web: www.blackbox.com • E-mail: info@blackbox.com © Copyright 2002. Black Box Corporation. All rights reserved.