Core Service Quick Start Guide Last change: 15.05.
Core Service Quick Start Guide 1 Electronic Shelf Labeling – A brief introduction 2 Label Family Introduction 2.1 General Key Features 4 5 5 2.2 The G1 label family 5 2.3 The VUSION label family 3 Get the latest software and documentation 3.1 Install software 6 7 7 3.2 System requirements 7 3.3 Installation process 7 3.4 SES-imagotag Customer and Partner Portal 4 Core Appliance 4.1 Why is it needed in the Store? 8 9 9 4.2 Key Features 5 Core Appliance initial setup 5.
Core Service Quick Start Guide 11.2 Sending pictures to labels 27 11.3 Article management 27 11.4 Matchings/Multi-Facing 28 11.5 Set (extended) filters for enums 29 11.5.1 Extended filter operators 12 Templates 12.1 General information about templates 12.2 SES-imagotag Template Editor 29 31 31 31 12.2.1 Starting SES-imagotag Template Editor 31 12.2.2 Open default template file and load records from server: 32 12.2.3 Design Mode 33 12.2.4 Enable and show color red 34 12.2.
Core Service Quick Start Guide 1 Electronic Shelf Labeling – A brief introduction An electronic shelf label is a device that shows article data and price information on its display. In comparison to printed labels the information is automatically updated if price or article data changes.
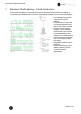
Core Service Quick Start Guide 2 Label Family Introduction The SES-imagotag electronic shelf label family offers high-quality display options, operating with a replaceable battery, thus working without any external power supply. The performance of the labels (updates per hour) depends on the mode of the access point. In the USA and Canada the AP-2010 usa/canada bundle incl. antenna with limited data efficiency is required (based on the FCC/IC regulation). 2.
Core Service Quick Start Guide content a service utility is required. To prevent accidentials overwrite this page is protected. To unlock this page contact the SES-imagotag support team. The content of all pages except page number 0 won't remain after a firmware update. 2.3 The VUSION label family The SES-imagotag VUSION (2.4GHz) electronic shelf label family is capable of changing all pixels to black, white or red. The current line-up has display sizes from 1.6 inch to 12.2 inch.
Core Service Quick Start Guide 3 Get the latest software and documentation Register at the SES-imagotag Customer and Partner Portal to get access to the latest software and documentation. https://portal.imagotag.com 3.1 Install software There’s several software you’ll have to install in order to configure and setup your ESL system. You’ll just have to extract the following 3 archives in a location of your choice: 1. SES-imagotag Core Service 2. SES-imagotag Control Center 3.
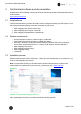
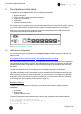
Core Service Quick Start Guide FIGURE 1-3: Unpacked imagotag software folder The SES-imagotag Core Service is now installed and you can step forward to point see Start SESimagotag Core Service and SES-imagotag Control Center on page 12. 3.4 SES-imagotag Customer and Partner Portal After user registration and activation you will have access to documentation.
Core Service Quick Start Guide 4 Core Appliance The Core Appliance is a compact network device which can be used to run the SES-imagotag Core Service in the store, instead of using an additional dedicated server. The SES-imagotag Core Service is always needed in the store locally, also when cloud-based/centralized middleware systems like Jeegy S3 Centralized/Jeegy Cloud or Bison ESL Manager is used. 4.1 Why is it needed in the Store? l l l l 4.
Core Service Quick Start Guide 5 Core Appliance initial setup To operate the Core Appliance there are only a few steps necessary: 1. 2. 3. 4. 5. Supply with power Turn it on (button on the backside of the device) Plug it into your network Initial setup Update to the latest version Per default, the Core Appliance comes with DHCP enabled. So if you have a DHCP service running you can find it with the MAC address which is printed on the bottom side of the Core Appliance.
Core Service Quick Start Guide # Set a nameserver set dns 192.168.1.21 Note: This simple bridge configuration connects the network interfaces. No matter where the network cable is plugged in, the appliance is accessible via the configured bridge address. 5.2 Front side LED description On the front side of the appliance you can see several status information: Core Appliance front view LED status information (Core Appliance version 1.8.
Core Service Quick Start Guide 6 Start SES-imagotag Core Service and SES-imagotag Control Center 6.1 Starting SES-imagotag Core Service If you've recently configured yourCore Appliance the SES-imagotag Core Service software is already running and you can step forward to the next step. In order to start the SES-imagotag Core Service with the default configuration, just execute the jar file “server.
Core Service Quick Start Guide 6.2 Starting SES-imagotag Control Center Go to the extracted directory and execute the “client.jar” file. FIGURE 1-6: Starting SES-imagotag Control Center The SES-imagotag Control Centeris configured to connect to a server on the local machine per default.
Core Service Quick Start Guide FIGURE 1-8: SES-imagotag Control Center Login 6.3 Activating your license After starting the SES-imagotag Core Service and SES-imagotag Control Center it's necessary to activate the license key which is included in the "Software License Document". To view your current license status there's a License status dialog. You can find it in the SES-imagotag Control Center under "Help - License status".
Core Service Quick Start Guide FIGURE 1-10: Activate License (SES-imagotag Customer and Partner Portal) Download the generated license file and complete the licensing process by importing the license file to your ESL system. With the successful activation of your license you're now able to register labels and add ESL access points. FIGURE 1-11: Import of license file downloaded before Note: Press "F5" (after 15 seconds) to update the license status after license file import.
Core Service Quick Start Guide 7 ESL Access Point Configuration The ESL access points are the communication center in the store that transmits information to the labels. In order to ensure the communication between SES-imagotag Core Service, ESL access point(s) and the labels the access points have to be configured at the start of the SES-imagotag Core Service. In the Core Service Quick Start Guide you will find the procedure to connect and configure the SESimagotag AP-2010.
Core Service Quick Start Guide FIGURE 1-12: List of discovered ESL access points Now you’re able to configure the AP-2010 access point via AP-2010 web UI under http:// or a right click on the discovered AP –> Open in browser.... In the status overview you get some details about the AP-2010: FIGURE 1-13: AP-2010 Status overview It’s recommended for the demo installation not to use the “Centralized Configuration” feature and configure the AP manually. 7.1.
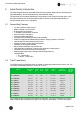
Core Service Quick Start Guide 1. Deactivate Centralized Configuration: Administration -> Configuration Mode 2. Set up network details (or keep DHCP mode): Administration -> Network 3. Set up an ESL channel: Administration -> Wireless Channel The AP-2010 supports 11 ESL channels. It’s recommended to choose one of the recommended channels: 3, 5, 8, 9 or 10. These channels do not interfere with standard Wi-Fi channels 1, 6, 11 and are scanned by the labels more often. 7.1.
Core Service Quick Start Guide Color Note Can take up to 5 minutes, if it takes much longer, Red Boot process the device is defective and there is a need for service.
Core Service Quick Start Guide FIGURE 1-15: SES-imagotag Control Center System - Access Point Configuration - Create configuration Note: It is possible to configure the access point via host name. To get this working there has to be a corresponding entry in the DNS sever.
Core Service Quick Start Guide 8 Selecting channels For a working installation an ESL channel must be selected on each ESL access point in the network. There are 11 non overlapping ESL channels reserved for the communication with the labels. Five of these ESL channels do not interfere with typical Wi-Fi installations and should therefore be favored. These are the ESL channels 3, 5, 8, 9 and 10 and they should be selected if there is a Wi-Fi installation on the Wi-Fi channels 1, 6 and 11.
Core Service Quick Start Guide 9 Setup Security The security concept is based on individual registration codes for each label. Not only that the new concept simplifies installations, it also provides stronger encryption and a secure key exchange with individual communication key derived from a user defined network key. 9.
Core Service Quick Start Guide 10 Register labels In order that labels can join the network it is necessary to register them first. 10.1 General procedure Via the SES-imagotag Control Center under File – Register Labels it’s possible to register your labels manually with the registration code shown on each single label or you could import a CSV file with your registration codes.
Core Service Quick Start Guide 10.2.1 Registration page vs. Reset page Page Layouts G1 4.4 Layout when shipped Registration Page Layout Note: The label ID can only be read and will not be displayed as barcode in this layout. Layout after successful registration Reset Page Layout Note: After successful registration, the AES key is exchanged for encryption and the label switch to a page where only the label ID is displayed as 1D Code128 barcode.
Core Service Quick Start Guide Note: New versions of the SES-imagotag Core Service, SES-imagotag Control Center and AP2010 (≥ 1.3.0) will also support old labels that do not come with a pre-programmed PIN code. New labels (≥ 3.0.0) will also work in old installations together with old labels but the SES-imagotag Core Service will not accept registration codes during the registration process.
Core Service Quick Start Guide FIGURE 1-23: Encryption status 10.5 Unlocking labels If the label was registered and a communication key was set it will no longer work in other networks using a different network key passphrase. To unlock this labels for other networks an unlock code is required. The unlock code is similar to the registration code - it is a combination of the label ID and a 128 bit PUK code. Via SES-imagotag Control Center select File – Unlock labels and enter the unlock key.
Core Service Quick Start Guide 11 Start tagging 11.1 What can I do now? As soon as labels are online you can do several things: Send images to labels, assign tags, show the current images, ping labels, reset labels (reset display to show label ID and label ID barcode), refresh displays, switch to a preloaded page, create a new matching (or multi-matching/multi-facing), set (extended) filters, check update logs, ... 11.2 Sending pictures to labels 1. Right click on one or more labels -> Send image… 2.
Core Service Quick Start Guide 11.4 Matchings/Multi-Facing The logical link between articles and the label that shows the article information and price of this articles is called matching. With a matching the layout of the image rendered for the label is also defined by specifying the name of a template.
Core Service Quick Start Guide It’s also possible to create Matchings with SES-imagotag Control Center under Labels and Articles, for this just select the desired article or label, right-click on it and select “New matching…” (the new matching dialog will be pre-filled with the article or label information). 11.5 Set (extended) filters for enums There are various filter options. Besides the known filter options you'll now have the possibility to set extended filters.
Core Service Quick Start Guide Operator Description < Less than > Greater than <= Less than and equal >= Greater than and equal ! Negation (Not) = Equals : Defines a range (e.g. RSSI filter -65:-75 shows all labels with current RSSI value within -65 and -75) Doesn't apply to date and text.
Core Service Quick Start Guide 12 Templates The template is used to specify the fields, which should be rendered into the image. The SESimagotag Core Service can handle multiple templates. 12.1 General information about templates The image rendering process is based on XSL (EXtensible Stylesheet Language) templates. The individual image for the label is then generated by applying the template to a XML, which is based on the properties of the label and is expanded by a custom XML from the user.
Core Service Quick Start Guide FIGURE 1-31: Starting the SES-imagotag Template Editor 12.2.2 Open default template file and load records from server: l l l Open the SES-imagotag Template Editor by clicking the “template.jar” file located in the template-directory (In our example it should be C:\imagotag\teamplate\). Next step is to create a new template file or to open an existing one (The default.xsl template file is located in the server-directory under C:\imagotag\server\data\template\).
Core Service Quick Start Guide After these steps your SES-imagotag Template Editor window should look something like this: FIGURE 1-33: SES-imagotag Template Editor with loaded records from server and default.xsl template file 12.2.3 Design Mode You can enable the graphical mode of the SES-imagotag Template Editor by selecting Settings – Configuration – tick Enable Design Mode and finally the Save-button. The Design Mode can be used for creating very simple templates.
Core Service Quick Start Guide After enabling the Design Mode a new tab will show up. FIGURE 1-35: SES-imagotag Template Editor Design Tab 12.2.4 Enable and show color red As there are label types which are capable of showing the color "red" there's a short description how to enable this inside the xsl template file.
Core Service Quick Start Guide 13 Integration 13.1 Webservice integration The SES-imagotag Core Service provides access to its interfaces methods through a RESTful web service API. The web service is designed according to the “Representational State Transfer” (REST) architectural pattern. The SES-imagotag Core Service listens for incoming HTTP web service requests on the TCP port 8001 by default.
Core Service Quick Start Guide 14 Troubleshooting If you run into any errors during connecting or sending images to labels, please refer to the documentation included in the SES-imagotag Core Service. This documentation can be found in the AP-2010 web UI of the SES-imagotag Core Service under “Documentation”.
Core Service Quick Start Guide http://:/service/dashboard.xml 14.2 Running the SES-imagotag Core Service as a background service The SES-imagotag Core Service may be started as a normal application, but on a productive system it is usually required to have it automatically started without a user logged in. To achieve this the SESimagotag Core Service can be registered as a Windows service. It is than started automatically without any graphics user interface.
Core Service Quick Start Guide 14.5 Establish a network configuration when no DHCP is available – Step by step 1. Set a laptops Ethernet adapter to DHCP 2. Turn off all other network adapters (Wi-Fi) 3. Connect to the same network as the AP-2010 (use a common Ethernet cable to connect your device directly with the AP-2010) 4. Start local SES-imagotag Core Service on laptop 5. Use the SES-imagotag Control Center to connect to your local SES-imagotag Core Service 6.
Core Service Quick Start Guide l l Is the access point registered to the SES-imagotag Core Service? Reboot the access point 14.8 Labels don’t come online After the registration it could last a certain time until all registered labels are joined to the network (up to two hours, depending on number of access points and the channels used.
Core Service Quick Start Guide l l l l l l l l l l l Right-click on “My Computer” and select “Properties” Click the advanced tab Click the “EnvironmentVariables” button Under “SystemVariables”, click New. Enter the variable name as JAVA_HOME Enter the variable value as the installation directory of your Java Runtime Environment Click OK Look for the Path variable in “SystemVariables” and edit it Append a semicolon (;) and %JAVA_HOME%\bin to it Click OK ApplyChanges Under Linux: l Use the “export” command
Core Service Quick Start Guide l g for gigabyte -Xmx2g The same method can be used to reserve memory for the SES-imagotag Core Service. Detailed information regarding JAVA options: https://docs.oracle.com/cd/E13150_01/jrockit_ jvm/jrockit/jrdocs/refman/optionX.html 14.14 Further documentation Please visit https://portal.imagotag.com for further documentation.
Core Service Quick Start Guide 15 Declaration FCC This device complies with part 15 of the FCC Rules. Operation is subject to the following two conditions: (1) This device may not cause harmful interference, and (2) this device must accept any interference received, including interference that may cause undesired operation. Changes or modifications not expressly approved by the party responsible for compliance could void the authority to operate the equipment.