Bedienungsanleitung 1
Vorwort Willkommen im Zeitalter des digitalen Fernsehens! Herzlichen Glückwunsch, Sie haben einen Qualitäts-Receiver aus dem Hause SetOne erworben. Unsere Produkte unterliegen ständigen strengen Qualitätskontrollen um sicher zu stellen, dass Sie viel Freude mit unseren Produkten haben. Diese Bedienungsanleitung hilft Ihnen beim • bestimmungsgemäßen, sicheren und vorteilhaften Gebrauch des digitalen Satelliten-Receivers, kurz Receiver genannt.
Wichtige Sicherheitshinweise Bitte lesen Sie die Bedienungsanleitung sorgfältig durch und beachten Sie die Sicherheitshinweise, bevor Sie den Receiver in Betrieb nehmen. Bewahren Sie die Bedienungsanleitung auf, um auch zu einem späteren Zeitpunkt etwas nachschlagen zu können. Alle Warnhinweise auf dem Receiver oder in der Bedienungsanleitung sollten unbedingt beachtet werden. Bitte befolgen Sie allen Bedienungshinweisen. Trennen Sie das Gerät vom Netz, bevor Sie es reinigen.
Entsorgung von Elektro- und Elektronik-Geräten Dieses Gerät darf nicht mit normalem Hausmüll entsorgt werden. Bitte wenden Sie sich bei Fragen zur Entsorgung an Ihre kommunalen Entsorgungsbetriebe, das Umweltreferat Ihrer Gemeinde oder an Ihrem Fachhändler, bei dem Sie das Produkt erworben haben. Helfen Sie mit den Verbrauch von Rohstoffen durch Recycling der Geräte zu reduzieren und die Umwelt durch eine fachgerechte Entsorgung zu schützen.
Inhalt INHALT Vorwort ........................................................................ 2 Wichtige Sicherheitshinweise .................................... 3 1. Einführung ........................................................... 7 2. 3. 1.1 1.2 Hauptmerkmale ...................................................... 7 Zubehör .................................................................. 8 2.1 2.2 2.3 Vorderseite ............................................................. 9 Rückseite.....
Inhalt 5.2.7 Softwareupdate via USB .................................. 30 5.2.8 OTA Update ..................................................... 30 5.3 Benutzer Präferenzen........................................... 31 5.3.1 Menüsprache ................................................... 31 5.3.2 Audio Sprache.................................................. 31 5.3.3 Video Ausgang ................................................. 31 5.3.4 Digital Audio .....................................................
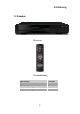
Einführung 1. Einführung 1.1 Hauptmerkmale • • • • • • • • • • • • • • • • • • • • • 64 programmierbare Satelliten 6000 programmierbare Kanäle 2 Common Interface (CI) Einschübe DVB-S/DVB-S2 kompatibel MPEG2 MP@HL, MPEG4 Part10/H.
Einführung 1.
Bedienelemente/Funktionen 2. Bedienelemente / Funktionen 2.
Bedienelemente/Funktionen 2.
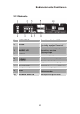
Bedienelemente/Funktionen 2.3 Fernbedienung 1. EIN/AUS ( Receivers ): Ein-/Ausschalten des 2. Stummschaltung ( ): Ein/Ausschalten des Tons 3. V.Format: Umschaltung der Bildschirmauflösung. 4. EPG: Elektronische Programm Zeitschrift. Zeigt Ihnen Programm Informationen zum aktuellen Sender. 5. FAV ( ): Auswahl der Favoritenlisten ): Umschaltung 6. TV/Radio ( zwischen TV oder Radio Betrieb. 7. INFO: Zeigt Informationen zur laufenden Sendung. 8. Ziffern-Tasten (0-9): Tasten zur Direktanwahl von Sendern. 9.
Bedienelemente/Funktionen 18. A/V: Öffnet das Audio/Video Auswahlmenü. 19. (+100), (-100): Seitenweise Blättern / Schaltet 100 Senderplätze höher oder niedriger. 20. (Pause): Hält das TV Bild an, aber lässt den Ton weiterlaufen. 21. A-Z: Sortiert die Sender alphabetisch. 22. F1 (SLEEP): Einstellen des Sleep-Timers. (AUS; 120, 90, 60, 30, 20, 10 min) 23. F2 ( ): Zeigt den Teletext (sofern ausgestrahlt) 24. F3 ( ): Zeigt Untertitel zur aktuellen Sendung. (sofern ausgestrahlt) 25.
Anschluss des Receivers 3. Anschluss des Receivers 3.1 An ein TV Gerät (HDMI / SCART) 1) Verbinden Sie das Antennenkabel mit dem Antenneneingang (IF INPUT). 2) HDMI: Verbinden Sie den Receiver über ein HDMI Kabel mit dem TV-Gerät. Sie benötigen keine weitere Audioverbindung, über HDMI wird der normale Stereoton, als auch der Dolby Digital Ton (Senderabhängig) übertragen.
Anschluss des Receivers 3.2 Über den Komponenten Ausgang 3) Verbinden Sie das Antennenkabel mit den Antenneneingang (IF-INPUT) 4) Verbinden Sie den Komponentenausgang des Receivers mit dem TV-Gerät. Beachten Sie bitte, dass die Farben übereinstimmen. 5) Verbinden Sie die Audio Ausgänge mit Ihrer Stereoanlage. Ansonsten haben Sie keinen Ton.
Anschluss des Receivers 3.3 Über den Video Ausgang 1) Verbinden Sie das Antennenkabel mit dem Antenneneingang. (IF-INPUT) 2) Verbinden Sie den VIDEO Ausgang mit dem TV-Gerät. Hinweis: Über den Video Ausgang bekommen Sie keine gute Bildqualität. 3) Verbinden Sie die Audio Ausgänge mit Ihrer Stereoanlage. Ansonsten haben Sie kein Ton.
Anschluss des Receivers 3.4 An einen Stereo / Dolby Digital Verstärker 1) Verbinden Sie den Receiver über den SPDIF Ausgang mit Ihrem Dolby Digital Verstärker, um den Ton in Dolby Digital genießen zu können. 2) Um den Ton über Ihre Stereo Anlage auszugeben, verbinden Sie die Audio Ausgänge mit dem Line-IN oder AUX Eingang Ihrer Stereo Anlage.
Betrieb 4. 4.1 Betrieb Senderinformationen Jedes Mal wenn Sie den Sender wechseln, werden für ein paar Sekunden Informationen zum aktuellen Sender angezeigt. Folgende Informationen werden Ihnen angezeigt: 1. Aktuelle Zeit. 2. Aktueller Sendername und Programmplatznummer. 3. Symbole für Verschlüsselung, Teletext, Anzahl der Audiospuren, EPG und Kindersperre. 4. Anzeige der Empfangsparameter (Leistung (P) und Qualität (Q)) 5. Name der laufenden Sendung, sowie die Laufzeit.
Betrieb 4.4 Senderliste (TV/Radio) Drücken Sie die „OK“-Taste, um sich die Senderliste anzeigen zu lassen. Innerhalb der Senderliste können Sie mit den / -Tasten und den ⊳/ -Tasten navigieren. Durch Drücken der „OK“-Taste wird der markierte Sender ausgewählt. Verlassen können Sie die Senderliste durch drücken der „EXIT“-Taste oder nochmaliges drücken der „OK“-Taste.
Betrieb Gelb (Sortieren): Durch drücken der gelben Taste können Sie die Senderliste alphabetisch sortieren lassen. Auf die rechte Seite wechseln Sie mit der -Taste. Mit den / -Tasten wählen Sie die jeweilige Funktion aus und aktivieren diese durch drücken der „OK“-Taste. Mit „Normal“ wird die vorherige Sortierung der Senderliste wiederhergestellt. 4.5 Favoritenliste Drücken Sie bitte die „♥“-Taste um eine Favoritenliste auszuwählen.
Betrieb 4.6 Elektronisch Programm Zeitschrift (EPG) Das EPG (Electronic Programm Guide) gibt Ihnen eine Übersicht über die einzelnen Programme eines Senders. Nach dem drücken der „EPG“-Taste, wird Ihnen das EPG-Fenster angezeigt, dieses ist in vier Bereiche eingeteilt. Oben links stehen Informationen zur markierten Sendung. Rechts daneben sehen Sie das laufende Programm in einem kleinen Vorschaufenster. Links unten ist die Senderliste eingeblendet.
Betrieb Um eine Sendung aufzunehmen, drücken Sie bitte die rote Taste. Danach öffnet sich ein TimerFenster mit den richtigen Einstellungen, um diese Sendung aufzunehmen. (siehe Timer auf Seite 27 für nähere Informationen) Eine zur Aufnahme vorgesehene Sendung ist in der Zeitleiste rot markiert. Ein nochmaliges drücken der roten Taste löscht die Markierung und damit auch den Timer. Durch drücken der gelben Taste springen Sie 24 Stunden in der Zeitleiste vor.
Betrieb 4.7 Teletext Der Teletext versorgt Sie rund um die Uhr mit aktuellen Informationen. Er ist aber nur verfügbar, wenn der Sender die entsprechenden Daten ausstrahlt. Erkennbar ist dies am Symbol ( ) in der Informationsleiste. Aufrufen tun Sie den Teletext mit der „F2 ( )“-Taste. Mit den Zifferntasten (0-9) wählen Sie die Seiten direkt an. Über die / -Tasten sowie den / -Tasten erhöhen oder verringern Sie die Seitenzahl um 1. Der Teletext ist ebenso über Ihrem TV-Gerät abrufbar.
Hauptmenü 5. Hauptmenü 5.1 Installation In diesem Menü können Sie die Empfangsparameter Ihrer Satellitenanlage einstellen, sowie die Satellitenfrequenzen bearbeiten oder hinzufügen. Links sehen Sie die Liste der vorprogrammierten Satelliten rechts befinden sich die Einstellungen für den ausgewählten Satelliten. Mit den ⊳/ -Tasten wechseln Sie zwischen den beiden Spalten. 5.1.1 Satelliten Einstellung Mit der roten Taste wird der ausgewählte Satellit nach einer Bestätigung gelöscht.
Hauptmenü Nach drücken der grünen Taste kann ein neuer Transponder hinzugefügt werden. Die Frequenz und Symbolrate werden mit der Zifferntastatur eingegeben. Die anderen Werte werden mit den ⊳/ -Tasten ausgewählt. Durch drücken der gelben Taste wird ein neues Menü geöffnet, wo Sie die PID’s (Packet Identifier) der einzelnen Sender des Transponders ändern können.
Hauptmenü 5.1.4 Sonstige Einstellungen LNB Frequenz: Hier kann mit Hilfe der ⊳/ -Tasten der LNB Typ eingestellt werden. Universal ist in den meisten Fällen richtig. DiSEqC: Sollte der Receiver an einem Multiswitch oder an einem Monoblock LNB betrieben werden, so können Sie hier die entsprechenden DiSEqC Einstellung vornehmen. Netzwerksuche: Wenn die Netzwerksuche aktiviert ist, dann holt sich der Receiver andere Transponderfrequenzen aus den übertragenen Daten.
Hauptmenü 5.2 Systemeinstellungen Im Systemeinstellungsmenü stehen Ihnen folgende Abschnitte zur Verfügung: 5.2.1 Kanal editieren Hier können Sie die Senderliste bearbeiten. Löschen: Nach dem drücken der roten Taste erscheint eine Auswahl mit verschiedenen Möglichkeiten. Hier wird nur der ausgewählte Kanal gelöscht. TP Kanal Auswählen: Hier werden alle Sender eines Transponders gelöscht. Sat Kanal Auswählen: Hier werden alle Sender eines Satelliten gelöscht.
Hauptmenü Umbenennen: Um den ausgewählten Sender umzubenennen, drücken Sie bitte die Gelbe Taste. Daraufhin öffnet sich eine virtuelle Tastatur mit deren Hilfe Sie bequem den Sendernamen ändern können. Sperren: Wählen Sie den zu sperrenden Sender aus und drücken die blaue Taste. Hinter dem Sendernamen erscheint ein Symbol ( ). Damit ist dieser Sender nur noch nach Eingabe eines Passwortes zu sehen. Favoriten: Sie können bis zu 8 Favoritenliste anlegen.
Hauptmenü 5.2.2 Kindersicherung Altersgrenze: Hier können Sie auswählen bis zu welchem Alter die Kindersicherung aktiviert werden soll. (Wird nicht von allen Sendern unterstützt) Passwort ändern: Um das Passwort (Standard: 0 0 0 0) zu ändern, drücken Sie die „OK“Taste und geben Sie ein neues Passwort ein und drücken die „OK“-Taste. Danach müssen Sie zur Bestätigung das neue Passwort nochmals eingeben und wiederum mit der „OK“-Taste bestätigen. Danach ist das Passwort geändert. 5.2.
Hauptmenü 5.2.5 Systeminformationen In diesem Menü werden Ihnen die Informationen zum Softwarestand (Version und Datum) angezeigt. 5.2.6 Timer In diesem Menü haben Sie die Übersicht über alle schon programmierten Timer und können selber Timer anlegen. Um ein neues Timerevent anzulegen, drücken Sie bitte die grüne Taste. Daraufhin öffnet sich ein neues Fenster, um den Timer einzustellen. Ereignis Typ: Hier können Sie das Ereignis einstellen was stattfinden soll, wenn der Timer startet.
Hauptmenü Verfahren: Hier können Sie einstellen, ob das Timerevent wiederholt werden soll (z.B. um eine tägliche Serie aufzuzeichnen). Folgende Einstellungen sind möglich: Einmalig, täglich oder wöchentlich. Datum: Hier wird das Datum eingestellt, wann das Timerevent starten soll. Um das Datum einzustellen, drücken Sie „die OK“-Taste, danach ist der Tag hellblau markiert. Mit Hilfe der / -Tasten stellen Sie den Tag ein. Mit den ⊳/ -Tasten können Sie zum Monat und Jahr wechseln.
Hauptmenü 5.3 Benutzer Präferenzen In diesem Menü werden alle Einstellungen mit den ⊳/ -Tasten vorgenommen. Die Auswahl der Menupunkte erfolgt über die / Tasten. Die Änderungen werden durch das Verlassen dieses Menüs übernommen. 5.3.1 Menüsprache Hier können Sie die Menüsprache einstellen.
Hauptmenü 5.3.5 TV Bildschirmverhältnis Stellen Sie hier das Bildschirmverhältnis ein, welches von Ihrem TVGerät unterstützt wird (16:9 oder 4:3). 5.3.6 Display Format Hier können Sie einstellen, wie das Bild angezeigt werden soll, wenn es nicht dem in Punkt 5.3.5 eingestellten Bildschirmverhältnis entspricht. 5.3.7 Display Zeit In diesem Menüpunkt können Sie einstellen wie lang das Menü oder die Infoleiste eingeblendet werden soll. 5.3.8 Transparenz Hier können Sie die Menütransparenz einstellen. 5.
Personal Video Rekorder (PVR) 6. Personal Video Recorder (PVR) 6.1 Empfohlene Hardware - Externe USB Festplatte mit externen Netzteil (7200 RPM) Dateisystemformat: FAT16/FAT32 (NTFS und andere Dateisysteme werden nicht unterstützt,) 6.2 Aufnahmefunktion 6.2.1 Eine Aufnahme starten Drücken Sie die „ “-Taste um eine Aufnahme zu beginnen. 6.2.2 Eine Aufnahme beenden Um eine Aufnahme zu beenden drücken Sie bitte entweder die „ “- oder die „ “-Taste.
Personal Video Rekorder (PVR) 6.2.3 Eine Datei wiedergeben Folgende Dateitypen kann der Receiver von einem externen Speichermedium abspielen: Musikdateien (*.mp3), Bilder (*.jpg) und aufgezeichnete Sendungen (*.ts) 1. Dateiliste: Drücken Sie die „ “Taste um die Dateiliste aufzurufen. 2. Datei auswählen: Mit den / -Tasten markieren Sie die Datei, die Sie abspielen möchten. Nach dem drücken der „OK“-Taste wird die Datei wiedergegeben. 3.
Personal Video Rekorder (PVR) 5. Wiedergabeoptionen ändern Bei der Wiedergabe von MP3-Dateien können Sie mit der gelben Taste den Wiedergabemodus bestimmen. Durch mehrmaliges betätigen wird zwischen folgenden Möglichkeiten hin- und hergeschaltet: Keine Wiederholung, Spiele alle Dateien ab, Wiederhole die aktuelle Datei, Spiele alle Dateien im aktuellen Ordner ab 6.2.4 1. 2. 3. 4. 5. 6.
Personal Video Rekorder (PVR) 6.2.5 Dateiliste Um sich die Dateiliste anzeigen zu lassen, drücken Sie bei angeschlossenem USB Speichermedium die „ “Taste. In der Liste werden allen abspielbaren Dateien angezeigt. Nach dem drücken der grünen Taste, werden Ihnen Informationen (z.B. Dateisystem, Gesamtkapazität, Freier Speicher, Belegter Speicher) über das angeschlossenen Speichermedium angezeigt. Zum löschen einer Datei oder eines Verzeichnisses drücken Sie bitte die gelbe Taste.
Personal Video Rekorder (PVR) Mit dem drücken der roten Taste wird die externe Festplatte formatiert. Diese Funktion steht nur zur Verfügung wenn eine externe Festplatte angeschlossen ist. ACHTUNG! Alle Dateien und Verzeichnisse auf der Festplatte gehen bei einer Formatierung unwiderruflich verloren. Um sich nur bestimmte Dateien anzeigen zu lassen (z.B. nur Musikstücke), drücken Sie bitte die blaue Taste. Durch mehrmaliges betätigen werden verschiedene Filter angezeigt. (Alles, aufgenommene Sendungen [.
Fehlerbehebung 7. Fehlerbehebung Problem Das Display auf der Vorderseite funktioniert nicht Kein Bild oder Ton Mögliche Ursache Netzkabel nicht angeschlossen Abhilfe Netzkabel richtig an der Steckdose anschließen Receiver falsch am TV-Gerät angeschlossen.
8. Technische Spezifikation Tuner Steckverbinder Frequenzbereich Eingangsimpendance Signalpegel LNB Spannungsversorgung LNB Umschaltung DiSEqC Demodulation Symbolrate FEC Decoder MPEG Video/Audio Decoding Level Datenrate Audiodecoding Audio Mode System CI Anschlüsse Sampling Prozessor FLASH Speicher Zwei vollunabhängige Common Interface Einschübe Video 39 IEC 169-24, Buchse 950 ~ 2150 MHz 75 Ohm -65 dBm~-25 dBm 13/18 Volt, max. 500 mA 22 kHz ± 4 kHz Version 1.0/1.2/.1.
Audio Daten Spannungsversorgung Abmessungen und Gewicht Versorgungsspannung Leistungsaufnahme Größe (B x H x T) Gewicht (netto) Betriebstemperatur Lagertemperatur 40 3 RCA Cinch (Komponent) 2 RCA Cinch SPDIF (Koaxial) RS 232 (115,2 bps) USB 2.0 100 – 250V AC , 50/60 Hz Max.
Garantie: Die Gewährleistung für diesen digitalen Satelliten-Receiver entspricht den gesetzlichen Bestimmungen zum Zeitpunkt des Erwerbs. Änderungen am Gerät führen zum Erlöschen der Gewährleistung und der Garantie des Herstellers.