
Operation Manual

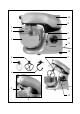

attachment mounting, positioning filler
opening correctly(see picture I). Secure
the lid by turning it anti-clockwise.
-
When fitting the attachments into the
mounting, ensure that the pin on the
mounting fits safely into the
corresponding recess in the attachment.
-
Push the attachment all the way in, then
lock it by turning it anti-clockwise (about
90°).
-
Put the ingredients into the bowl.
-
Turn the release lever clockwise to
release the drive head ( ).Tilt the head
downwards until it is heard locking into
place (lever position ).
-
Insert the plug into a wall outlet.
-
Turn the rotary control knob slowly to
the required speed setting.
-
The splash-proof lid facilitates the option
of adding further ingredients through the
filler opening during the blending or
kneading process.
-
After use, switch the appliance off and
remove the plug from the wall outlet.
-
Turn the release lever (9) clockwise to
release the drive head ( ). Tilt the
head upwards until it is heard locking
safely into place (lever position ).
-
Push the attachment upwards all the way,
then unlock it by turning it in a clockwise
direction (about 90°) and remove it from
its mounting.
-
To remove the splash-proof lid, unlock it
by turning it in a clockwise direction.
-
Unlock the blender bowl by turning it in
anti-clockwise direction ( ) and
remove it.
General care and cleaning
● Before cleaning the appliance, ensure it is
disconnected from the power supply and
has cooled down completely.
● To avoid the risk of electric shock, do not
clean the appliance with water and do
not immerse it in water.
● Do not use abrasives or harsh cleaning
solutions for cleaning.
-
The housing may be wiped with a damp,
lint-free cloth.
-
The splash-proof lid, blender bowl, whisk
and kneading hooks may be cleaned
using hot water and a mild detergent.
Additional accessories
Your food processor can be fitted with
additional, optional attachments:
-
Blender attachment (art.no. 9750)
-
Vegetable grater attachment (art.no.
9752)
-
Meat mincer attachment (art.no. 9751)
The attachments may be ordered through
the Severin Service Centre quoting the article
number of the desired attachment.
The blender mounting is located underneath
the cover (14).
Disposal
Do not dispose of old or defective
appliances in domestic garbage; this
should only be done through public
collection points.
Guarantee
This product is guaranteed against defects in
materials and workmanship for a period of
two years from the date of purchase. Under
this guarantee the manufacturer undertakes
to repair or replace any parts found to be
defective, providing the product is returned
to one of our authorised service centres. This
guarantee is only valid if the appliance has
been used in accordance with the
instructions, and provided that it has not
been modified, repaired or interfered with
by any unauthorised person, or damaged
through misuse.
This guarantee naturally does not cover
wear and tear, nor breakables such as glass
and ceramic items, bulbs etc. If the product
fails to operate and needs to be returned,
pack it carefully, enclosing your name and
address and the reason for return. If within
the guarantee period, please also provide the
guarantee card and proof of purchase.
7