GLASSBLOCK assembly instructions ProVantage® Glass Block Silicone Installation System www.sevesglassblock.
Seves Glass Block ProVantage® Glass Block Installation System Assembly Instructions Introduction: The ProVantage® Glass Block Installation System is the easiest way to install Seves Glass Block 4-in Series (4" thick) Glass Block, and get professional results. ProVantage® I Installation System (Channel Construction): • This method is used to install straight walls in 4-sided openings. • In this method, glass block is installed in a perimeter channel.
All glass block panels are non-load bearing, so adequate provisions must be made for support of construction around the panel.
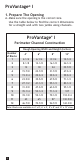
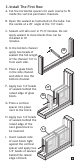
ProVantage® I 1. Prepare The Opening A. Make sure the opening is the correct size. Use the table below to find the correct dimensions for a straight wall with two jambs using channels.
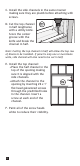
B. Use a level to make sure the opening is level and plumb. Note: If there are any problems with the opening, adjust it before proceeding. 2. Install Perimeter Channel A. Cut the channel to fit the perimeter of the opening. The channel ends may be cut straight or mitered. 2A 2B 45° B. Install the bottom channel: • Apply two 1/4" beads of sealant on underside of channel horizontally 1/2" from both sides. Insert two screws in each end of the channel.
C. Install the side channels in the same manner making sure they are plumb before attaching with screws. D. Cut the top channel in half lengthwise with a utility knife. Score the center groove with the knife and break the channel in half. Note: Cutting the top channel in half will allow the top row of blocks to be installed. If panel is only one or two blocks wide, side channel will also need to be cut in half. E.
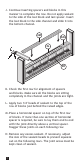
3. Install The First Row A. Cut the horizontal spacers for each course to fit inside the vertical perimeter channels. B. Open the sealant as instructed on the tube. Cut the nozzle at a 45° angle at the 1/4" mark. C. Sealant will skin over in 15-17 minutes. Do not apply sealant to more blocks than can be installed in 10 minutes. D. In the bottom channel apply two beads of sealant the full length of the channel 1/4" in from each side. 3D E.
J. Continue inserting spacers and blocks in this manner to complete the row. Do not apply sealant to the side of the last block and last spacer. Insert the last block in the side channel and slide it into the bottom channel. 3M 3M 3L 3K K. Check the first row for alignment of spacers and blocks. Make sure all the blocks are sitting completely in the channel and the joints are tight. L. Apply two 1/4" beads of sealant to the top of the row of blocks just behind the raised edges. M.
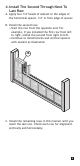
4. Install The Second Through Next To Last Row A. Apply two 1/4" beads of sealant to the edges of the horizontal spacer, 1/4" in from edge of spacer. B. Install the second row: • Start the row from the opposite end. For example, if you installed the first row from left to right, install the second from right to left. • Continue to install blocks and vertical spacers with sealant as illustrated. 4B C. Install the remaining rows in this manner until you reach the last row.
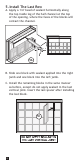
5. Install The Last Row A. Apply a 1/4" bead of sealant horizontally along the top inside leg of the half channel at the top of the opening, where the faces of the blocks will contact the channel. 5A B. Slide one block with sealant applied into the right jamb and one block into the left jamb. C. Install the remaining blocks in the same manner as before, except do not apply sealant in the last vertical joint. Insert the last spacer after installing the last block.
D. Apply a 1/4" bead of sealant horizontally across the top of the opening 1/2" from the face of the glass blocks. This sealant line will be used to secure the second half of the top channel. 5D E. Apply a 1/4" bead of sealant along the top inside leg of the second half channel. 5E F. Slide the half channel into place between the blocks and the top of the opening. If necessary, temporarily apply a piece of tape to the channel to hold it in place until the sealant sets. G.
ProVantage® II 1. Prepare The Opening Or Curb A. Make sure the opening is the correct size. Use the table below to find the correct dimensions for a straight wall with two jambs.
B. If installing glass block with angled wall sections follow these steps: • For walls with angles it is recommended that you layout your wall before constructing a curb. • Make sure the angled sections of your opening or curb are configured correctly. • The curb must be as wide as, or wider than, the glass block thickness (4" or wider). • Apply finish material to the curb. The curb will be visible through the glass blocks.
2. Install The Anchors A. Cut the horizontal spacers for each course to fit the opening. 2E 2B 2D B. Insert an anchor into the ends of the horizontal spacers where they meet a jamb. C. Apply two 1/4" beads of sealant to the edges of the horizontal spacers 1/4" in from edge of spacer. Place spacer sealant side down. 2F D. Then apply two 1/4" beads of sealant to this same horizontal spacer, 1/4" in from edge of spacer. E. Attach anchor to jamb with screws. Cut expansion strip to length. F.
3. Install The Glass Block A. Place a glass block in the opening against jamb. B. Apply two 1/4" beads of sealant behind the raised edge of glass block. C. Press a vertical spacer into place next to the block. 3B 3C D. Apply two 1/4" beads of sealant behind the raised edge of the next glass block to be inserted. E. Insert sealant side of next block tight against the vertical spacer and apply two 1/4" beads of sealant behind the raised edge of block. 3E F.
H. Apply two 1/4" beads of sealant to the top of the row of blocks just behind the raised edges. I. Place a horizontal spacer with anchors installed on top of the first row of blocks. If more than one section of horizontal spacer is required, be sure to lay them end to end with the joint directly above a vertical spacer. Stagger these joints on each following row. 3I 3H 3G J. Remove any excess sealant. If necessary, adjust the size of the sealant beads to prevent squeeze out on the following rows.
NOTES: For Straight Blocks and Finishing Units a. For walls with angles it is recommended that you layout your wall before constructing a curb. Note: If it is necessary to have a joint in the horizontal spacer, to extend it to fit the width of the section, make sure the joint will align with a vertical spacer. Stagger these joints on each following row. b. For straight sections between one jamb and an End Block, cut the horizontal spacer 1" shorter than the nominal dimension. c.
Grout Finishing IMPORTANT: Sanded acrylic polymer modified cement based grout, or urethane based sanded grout suitable for use on ceramic, porcelain, or glass tiles MUST be used. CAUTION: Avoid contact with skin. Safety glasses and impervious gloves are recommended to minimize skin and eye contact. Do not finish the joints until sealant has cured for 24 hours. A. Remove any sealant squeezed out from the joints with a utility knife. B. Follow directions on the Surface Grout container for grout application.
Sealant Finishing of Exterior Joints IMPORTANT: Not recommended for shower applications. CAUTION: Avoid contact with skin. Safety glasses and impervious gloves are recommended to minimize skin and eye contact. Provide sufficient mechanical ventilation. Do not finish the joints until sealant has cured for 24 hours. Note: If you are installing blocks in a moist environment or if your wall is not framed on all four sides, grout finish is recommended. A.
D. Push the spoon shaped finishing tool over the joints at a 45° angle to collect the excess sealant and seal the joint. Periodically wipe the sealant from the finishing tool. E. Seal the vertical joints in the same manner. Carefully work the joint intersections to create a smooth finish. F. Let the sealant cure for 48 hours before putting any stress on the panel. G. Seal the perimeter joints with sealant.
The information contained herein is accurate and reliable to the best of our knowledge.
GLASSBLOCK Seves Glass Block Inc. Cleveland, OH 44147 www.sevesglassblock.com All trademarks and registered trademarks in this brochure are owned and protected by Seves Glass Block Inc., Cleveland, OH 44147 © 2016 Seves Glass Block Inc. Printed in U.S.A. SGB-001 Rev.