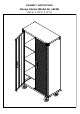
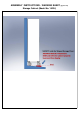
ASSEMBLY INSTRUCTIONS Storage Cabinet (Model No.
(pg 1 of 10)
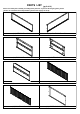
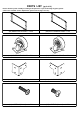
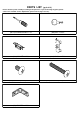
PARTS LIST (pg 2 of 10) Please check the parts carefully according to the parts list. If you are missing any parts, please contact our customer service department. (please refer to page 10 of 10) .
PARTS LIST (pg 3 of 10) Please check the parts carefully according to the parts list. If you are missing any parts, please contact our customer service department. (please refer to page 10 of 10) .
PARTS LIST (pg 4 of 10) Please check the parts carefully according to the parts list. If you are missing any parts, please contact our customer service department. (please refer to page 10 of 10) .
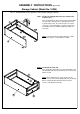
ASSEMBLY INSTRUCTIONS (pg 5 of 10) Storage Cabinet (Model No. 16234) *NOTE: Recommend using 2 persons to assemble Storage Cabinet. Step 1: Install Left and Right Side Panel (#1 and #2) to the Top Panel (#3). Place the Right Panel (#2) on the ground vertically. Make sure the front of the panel faces downward. Place the Top Panel (#3) next to the Left Panel (#1). Line up the screw holes, insert and tighten 3 Screws F (#41) using Screw Driver (#21-A). Install the Right Panel (#2) the same way.
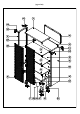
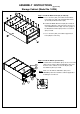
ASSEMBLY INSTRUCTIONS (pg 6 of 10) Storage Cabinet (Model No. 16234) Step 3: Install the Back Panels (#8, #9 and #10). a. Use 7 Screws F (#41) to install the Bottom Back Panel (#10) onto both Left and Right Side Panels (#1 and #2) and Bottom Panel (#4). b. Install both Middle Back Panel (#9) above Bottom Back Panel (#10) the same way. Place the groove of the Middle Back Panel (#9) onto the top edge of the Bottom Back Panel (#10) and use 8 Screws F (#41) to install. c.
ASSEMBLY INSTRUCTIONS (pg 7 of 10) Storage Cabinet (Model No. 16234) Step 5: Install the Middle Shelves (#5). a. Decide the height for the each Middle Shelf (#5) and place the Hooks (#34) into the hook slot and push down. Note: Each Middle Shelf (#5) needs a hook at the four corners to support it. Place Hooks (#34) at the four corners and make sure they are at the same height. b. Place each Middle Shelf (#5) into cabinet and push down onto the Hooks (#34). Step 6: Install the Middle Magnet (#23).
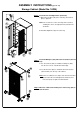
ASSEMBLY INSTRUCTIONS (pg 8 of 10) Storage Cabinet (Model No. 16234) Step 7: Install the Left and Right Doors (#6 and #7). a. Attach the Left Door (#6) to the unit using 10 Screws F (#41) to tighten it. Note: The screw holes on the door hinge have tolerance, enabling the door to be adjusted and centered in the doorframe. b. Install the Right Door (#7) the same way. Step 8: Install the Bumpers (#58) and Corner Protection (#14 and #15). a.
ASSEMBLY INSTRUCTIONS - WARNING SHEET (pg 9 of Storage Cabinet (Model No.
CONTACT INFORMATION (pg 10 of 10) *If you are missing any parts, have any questions, or need additional assistance in assembly, please contact our bilingual (English/Spanish) customer service department at: Seville Classics, Inc. 19401 South Harborgate Way Torrance, CA 90501 USA Telephone: (800) 323-5565 within USA Hours: 9:00am - 4:30pm (Pacific Standard Time) Fax: (310) 533-3899 E-mail: support@sevilleclassics.com Website & Online Store: www.sevilleclassics.
UltraHD Line Model No. 20206 UltraHD Workbench Model No. 20209 UltraHD Wall Cabinet Model No. 20242 UltraHD Rolling Workbench Model No. 20247 UltraHD Lighted Workcenter Model No. 20215 UltraHD Trash Bin Model No.