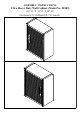
ASSEMBLY INSTRUCTIONS Ultra Heavy Duty Wall Cabinet (Model No. 20209) (24" W X 12" D X 28" H) (60.96cm W X 30.48cm D X 71.
(pg 1 of 12) For Door Handle at LEFT Side #2 #11 #1 #8 #10 #13 #6 #4 #9 #5 #3 #2 #7 #12 For Door Handle at RIGHT Side #2 #11 #1 #8 #9 #13 #6 #4 #12 #5 #3 #7 #2 #10
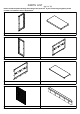
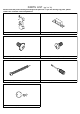
PARTS LIST (pg 2 of 12) Please check the parts carefully according to the parts list. If you are missing any parts, please contact our customer service department.
PARTS LIST (pg 3 of 12) Please check the parts carefully according to the parts list. If you are missing any parts, please contact our customer service department.
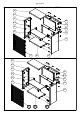
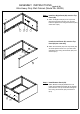
ASSEMBLY INSTRUCTIONS (pg 4 of 12) Ultra Heavy Duty Wall Cabinet (Model No. 20209) Step 1: Install the Right Panel (#3) onto the Top Panel (#2). a. Attach the Right Panel (#3) to the Top Panel Back (#2) as the left picture shows. Line up screw holes and tighten them using Screw Driver (#14) and Screw A (#11). #3 #11 #14 #2 Front Install the Left Panel (#1) onto the Top Panel (#2) the same way. b. Attach the Left Panel (#1) to the Top Panel (#2) as the left picture shows.
ASSEMBLY INSTRUCTIONS (pg 5 of 12) Ultra Heavy Duty Wall Cabinet (Model No. 20209) #4 #11 Step 3: Install the Bottom Back Panel (#5) and Upper Back Panel (#4). Top First place the Bottom Back Panel (#5) onto the Left Panel (#1), Right Panel (#3) and Bottom Panel (#2) as the left picture shows. Now place the Upper Back Panel (#4) onto the Left Panel (#1), Right Panel (#3) and Upper Back Panel (4). Line up screw holes and tighten them using Screw Driver (#14) and Screw A (#11).
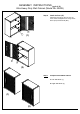
ASSEMBLY INSTRUCTIONS (pg 6 of 12) Ultra Heavy Duty Wall Cabinet (Model No. 20209) Step 6: Install the Door (#7). Attach the Door (#7) to the unit. Line up screw holes and tighten them using Screw Driver (#14) and Screw B (#12). #7 #12 (1) #7 #12 (2) Step 7: Complete Assembled Cabinet. a. Left Side Door (1) b.
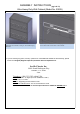
ASSEMBLY INSTRUCTIONS (pg 7 of 12) Ultra Heavy Duty Wall Cabinet (Model No. 20209) #8 #8 Use the Installation Guide on pages 7 and 8 to secure the two Wall-Hanging Brackets (#8) to the wall. Lift the wall cabinet up and hook its tongues (located on the back panels) over the Wall-Hanging Brackets. Assure all tongues hook securely over both Wall-Hanging Brackets. Please refer to the pictures on pages 8 and 9. Installation Guide for the WALL HANGING BRACKET of the UltraHD Wall Cabinet (Model No. 20209) A.
ASSEMBLY INSTRUCTIONS (pg 8 of 12) Ultra Heavy Duty Wall Cabinet (Model No. 20209) 1 2 *Drill a small hole (1/8" diameter) at both stud locations to assure that the hanging anchor is secured. D. To find the rest of the screw holes to fasten the Wall-Hanging Brackets, please refer to the accompanying shop drawing. Place the shop drawing on the wall and align the holes in the drawing with those already drilled in the wall.
ASSEMBLY INSTRUCTIONS (pg 9 of 12) Ultra Heavy Duty Wall Cabinet (Model No. 20209) 将 左 Back Panel View of Wall Cabinet shows 6 flat hooks that allow the Cabinet to hang on two Wallhanging Brackets. Close-up view of how the Wall-Hanging Brackets fit with the 6 flat hooks on the back of the cabinet. *If you are missing any parts, have any questions or need additional assistance with assembly, please contact our bilingual (English & Spanish) Customer Service Department at: Seville Classics Inc.
UltraHD Line (pg 10 of 12) Item# 20205 UltraHD Rolling Drawer Cabinet Item# 20206 UltraHD Workbench
UltraHD Line (pg 11 of 12) Item# 20224 Steel Pegboard Set Item# 20242 UltraHD Rolling Workbench
UltraHD Line (pg 12 of 12) Item# 16234 UltraHD Rolling Cabinet
Stud Stud Cabinet Hanging Deatil ONE Stud 24.00 24.00 16.00 0.75 28.
Stud Stud Cabinet Hanging Deatil TWO Stud 24.00 24.00 16.00 0.75 28.
Stud Stud Cabinet Hanging Deatil THREE Stud 24.00 24.00 16.00 0.75 28.