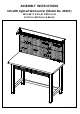
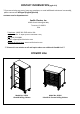
ASSEMBLY INSTRUCTIONS UltraHD Lighted Workcenter (Model No. 20247) 48 in W X 24 in D X 65.5 in H (1.21 m x 60.9 cm x 1.
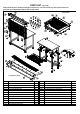
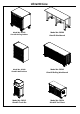
PARTS LIST (pg 1 of 8) Please check the parts carefully according to the parts list. If you are missing any parts, please contact our customer service department (please refer to page 8 of 8). Small Drawer Top Cantilever Shelf Parts No. Qty. SOLID HARDWOOD BOARD TOP 1PC #2-C TOP PEGBOARD PANEL #3-B BOTTOM CROSSBAR #3-C #5-B Parts No. Qty.
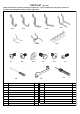
PARTS LIST (pg 2 of 8) Please check the parts carefully according to the parts list. If you are missing any parts, please contact our customer service department (please refer to page 8 of 8). #101 #100 #102 #50 M8X20 pcs #27-B #21 #40 #41 #51 #45 #25 Parts No. #107 #106 #105 #15 #104 #103 Qty. Parts No. Qty. #15 SCREW B (M4 x 8L) 46PCS #100 1/2" CURVED 4PCS #21 SCREW DRIVER 1PC #101 1" CURVED 4PCS #25 WRENCH 1PC #102 1" STRAIGHT 4PCS #27-B WASHER 10PCS #103 1.
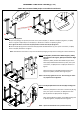
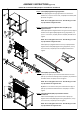
ASSEMBLY INSTRUCTIONS (pg 3 of 8) *NOTE: We recommend TWO people to assemble the workbench. B A Step 1. Install (#5-B) Leg Piece. A: Open the package, and put the parts aside. Then, attach the (#47) "L" Bracket to the (#5-B) Leg Piece, use (#50) Screw I to tighten. Repeat Step A to install (#47) "L" Brackets to another one (#5-B) Leg Piece. Note: Tighten the all the screws after the (#47) Brackets are flush with the (#5-B) Leg Piece.
ASSEMBLY INSTRUCTIONS (pg 4 of 8) *NOTE: We recommend TWO people to assemble the workbench. Step 4. Install (#49) Pegboard Long Support Bar. Attach (#49) Pegboard Long Support Bar to the back of the workbench, line up the screw holes, use (#40) Screw E with (#27B) Washer to tighten. NOTE: Do not fully tighten the screws. This will help you make any adjustments to alignment later. Step 5. Install (#3-C) Bottom Pegboard Panel and (#2-C) Top Pegboard Panel.
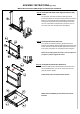
ASSEMBLY INSTRUCTIONS (pg 5 of 8) *NOTE: We recommend TWO people to assemble the workbench. Step 8. Install (#20-3 & #20-4) Left & Right Small Drawer Side Panels. Fit and attach the (#20-3 & #20-4) Left & Right Small Drawer Side Panels to the (#20-1) Small Drawer Front Panel. Make sure the (#20-3 & #20-4) Left & Right Small Drawer Side Panels are placed in all the way making contact with the rear of the (#20-1) Small Drawer Front Panel. Line up the screw holes and use (#15) Screw B to tighten. Step 9.
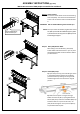
ASSEMBLY INSTRUCTIONS (pg 6 of 8) *NOTE: We recommend TWO people to assemble the workbench. Step 11. Insert Drawers. Pull out the drawer sliders and inner ball bearing track completely. Then attach and fit the Drawer to the inner track of the sliders and slide drawers in. WARNING: Pull out the Ball Bearing track towards you. Pull the ball bearing track towards you.
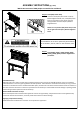
ASSEMBLY INSTRUCTIONS (pg 7 of 8) *NOTE: We recommend TWO people to assemble the workbench. Step 14. Place (#45) Power Strip. Insert and screw (#51) Stud Screw J to (#3-C) Bottom Pegboard Panel, then, hook (#45) Power Strip on and make sure the power cord goes through Rubber Grommet of (#3-C) Bottom Pegboard Panel. NOTE: You can position (#45) Power Strip on the left or right side of the (#3-C) Bottom Pegboard Panel. [!] CAUTION: Potential Shock or FireHazard.
CONTACT INFORMATION (pg 8 of 8) *If you are missing any parts, have any questions, or need additional assistance in assembly, please contact our bilingual (English/Spanish) customer service department at: Seville Classics, Inc. 19401 South Harborgate Way Torrance, CA 90501 USA Telephone: (800) 323-5565 within USA Hours: 9:00am - 4:30pm (Pacific Standard Time) Fax: (310) 533-3899 E-mail: support@sevilleclassics.com Website & Online Store: www.sevilleclassics.
UltraHD Line Model No. 20205 UltraHD Rolling Cabinet Model No. 20206 UltraHD Workbench Model No. 20209 UltraHD Wall Cabinet Model No. 20242 UltraHD Rolling Workbench Model No. 20215 UltraHD Trash Bin Model No.