2-Tier Mesh Wall Shelves Model #: WEB473 Thank you for choosing Seville Classics! We hope that you enjoy your new wall-mounted shelves. Please read through this user guide for parts list, assembly instructions, frequently asked questions and further contact information. Seville Classics Torrance, CA 90501 USA www.sevilleclassics.
Parts List Required Tools A. Shelf (2) Phillips Screwdriver B. Bracket (2) Pencil C. Screw (6) Bubble Level D. Anchor (6) Tape Measure Hammer Please make sure you have all the parts on this list. If you’re missing parts, contact us for replacements at (800) 323-5565 or send an email to Support@SevilleClassics.com Seville Classics Torrance, CA 90501 USA www.sevilleclassics.
Caution! Make sure to read and comprehend the instructions thoroughly before beginning installation. The instructions must be read and understood to prevent personal injury and property damage. Keep these instructions in an easily accessible location for future reference. Included installation hardware is for DRYWALL USE ONLY. Additional hardware is required for installation on wood, concrete or masonry. DO make sure you have enough space BEFORE beginning installation.
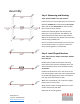
Assembly Step 1. Measuring and Marking Tools: pencil, bubble level, tape measure Confirm that you have enough space for the shelves. Brackets (B) MUST be installed exactly 21.5 inches apart, with at least 6.25 inches of room to either side in order to fit the shelves. Position the brackets (B) so that the flat metal plates are in contact with the wall. Measure the distance between brackets with a tape measure. Make sure the brackets are parallel with each other and flat using a bubble level.
Step 3. Install Brackets Tool: Phillips screwdriver Make sure the anchors in the wall align with the mounting holes in each bracket. Secure the brackets to the wall by sending screws (C) through the mounting holes and into the anchors on the wall. When both brackets are secure, test fit a shelf on more than one level to make sure the brackets are the correct distance apart and parallel. Step 4. Hang Shelves Tool: None Slip the hooks on the back of the shelves over the rungs at your desired height.
Use Instructions 1. Hang shelves on bracket rungs at desired height. 2. Lift up, then out to remove shelves. FAQs Q: How much space do I need to install these? A: Assembled, the entire unit measures 36" W x 14.72" D x 24". Make sure there is enough space in your area before installation. Q: How do I tell if my walls are drywall? A: The simple way is to remove the cover of a nearby light switch and examine the wall that way.