User’s Manual for 110
Introduction to Manual This manual provides operation guideline information for you. Please refer to Guideline for Quick Use if necessary to grasp the basic functions fast. Introduction to Operation Procedures The following ways are used in the User’s Manual in order to search the functional menu: Operation path: Main menu > Messages. The case indicates: click the[Central Key] from standby menu, the phone displays the main menu and click the message functional menu.
TABLE OF CONTENTS COMPREHEND YOUR PHONE..................................................................... 4 Front View................................................................................................4 Side View .................................................................................................5 Back View ................................................................................................6 BEGIN TO USE................................................................
FUNCTION MENU ......................................................................................... 33 SAT.........................................................................................................33 Browser ..................................................................................................33 Entertainment .........................................................................................39 Camera ........................................................................
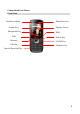
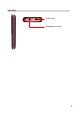
Comprehend Your Phone Front View Auxiliary camera Central Key Navigation Key LSK Browser Call Key Phone Receiver Display Screen RSK Delete Key On/Off Key Numeric Key Special Function Key 4
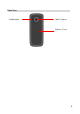
Side View USB socket Headphones socket 5
Back View Loudspeaker Main Camera Battery Cover 6
Begin to Use (U)SIM Card and Battery When you reserve to access to the communication network services, you will receive a phone-inserted subscriber identity module (abbreviated as (U)SIM card), which contains the information of the network services booked by you, your personal identity number (PIN) and the available network service info. Please consult with your SIM card provider, network service provider or network operator to obtain and use SIM-based information.
Recharge Battery When the battery capacity is low, the phone will send out the low power information. Under this case, you are supposed not to use some functions of the phone. When the power is lower than the threshold value, the phone will be power off automatically. Please recharge the battery. When the phone is power-on and being charged, the flickering battey icon is displayed on the top-right corner of the screen.
recently standby menu if you use at the second time. 4. If desired to set up the phone, please consult for more details. After the phone is launched, it will identify the (U)SIM card supplier automatically, and finish setting up the SMS and wireless network parameters. If the phone does not configure the correlative parameters automatically, please consult the service supplier for the correct parameters and finish the setting. Close Phone 1.
Display Screen Display Screen Status Indication Standby Message Wallpaper LSK Function Indication RSK Function Indication Central Key Function Indication Status Indication: signal status, battery status, message status, incoming call status, user’s profile status, function launch status and insert status of external device etc. Standby Message: name of operator, date, week message, time, Am.& Pm. prompt (12 hours). Wallpaper: background image under standby status.
Keys Keys Central Key entries. Navigation Key - Enter into main function menu or confirm selected Move the selected frame amid menus of every level and entries. To execute the displayed function upon this key. Launch Browser. Launch call. After ending the call, power on/off or return to the standby status. Delete entries or clear away input. Press and hold to dial voice mailbox service. Press and hold to call the contact that has been set as quick dial. Quickly enter into the menu or edit input.
Input with Multi-pressing Input Mode: 1. Locate at character input status, for example: Main menu > Messages > SMS > New. 2. The cursor keeps 0.5 second at the same position, before moving the till the required character cursor, repeatedly press the icons appears. 3. If desired to switch capital and small-case letters, you can click “Option” to select “Input mode”, and then select “ABC/abc” of letter input mode and click “Ok”. 4.
You can click[Central Key]to enter the main function menu under standby status.
Tools Multimedia My stuff Calendar Call Log Settings Group Alarm Calculator Recorder E-book World time Media player Radio Images Sounds Videos Applications Others Missed calls Outgoing calls Incoming calls All Calls Data Transmission Call duration Profile Display Settings Phone Settings Call Settings Network Settings Security Settings Connection Settings Reset Settings Flight mode Set up Your Phone 14
Set up your phone personally, including display Settings, ringtone Setting, language Setting, time and date Setting, shortcut Setting and phone lock Setting. Display Settings Operation path: Main menu> Settings > Display Settings Select Wallpaper Operation path: Main menu > Display Settings > Idle screen. Select the entry of “Wallpaper” and click [Central Key]to enter into the My stuff, select the file which required to be loaded as wallpaper and click to “Save”.
you can click[Central Key]to enter My stuff, select the required ringtone files. Select on/off status. After finishing setting, click “Save”. And the phone will return back to the list of Profile and launch the selected scene. Language Setting Select the Phone Display Language Operation path: Main menu > Settings > Phone Settings > Language. Select your required language type, and click “Ok” to save the Settings.
input the required password. The default password of the phone when leaving the factory is 0000. Modify the Phone Password Operation path: Main menu > Settings > Security Settings > Change phone code. Select the input entries in succession, old password or new password, and then confirm the password and select to input, click “Ok” to save and modify the password setting. Unlock the Phone Lock Operation path: Main menu > Settings > Security Settings >Phone lock You can select “On” and then click “Ok”.
quality effectively. Dial Phone Normal Phone Dialing 1. Click the number of physical keyboard under the standby status. 2. Click the[Call Key]to launch the calling. 3. If desired to end the call or cancel the call, please click[On/Off Key]. When you are desired to dial the international call, you can click the icon continuously for many times, input + to replace the international connecting number, and then input national code, regional code and phone number.
key to dial. 1. Main menu > Contacts > Option > Settings > Speed dial. 2. Select shortcut key, click “Set” to input the corresponding number of shortcut key or click “Search” to select the number of contacts in the Contacts. 3. Click “OK” to save the settings. under 4. Press and hold the corresponding shortcut keys the standby status to launch the call. Fixed Dial Set up the number which is allowed to launch the call. 1. Operation path: Main menu > Contacts > Option >Settings > Fixed dial 2.
other countries or regions in SIM card. Answer the Call Set up the Answer Mode 1. Use path: Main menu > Settings > Call settings > Answer mode > Any key/Send key 2. Select setting, click “Ok” to save the settings. Normal Answer When your phone has incoming call, the ringtone will pop up or vibrate, and the display screen will display incoming call icon. 1. Click “Answer” or[Call Key]to receive the incoming call. 2. If desired to end the call or reject to answer the incoming call, you can click[On/Off Key].
Transfer to receive the Incoming Call 1. Operation path: Main menu > Settings > Call settings > Call divert > Voice call/Video call. 2. Select transfer condition: All calls /If busy/If not answered/If not available. 3. Click “Option” to select “On”, select “To voicemail” or “To another”. 4. If you select “To another”, you can directly input the transfer number or click [Central Key]to select the number of contacts from the Contacts. 5. Click “Ok” to save the settings. 6.
This function requires the supports from network, please preset the network service. For relevant information, please consult the network service provider. Call during Calling 1. During calling, click “Option” to select “New call”, Enter into the contact for selecting numbers and make a call, or directly input the phone number and click[Call Key]to make a new call. 2. If desired to switch amid two calls, please select “Switch”. 3. If desired to end the call, you can click[On/Off Key].
Video Call Video Call If desired to use video call, please ensure that the counterparty and you should hold the service registration of 3G service and locate inside the 3G network coverage. You can dial or answer the video call while the 3G mark appears at the display screen. 1. You can input the phone number under the standby status to dial out the video call. 2. If receiving the video incoming call, you can click[LSK]/[Call Key] to confirm the video call, and you can answer normally. 3.
SMS The Text message may contain simple text message. You can click “Option” to insert the message of contacts, commonly-used message edited in advance or the website of the bookmark in the Contacts when you edit the Text message. If you set up relevant parameter of Text message, please by the path: Main menu > Messages> SMS > Settings.
If desired to set the E-mail-related parameters, please use the path: Main menu > Messages > Email > Settings. If required using the same phone E-mail address as in the computers, you may consult the E-mail service supplier for related parameter settings or search the related message in the E-mail procedures settings of the computer. The settings of Email account includes: Account name, My address, Save copy, User name, Password, Receive server, Send server, Receive port, Send port, Auth.
5. If desired to select a receiver from the contacts, click the [Central Key] or “Option” to select addressee from contacts. The modes can be the phone number or e-mail address when you send the mail. 6. If desired to select a addressee from the latest contact list, click “Option” to select “Recent receiver” and select the number of addressee. Contacts Function You can save and search the contact data with the contacts or (U)SIM card contacts. The contacts can store many entries of contact info.
Edit v-Card 1. Operation path: Main menu > Contacts. 2. Click “Option” to select “Settings”, and open setting list to select “My business card”. 3. Select name entry and click it to enter into the editing window, you can input name and click[Central Key]to save. 4. Select data entry and input the required message. 5. After finished all message input, you can click “Save” to reserve the business card settings. Video Function With this function, you can shoot the photo or record the video.
and click[Central Key]again to continue the video. 5. You can click[LSK]to end the video. The phone will save the snapped image into the My stuff and return back to the video standby status. 6. If desired to view video, you can click “Option” under the camera status and select “Video album”, click[Central Key]to open the video. 7. If desired to quit out the video function, you can click “Back” to back to the function menu.
4. 5. 6. playing, press and hold [Left Navigation Key] or [Right Navigation Key] to backward or forward the playing file. You can click [Up Navigation Key] to open play list under the status of media player. Under the status of play list, you can click[Central Key]to play the selected files when the play list is not empty. If desired to set up cycle play, you can click “Option” under the status of media player, and then enter into the play mode window. Select entries to set up parameters.
3. Click “Option” to select “New folder”, input the name of new folder and click[Central Key]to save. Move, Copy and Delete the Files 1. Operation path: Main menu > My stuff. 2. Select a folder including: images, sounds, videos, applications and others. You can open the folder list under this folder. 3. After select and open the folder, you can select the files you required. 4.
Browse 1. Use path: Main menu > Browser. 2. Select “Go to homepage” and then click the[Central Key]to access to the homepage of operator. 3. If desired to access to other webpage, you can select “Enter URL” to input the website, click “Option” and select “Ok”. 4. After the webpage is uplinked, the linkable items will be highlighted. Click the [Central Key] to open the selected link. If select the phone number of webpage, you can click[Central Key]to dial out the phone number. 5.
to use according to local regulations or laws. If not allow to use the Bluetooth technology, please turn off the Bluetooth function. It is suggested that the device to be linked is beside of a 10m range without any barrier of solid objects. The maximum tolerable data traffic of Bluetooth devices for the phone will be adjusted according to the local regulations automatically. Thus the upper limit of the clearance for the Bluetooth device will be deviated from each other probably. Bluetooth Link 1.
to input the matched password. Please input it. 5. After linked, the phone will display a prompt of Sending File. Match to Device The requirement for matching signifies the identity authentification. In order to achieve the matching requirement, the subscribers of both phones backing the Bluetooth& wireless technology must agree upon a co-used password and input an identical password on both devices. 1.
ringtone and music. If desired to enter into to the browser menu, please click [Central Key] under the standby mode and select in the main function menu. You can only use the services trusted by you. The service supplier can provide essential security protection against the attack by the virus software. You can download files that cannot be displayed on the webpage, such as ringtone, image, network symbol, subject mode and video segments.
the homepage URL with the main menu. 1. Operation path: Main menu > Browser> Go to homepage. 2. Select webpage linkage, click “Back” and quit out the current page. 3. Click “Option” and select “Exit” to withdraw browser. Enter URL Access to Webpage Manually input the URL to access the related webpage. 1. Operation path: Main menu >Browser> Enter URL. 2. After the URL input, click “Option” to select “Ok”. Clear up the relevant records on Internet 1.
Open Bookmark 1. Operation path: Main menu >Browser > Bookmark. 2. Search the bookmark you required, and then click the [Central Key] to link and access to the bookmark. Option Menu of Bookmark: New: create a new bookmark. Edit: re-edit the bookmark title and URL. Delete: delete and delete all. Details: view the title of bookmark and address. Send Link: send the network linkage by Text message, MMS and Bluetooth.
When browsing a webpage, click “Option”to select “Tools”, and then select “Save page”. The phone will save the current webpage to a folder of “Saved pages”. Browse Saved pages 1. Operation path: Main menu > Browser > Saved pages. 2. Select webpage list and click the[Central Key]to view the webpage. 3. When viewing the Saved pages, select a linkable item in the webpage and click the[Central Key]. The browser will automatically link to the network source and open the linked webpage online.
setting by clicking “Ok”. Set up Browser Display Characteristics 1. Operation path: Main menu > Browser > Browser Settings> Look and feel. 2. Select Setting type, and click “Ok” to open the parameter choice window. 3. Select the concrete display character parameter to select and save the setting by clicking “Ok”. Network Settings Set up network connection parameters. Operation path: Main menu > Browser > Network Settings. Create Network Settings 1. Operation path: Main menu > Browser > Network settings. 2.
Delete: delete a network configuration entry. Entertainment The phone supports various functions of JAVA application. You can download the games from the network and install in the phone for use. If desired to use the online application by downloading from the network, you can consult the network service supplier for relevant information. If desired to enter the entertainment menu, you can click [Central Key] under the standby status, and then enter into main functional menu to select “Entertainment”.
Install Application Software 1. Operation path: Main menu > Entertainment. 2. Click “Option” to select “Go to Java”, and then click “Ok”. 3. Select the application software you required to install, Click [Central Key]to select “Yes”, the phone will begin to install the application software. 4. The screen will display the installation progress when the phone installs software. If the phone installs the games with same version, the phone will display to confirm the installation prompt. 5.
Camera You can snap the photo and record a video by using the camera function in the phone. If desired to enter the camera menu, please click[Central Key]under the standby status, and then enter into the main functional menu and select. Do not snap or take a video record without the permission of the party or when concerning other person’s privacy. Do not use snap or video function when you are locating at the photo-prohibited areas.
9. Effect > Close/Black and white/Negative/Sepia/Aqua. If you want to set the parameter of the camera, for example Shutter sound、Quality、 Image size、White balance、Anti-Banding、Night mode 、 Photo default name, please use operation path under view-selecting status of the camera: Option >Settings. Open Option Menu by Clicking “Option” under View-selecting Status of Camera: To camcorder: switch the snap mode to video camera. Photo album: switch to My Album of My stuff.
Cloudy, Auto is set in default. Anti-Banding: 50Hz/60Hz, 50Hz is set in default. Night mode: Open/Close, Close is set in default. Photo default name of picture: Image. Save location: the storage position for screened photos. The option is phone/Memory card. The phone is set in default. Memory status: display the current memorizer and usage status. The display contents are used space/ total space and classified as phone and external memorizer display.
6. 7. video camera status: Option >Auxiliary camera. If you are desired to set up the video color, please use operation path under the video camera status: Option >Effect >Close/Black and white/Negative/Sepia/Aqua. If you want to set up the parameter of the camera, for example Quality、 Image size、White balance、Record sound、Video type、 Record time limit、Anti-Banding、Night mode、Video default name, please use the operation path under video camera status: Option >Settings.
Video default name: Video. Save location: the storage position for screened photos. The option is phone/memory card. The phone is set in default. Memory status: display the status of currently used storage space and total storage space and classified as phone and storage card display. Send Picture and Video Send Picture Through MMS or E-mail 1. Operation path: Main menu >Camera. 2. Select to camcorder and click[option]to open photo album. 3.
2. Click “Option” to select “Save location”, and then select “Phone” or “Memory card”. Set up Storage Position of Videos 1. Operation path: Main menu >Camera. 2. Click “Option” to select “To camcorder”, and then select “Ok”. 3. Click “Option” to select “Save location” under video window, and then select “Phone” or “Memory card”. View Storage Message View Storage Message 1. If you are desired to view the memorizer status, please use the operation path: Main menu >Camera. 2.
The phone can identify the supplier of (U)SIM card and can set up message parameters automatically as well. You can set up the parameters manually if the phone has not set up the message parameters automatically. For relevant parameter questions, please consult the provider or network operator. The messages menu will display different folders, please refer to the folders as follows: Text message: Create, Edit and Save text message. Multimedia: Create, Edit and Save multimedia message.
Input settings: set up the electable option of input mode. View Received Message 1. Operation path: Main menu > Messages > SMS > Inbox. 2. Arrange message by time sequence to search the contents to be viewed. Under the message list status, you can view the detailed message content by clicking “Option” and selecting “Details”. Option Menu after Selecting Inbox: Reply: reply the current Text message by SMS /MMS.
View Message Failed in Sending 1. Operation path: Main menu >Messages>SMS>Outbox. 2. Arrange message by time sequence to search the SMS to be viewed, click[Central Key]to view SMS in details. Option Menu of Outbox Message Resend: resend a selected message. Delete: delete or delete a batch the selected SMS. Delete all: clear up the current outbox. View mode: display the message in the message-sending list by date and subject. Details: addressee, time and type.
Details: addressee, time and type. View/Edit Draft Message 1. Operation path: Main menu >Messages > SMS >Draftbox. 2. Arrange message by time sequence and search required information. 3. If you are desired to continue to edit the draft message, select a draft entry to reedit it. 4.
2. If you are desired to reedit the saved commonly-used templates, you should select the required templates entry, then click[Central Key]to edit. 3. If you are desired to create the new commonly-used templates, you can click “Option” to select “New”, and then input the content of message templates and click[Central Key]to reserve the preset setting. Option Menu when the Preset Message Templates Entry is not full: Send: send the preset commonly-used SMS to the contacts.
1. 2. Operation path: Main menu > Messages > MMS> New. Select the subject and click[Central Key]to input the subject under MMS editting status. 3. Select the text and click[Central Key]to input the MMS contents under MMS editting status. 4. Select image or video and click[Central Key]to open the My stuff, and then select the required image or video files, click [Central Key]to add the file into the MMS under MMS editting status. 5.
Preview: preview the edited MMS.. Slide time: Set slide show interval. Add page: add an edited page in the MMS. Save to draft: save the well-edited MMS to the draft. Save as MMS template: save the well-edited MMS into the phone as MMS template. View MMS 1. Operation path: Main menu>Messages>MMS>Inbox. 2. Arrange message by time sequence to search the MMS to be viewed, click[Central Key]to view MMS in details. 3.
View the unsuccessfully-sent MMS: 1. Operation path: Main menu>Messages> MMS>Outbox. 2. Arrange message by time sequence to search the MMS to be viewed, click[Central Key]to view MMS in details. Option Menu of Outbox Message: Resend: resend the selected MMS. Delete: delete or delete a batch the selected MMS. Delete all: clear up the current outbox. View mode: display the MMS in the message-sending list by date and subject. Details: subject,address,time , priority and size.
entry and click[Central Key]to enter into the editing window. 3. After selecting the editing entry and finishing the editing, you can click “Option” to select “Send”, and then input the number of addressee, or by selecting addressee’s number from “Recent receiver/Contacts” and click [Central Key]to send the message. Option Menu after Selecting Draft Box: Send: send the draft to the contacts Delete: delete the current or the bulk delete. Delete all: clear up the current draft box.
limit and Profile settings. Memory status Display the current memorizer and usage status. The display contents are used space/ free space and classified as phone and external memorizer display. Email Create and Send Email 1. Operation path: Main menu >Messages >Email>New. 2. Select the subject and click to input the subject under E-mail editing status. 3. Select text and click to input the text under E-mail editing status. 4.
Add attachment: select the Add File from the My stuff. Add vCard: select and add contact info from the Contacts. Save to draft: save the well-redacted E-mail in the draft. View Received Email 1. Operation path: Main menu >Messages >Email>Inbox. 2. Arrange E-mail by time sequence to search a required E-mail. 3. Under the E-mail list status, click the [Central Key] to view the E-mail contents. 4. With the set E-mail receiving mode, the E-mails in the inbox may be a themed one or an integral one.
Option Menu of Outbox Message: Resend: resend the selected mail. Delete: delete or delete a batch the selected E-mail. Delete all: clear up the current outbox. View mode: display the mail of mail-sending list by date and subject. Details: from,subject,time,size,to,priority,attachment. Option Menu of Viewing unsent E-mail: Resend: resend the selected mail. Delete: delete the current email. Extract: extract number, URL, mail address from the content. View Sent E-mail 1.
Details: from,subject,time,size,to,priority,attachment. View/Edit Draft 1. Operation path: Main menu >Messages >Email>Draftbox. 2. Arrange E-mail by time sequence to search a required E-mail. 3. If you are desired to continue to edit message in draft box, you can select draft entry and click[Central Key]to edit, and click “Option” to select “Send” to send the mail. Option Menu after Selecting Draft Box: Send: if there is no addressee, you can jump to the address editing window of addressee.
incoming call image or send the v-Card to the contacts. If desired to enter into the contacts menu, please select [Central Key] under the standby status, enter into the main function menu and select . Set up Current Contacts Display Set up Current Contacts Display 1. Operation path: Main menu > Contacts. 2. Click the “Option” to select “Contacts Display”, click “Ok” to select Phone /USIM Card/All. Operate Contact Data New Contact 1. Operation path: Main menu >Contacts. 2.
1. 2. Operation path: Main menu >Contacts. You can input the initial letter of the contact’s name when you search English name and search the required inquiring about the name and phone number of the contacts. Option Menu under Contacts Status: Call: call the selected contact by voice call/video call. Send message: edit SMS or MMS. New: create the message of contact in contacts. Edit: edit the message of the current contact in contacts.
phone just supports to dial the numbers in fixed dial list. Edit Contact Reedit the possessed data of contacts. 1. Operation path: Main menu > Contacts. 2. Select the contact entry, click “Option” to select “Edit”, and then click “Ok”. 3. If the data of contact save in the phone, the contents which can be edited include: Name, Mobile number, Video number, Number, Number type, Group, E-mail, URL, Birthday, Ringtone, Image and Notes.
Option Menu of Predefining Group: Edit: edit relevant data for current group, including group name, group ringtone and group OSD. New: create the group. Option Menu of Customizing Group: Edit: edit relevant data for current group, including group name, group ringtone and group OSD. New: create the group. Delete: delete a currently-selected group.
Send My business card through Contacts 1. Operation path: Main menu >Contacts. 2. Click “Option” to select “Settings”. 3. Select “My business card” and click[Central Key]to open the business card message window. 4. Click “Send” to select the sending mode and click “Ok”. 5. The phone will open the message editing window and add business card in message. 6. After finishing message editing, you can click “Option” to select “Send”, click “Ok”. Input the message of addressee and click[Central Key]to send.
enter into the setting page of alarm clock. 3. Input the parameters of alarm clock in order, and click “Save” to save the setting of alarm clock. 4. If you are desired to activate the closed alarm clock, please click “On” to open the selected alarm clock under the list window. Calculator The phone supports the simple calculator function, including addition, subtraction, multiplication and division operations, radical sign operation, storage operation and operation number reverse.
it can not be negative, if the current number is negative, the radical sign will conceal. MS: this operation sign and MR MC are the stored operation signs. The operation sign is stored order, namely, the current operation number and operation results will be stored in EMS memory. But it has no operation function and can not fulfill any operation, therefore, it will not breach the current display contents. Note: it can not store multiple data, and the re-saved data will replace last stored data.
World Time The phone supports displaying time of cities in different time zones. Search City Info via Focusing on Map 1. Operation path: Main menu > Tools >World Time. 2. Search city info via the [Navigation Keys]amid different time zones. 3. The city name, map position, local city time, time zone and day & night status will be displayed on the window. Quickly Search City via City Name 1. Operation path: Main menu > Tools > World Time. 2.
Summer time: launch or close summer time. Set locate zone: set up the time of selected city to local time. E-book Phone supports browsing e-books. E-book Usage 1. Operation path: Main menu > Tools >E-book 2. if you need read from the machine, firstly put ebook resource under the folder "Others" from My stuff then click on [Central Key] to open Ebook you added) Read the e-book mode Options menu: Book Marker Find Go to Auto scroll Encode Multimedia Multimedia includes media player and radio.
click[Central Key]to open the My stuff. 4. Select media folder/file of required playing, click[Central Key]to finish the addition of play list. Delete the File from the Play List 1. Operation path: Main menu > Multimedia > Media player. 2. Click “Option” to select “Play List”, click “Option” to unfold the play list. 3. Click “Option” to select “Remove”, click to select deletion mode. 4.
Details: display the attribute message of play file, including name, format, type,creation date, length, size ,position, protected Change volume: Adjust the volume of the Media player. Quit: Drop out the Media player. Radio The radio will select the frequency band according to network received country or regional message. Listen to the broadcast Please note that the effect of receiving broadcast by radio which depends on the coverage inner the customized region of broadcasting station.
7. Open option to select “Quit”, you will drop out the radio. My stuff The My stuff supports the operation of images, sounds, videos and java files. If desired to enter the My stuff menu, please click[Central Key]under the standby mode, enter into the main functional menu, and select . Folder Newly-built Folder 1. Operation path: Main menu > My stuff > Images/Sounds/Videos/Applications/ Others. 2. Click “Option” to select “New folder”, and click “Ok”. 3.
Operate the File 1. Operation path: Main menu > My stuff > Images/Sounds/Videos/Applications/ Others. 2. Select and open the folder, select the required file. 3. Click the “Option” to select “New folder/View mode/Memory status”, and select specific operation mode: “Delete/Batch to delete”, “Move/ Batch to move”, “Copy/ Batch to copy”. 4. For the batch operation, using[Central Key]to select the required file, click “Option”, open option menu to select the specific operation.
Slides show: display the file by playing slide. Send: send thecurrent files by MMS/E-mail/Bluetooth. Delete: delete the current file. Details: display the current specific message of the file, including Name, Format, Type, Creation date, Size, Resolution, Position and Protected. Option Menu of Music Ring List: Set as: set up the selected file as voice call ring/video call ringtone/message alert/email alert. Send: send the selected files by MMS/E-mail/Bluetooth.
image. Details: display the current detailed message of the file, including name, mode, type, time creation, size, position and file protection. Memory status: view the phone and occupied status of external memorizer. Option Menu of Application List: Send: send the selected files by MMS/E-mail/Bluetooth. Move: move the selected file from the current position to other position. Copy: copy selected file to other position. Delete: delete the selected file. Rename: rename the current file.
Delete:Delete the event in a select date To certain day: skip to a designated date. Settings: set up alarm ringtones for different types of events, and set up the parameter for Week View including the date and name of Week View. Expired Event: display all outdated event logs. Event Recording Entry Create Event 1. Operation path: Main menu > Calendar. 2. Select newly-built event’s date in calendar, click[Central Key]to enter into the event management list in the present day. 3.
View Calendar View Events in Designated Date 1. Operation path: Main menu > Calendar. 2. Click “Option” menu to select “To certain day”, click “Ok’. 3. After inputting the date, click “Ok”. Week View 1. Operation path: Main menu > Calendar. 2. Click “Option” to select “Week view”, click “Ok’. 3. If there is an event log in a time interval, the week view will prominently display the time interval. Outdated Event 1. Operation path: Main menu > Calendar. 2.
restriction, Rate standard or replacement. Call Log View Call Log 1. Operation path: Main menu > Call log > Missed calls/Outgoing calls/ Incoming calls/All calls. 2. View call log entries. Save Record Number 1. Operation path: Main menu > Call log > Missed calls/Outgoing calls/ Incoming calls/All calls. 2. Select call log entry to open “Option”, select “Save number”, and then select save mode, click “Ok”. 3.
number. voice call: Users to establish voice call. video call: Users to set up video call. View the Transmission Data Capacity 1. Operation path: Main menu > Call log > Data transmission. 2. Click “Reset” to re-set and recalculate the data capacity. Review Call duration 1. Operation path: Main menu > Call log > Call duration. 2. Click “Reset” to reset and recalculate the call duration. Settings The settings function will help you customize the phone.
Profile You can set up personal ringtone and relevant prompt tone of the phone in different scenes. 1. Operation path: Main menu > Settings > Profile. 2. Select required Profile of setting, click to open the window of parameter setting. 3. Select your required type of setting to set up, after completing, click “Save” to save the setting value. 4. Click “Select” when the phone returns back to the Profile and then launch the Profile.
Items of Display Settings: Idle screen: set up standby menu for the phone. It includes wallpaper and whether to display the time and date. Backlight time: set up the waiting time of screen light, including 5 seconds/10 seconds/20 seconds/ Always. Brightness: set up the brightness of display screen. Phone Settings Set up the language, time, date and shortcut of the phone. 1. Operation path: Main menu > Settings > Phone settings. 2.
Answer mode: set up to receive the call by random key/receving key. Auto redial: set up whether continuing to dial if calling failure, this function supports at most 10 times automatic re-dial. Minute prompt: set up whether reminding 10 seconds prior to integral minute under the call status of the phone. Answer prompt: prompt the receving function of the phone. Call divert: transfer the voice incoming call/video incoming call to another number or voice/video message box which you designated.
of the phone and (U)SIM card passwords. The phone and (U)SIM card passwords as well as PIN2 support 4-8 digits but not support other characters. The original lock password of the phone when leaving the factory is 0000, the (U)SIM card password and PIN2 are provided by the network operator. If you input PIN/PIN2 wrongly in continually 3 times, your (U)SIM card will be locked.
data account. Operation path: Main menu>Settings>Connection settings. Items of Connection Settings: Bluetooth: activate or deactivate the Bluetooth function, search Bluetooth devices or set up Bluetooth parameters. Data account: Set up the parameter of data account. Bluetooth Settings Operation path: Main menu > Settings > Connection Settings > Bluetooth> Settings. Items of Bluetooth Settings: Visibility: Aiming at other Bluetooth device to display or conceal the local phone.
Data Account Settings 1. Operation path: Main menu > Setting >Connection Settings > Data Account. 2. Select a data account; click the[Central Key]to view the account info including account name, access point, authentification type, user’s name and password. 3. If desired to create a new data account, select “Create” via option, input account setting parameters, and click “Save”. 4. If desired to re-edit the data account, select “Edit” via option, input account setting parameters and click “Save”.
FAQs and Troubleshooting Solution Please carry on the following straightforward check prior to contact with a professional post-sale service in order to save your time and unnecessary expenses. The phone cannot be started up Check whether the power key is pressed and held continuously. Check whether the battery is contacted well or not. Please firstly remove the battery and refit it, then re-power on the device. Check whether the battery is run out or not. Please recharge it.
Cannot Dial Out Please confirm whether the dial key is pressed after the number is dialed. Please confirm whether the call is barred due to owned toll. Please confirm whether the (U)SIM card is valid or not. Please confirm whether the call restriction function is set up. Please confirm whether the fixed dial function is set up. Bad call quality Check whether the volume is adjusted appropriately.
signal is strong to use the phone or temporarily power the phone off. The battery requires to be displaced with a new battery. Cannot charge Bad contact! Please check that the plug is connected well. Wipe the interfaces of the phone and battery with soft and dry clothing. Please change the charging environment when charge at the environment below 0℃ or beyond 40℃. The battery or adapter is damaged and requires to be replaced.
Health & Safety Information RF/SAR Information Your phone is a low-energy wireless receiver. Upon powering it on, the phone will emit a low-level radio frequency (RF). All governments around the world use the national safety directives framed by specialized scientific organizations, such as ICNIRP and IEEE. These directives have established an approved level of radio waves exposure to common population.
recycling location, and should not discard with the life trash. The battery charging time depends on the remained capacity, type and adapter. The battery may be charged for thousands of times, but will wear out gradually. Please purchases new battery when the standby time is shorter than the normal time obviously. Please use the adapter and battery dedicated to or authorized for the phone. Please disconnect the adapter and the power supply when the adapter is not used.
distributor in case of the above problems. Please close your mobile phone when fuelling or at any place where the bidirectional wireless devices are prohibited using. Please do not place the phone together with the flammable and explosive articles because the internal sparkle can ignite. Please close the mobile phone before the plane takes off. Be sure not use the phone during the flight in order to prevent the phone form disturbing the plane communication system.
personal medical apparatus in confirmation of wireless shield wave. The doctor may assist you obtaining the information. Please close the phone if the phone is prohibited using near the healthcare facilities. Automobile device: please consult the manufacturer in confirmation of the information because the wireless signal may affect the electronic devices installed in the automobile.
Keep the phone dry, and avoid all types of liquids entering in interior of the phone so as to prevent against damage. Do not operate the phone with wet hands, or otherwise cause electric shock. Please do not store the phone under elevated temperature, or otherwise shorten the service life of the electronic apparatus, damage the battery and melt the accessories. Please do not store the phone under the low temperature.
Declaration of Conformity This equipment has been tested and found to comply with the limits for a Class B digital device, pursuant to Part 15 of the FCC Rules. These limits are designed to provide reasonable protection installation. This equipment generates, uses and can radiate radio frequency energy and, if not installed and used in accordance with the instructions, may cause harmful interference to radio communications.
all persons, regardless of age and health. The exposure recommendations for mobile phones use a measurement unit known as the Specific Absorption Rate (SAR). The SAR limit recommended by the ICNIRP for the mobile phones used by the general public is 2.0W/kg averaged over ten grams of tissue and, is 1,6W/kg averaged over one gram of tissue by IEEE Std 1528 for the head.