
User's Manual


. .
Receiving signals and ID is matched. : On
Receiving signals, but ID is not matched. : Off
No signal reception.: Off
Receiver ID memory is empty.: Blink per second
The transmitter has an individual randomize ID that is created in the factory; even it is almost have no
chance to meet the same ID transmitter in the same fly field, in case it does happen. The transmitter
has an ID set up function.
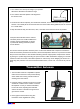
By holding the “PDM” button to turn on the transmitter, the LED will blink. Press the “PDM” button
to random change a new ID, the new ID will active when the transmitter turns on next time. Once you
have set up a new ID for your transmitter, please must remember to re-pair your receiver with your
transmitter before running.
You can go back to the original factory set ID by holding the “PDM” when turn on the transmitter,
without press the “PDM” button, turn it off and on again to get back the original factory set up ID.
.
.
.
.
.
.
.
.
Chang the transmitter ID
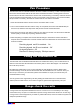
A range check must be performed before the first run of a new car. It is not necessary to do a range
check before every run (but is not a bad idea to perform a range check before the first run of each day).
A range check is the final opportunity to reveal any radio malfunctions, and to be certain the system has
adequate operational range.
.
.
.
.
Range check the radio
RR
5
Pair Procedure
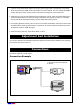
The transmitter has an individual randomize ID that is created in the factory, In order to start operation,
the receiver must be linked with the ID code of the transmitter with which it is being paired. Once the
link is made, the ID code is stored in the receiver and no further linking is necessary unless the receiver
is to be used with another transmitter or when you purchase a new receiver for your recent transmitter,
this procedure is necessary; otherwise the receiver will not work with the transmitter.
1. Place the transmitter and the receiver close to each other within 1 meter.
2. Turn on the transmitter then the receiver. If they are not paired, the receiver red LED will blink per
second or off, follow the next steps to link and pair the receiver and the transmitter.
3. Press down the receiver “pair button” switch for more than two seconds once the receiver LED start
to blink quickly, it shows they are pairing, release the switch.
4. When the pairing is complete, the receiver LED will change to solid red and receiver will start to
response to the transmitter after 2 seconds. Please refer to the table below for the LED status of the
receiver's condition.
.
.
.
.
.
.