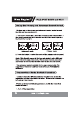
any time during the charge or discharge process the battery begins to balloon or swell, discontinue charging or discharging immediately. Quickly and safely disconnect the battery, then place it In a sags, open ares away from flammable materials to cheerer it for 30-45 minutes. Continuing to charge or discharge a battery that has begun to balloon or swell can result in a fire. A battery that has ballooned or swollen even a small amount must be removed from services completely.
IRI Ey below the minimum operating voltage of the receiver and other electronics. Also, it Is not recommended that you fly to the soft LVC every teems you fly. Instead, you should be aware of the power level of the battery/helicopter throughout the flight, and if at any teems the helicopter begins to require more throttle than typical to maintain hover or flight, you should land the helicopter immediately. Routinely discharging the battery to the soft LVC can still cause permanent damage to the battery.
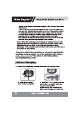
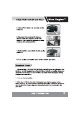
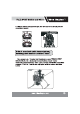
NE D. when the battery is fully charged the Led light will go out entirely E. You must take out the LI-PO when it finishes the chars process. 1. Take off the transmitter cover 2. Install four(4) AA batteries in the transmitter 3. Turn on the power, check if there is any content showed on LCD Slide the LI-PO battery into the battery slot on frame of helicopter {usually with the label on the battery facing outward} however, be sure to check for proper alignment and polarity before proceeding to the next step.
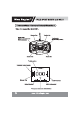
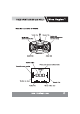
Nine Eagles™ When the transmitter is MODE. Bidder stick 4 / {Primary and advanced \ / Throttle stick switched bunion) {Cote Binding button} Rudder Trim Alter an trim Throttle reading N \ \, Transmitter power reading ~ ~\ Throttle trim show Elevator Trim / Rugged trim show Aileron bunion show Primary and advanced switched button
Nine Eagles”™ When the transmitter is MODEM: Throttle trim \ Rudder stick Throttles stick \ {Primary and advanced {Cuds Binding button} y switched bunion) / \ Rudder Trim Randall trim Arthritis reading N\ Primary and advanced switched button Transmitter power reading Throttle trim show Elevator Trim 7 \ Rudder Trim Aileron button show
Ey We have set up the primary and advanced control model to nest the different fans requirement. 1. Turn on the transmitter, check the present model of transmitter. if the mode is advanced the illustration as left, if the mode is primary the Frustration as right. ‘mane | moos coo | [i 000 Advanced mode Primary mode 2. Press the button to switch the mode of the primary and advanced. Note: This throttle curve in the low rate mode Iz also different than it is in the high rate mode.
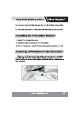
\N 2. Tass off the fixed nut and clip on the antenna. 3. Reverse the antenna 90 degree, circumnavigate the antenna shaft 180 degree, then make ths antenna to cling another side of transmitter. 4. Reinstall the nut and the fix clip on the antenna.
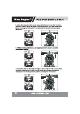
Nine Eagles™ 3. Move the elevator stick on the transmitter forward and after to check elevator control. When the stick is pushed forward, the right-hand serve {when viewing the helicopter from behind) should pull the swash plate downward. . 4. With the stick pulled back, the right-hand serve should push the swash plate upward. 5. Moss the aileron stick lef! and right to check aileron roll control.
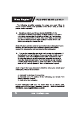
= 6. With the aileron stick pushed right, the left-hand servo should push the swash plate upward. The unique 5-in-1 Control Unit installed on your FREE SPIRIT MICRO/SOLO is a lightweight combination of main motor electronic speed controls, mixer, gyro, servos and FISK compatible receiver. The 5-in-1 unit is also equipped with two status indicator LESS.
CRITIC Ey The following checklist contains the steps you must follow to ensure proper arming and operation of the 5-in-1 unit, as well as proper motor response: @ Each time before you fly you should ALWAYS turn the transmitter on before connecting the flight battery to the 5-in-1 unit. Never connect the flight battery to the 5-in-1 unit before power in the transmitter on first. Adler each flight, be sure that you always disconnect the flight battery from the 5-in-1 unit before powering the transmitter off.
= ® Once you have placed the helicopter in a safe area, free of obstructions, and are clear of the rotor blades, you can safely begin to prows up the model to check for proper operation of the motors. @ Advance the throttle stick upward slowly, just until both rotor blades begin to spin. DO NOT attempt the fly the helicopter at this time. Note the direction that each of the rotor blades spins.