HANDHELD REMOTE CONTROL
325 Campus Drive • Aurora, OH 44202
TABLE OF CONTENTS Lighting Kit Overview Basic Concepts of Wireless Lighting Planning Your Lighting Network Power Failure with Wireless Light Bulbs Remote Control Overview Indicators Installation Using the Remote Remote Control Operation Turning Lights on and Off Brightening and Dimming Lights Changing a Light Bulb’s Lighting Group Cloning a Remote Control Replacing Batteries Resetting the Remote Control Light Bulb Tasks Adding Light Bulbs to the Network Removing Light Bulbs from the Network Optional Lightin
2
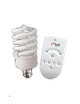
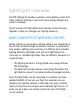
lighting kit overview The TCP lighting kit includes a wireless smart lighting system that helps make the lighting in your home more energy efficient and easier to manage. The kit includes CFL light bulbs and a remote control that work together to help you manage your lighting wirelessly.
PLANNING YOUR LIGHTING NETWORK Whether you have only one wireless light bulb or you are replacing your entire home with wireless light bulbs, you should plan how you want the lighting on your network to behave. For example, if you only have one light bulb you might want to place it in a central location that would be optimum for turning on and off when you are away or arrive home.
The following limitations apply when working with network light bulbs and lighting groups in a system using remote control only: • A light bulb can belong to only 1 lighting group. • Your remote control can control up to 4 different lighting groups. If you add additional remote controls to your network, each of them can control 4 additional lighting groups. • The remote can control 250 light bulbs divided in any manner among the 4 different lighting groups.
Remote Control Range When using your remote control, you must be within range of your lighting network for the remote control to be able to control your lighting. However, this does not mean that it has to be within range of all network light bulbs. Since the light bulbs are interconnected across the network, they can pass commands to each other as long as they are within network range of each other.
POWER FAILURE WITH WIRELESS LIGHT BULBS Wireless light bulbs are powered through light fixtures the same way standard light bulbs are. However, you must leave the light fixtures in the on position so that power is available when using your remote control to turn the wireless light bulbs on and off. If power is removed from a light bulb, whether from power failure or from manually turning off the light fixture, the light bulb will turn off.
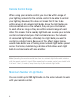
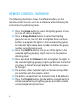
REMOTE CONTROL OVERVIEW The following illustration shows the different buttons on the remote control. You can use it as a reference while following the instructions for performing tasks. 01. Press the Group button to select all lighting groups to turn on, turn off, dim, or brighten. 02. Press a Group Number button to select that lighting group to turn on, turn off, dim, or brighten. Also use these buttons to program the lights in the corresponding group.
5 4 3 2 1 7 6 9
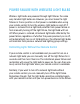
INDICATORS The remote control has four group number indicator lights and one primary status indicator light that display the following patterns to show you the remote control’s status during different processes: 10 PROCESS INDICATOR AND DESCRIPTION Initial Remote Control Setup Primary indicator flashes steadily: During the process of installing batteries for the first time, the remote control is determining the best signal for your lighting system.
installation Installation of your lighting kit includes installing the light bulbs into light fixtures and preparing the remote control. INSTALLATION STEPS Before installing the light bulbs, determine the appropriate locations in your home for installing them. The Lighting Kit Overview chapter provides information on planning your lighting network. When you are ready to install the light bulbs, perform the following steps: 01.
06. Leave the light fixture switches ON so that power is available when using your remote control to turn the light bulbs on and off. Once these steps are complete, you can use the remote control as discussed in the Remote Control Operation chapter to operate your lighting network. Installation Tips Review The Safety Information. Be sure to review the information contained in the Safety Information chapter for important safety information you should follow. Keep radio signals clear.
remote control operation You can perform several tasks with the remote control, including: • • • • • • Turning lights on and off Brightening and dimming lights Changing the lighting group to which a light bulb is assigned Cloning the remote control to a new one Replacing batteries Resetting the remote control to factory default settings Note: Some tasks require pressing the Program button, which is located inside the battery compartment on the back of the remote control.
Note: The previously selected group (or all groups, if selected) remains the active group on the remote control. To take action on that same group again, you do not have to press the group button again. Brightening and Dimming Lights You can brighten and dim your lights even if though they are not connected to a fixture with a dimmer switch. To set the brightness level of lights, you must set the level for an entire lighting group: 01.
Note: The previously selected group (or all groups, if selected) remains the active group on the remote control. To take action on that same group again, you do not have to press the group button again. Changing a Light Bulb’s Lighting Group To change a light bulb’s lighting group, you must first remove the bulb from the network using the removal procedure in the Light Bulb Tasks chapter.
01. On the ORIGINAL remote control: a. Press and hold the Program button. b. While pressing the Program button, press the On/Off button three times. c. Release the Program button. The primary indicator indicator starts flashing steadily. 02. On the NEW remote control: a. Press and hold the Program button. b. While pressing the Program button, press the 1- 4 button three times. c. Release the PROGRAM button. The primary LED indicator starts flashing rapidly.
Replacing Batteries Your remote control uses two AA 1.5V alkaline batteries (included). To replace the batteries, remove the battery cover from the back of the remote control and remove the old batteries. Insert the new batteries as indicated in the battery compartment. CAUTION: RISK OF EXPLOSION IF BATTERY IS REPLACED BY AN INCORRECT TYPE. DISPOSE OF USED BATTERIES ACCORDING TO THE INSTRUCTIONS.
If you are sure you want to reset the remote control, use the following steps: 01. Remove the battery cover from the back of the remote. 02. Remove the batteries from the remote control. 03. Press and hold the Program button. 04. While still pressing the Program button, reinsert the batteries into the remote control. 05. Release the Program button. The remote control is returned to its default factory settings. To use it again, you must follow the original installation instructions.
01. Make sure your remote control is in range of the light bulb you are adding. Remove the battery cover from the back of the remote control so that you have access to the Program button. 02. Make sure power to the fixture where you are installing the light bulb is turned OFF. 03. Remove any existing light bulb from the light fixture. 04. Install the network light bulb into the light fixture as you would any standard light bulb.
indicator light on the remote control will continue to flash for up to five minutes to give you time to install any additional light bulbs to that lighting group. 07. To add more light bulbs, repeat these steps. Remember, if the group number indicator light on the remote control is still flashing from step 6, then it will automatically find the new light bulb without you pressing any buttons, and it will add the bulb to the same lighting group.
01. Make sure your remote control is in range of the light bulb you are removing. Remove the battery cover from the back of the remote control so that you have access to the Program button. 02. Make sure power to the fixtures containing the light bulbs you want to remove is turned ON.
light (or all group number indicator lights if removing all groups) and the primary indicator light flash slowly for 30 seconds while the light bulbs are removed. When the light bulbs have been removed from the network, they will brighten and dim. 04. Repeat these steps to remove light bulbs from another lighting group.
optional lighting gateway This user guide explains how to use lighting kits that do not have a Lighting Gateway. A Lighting Gateway is an optional device, similar to your home network router, that extends the range, features, and functionality of your lighting network. You can upgrade your network to operate with a Lighting Gateway to gain the following benefits: • You can use a Smartphone application or your Web browser to perform many tasks with your lighting network and bulbs.
troubleshooting If you are having problems with your lighting system, refer to the following sections for possible troubleshooting solutions. Light Bulb Not Responding During Installation When you add a new light bulb to the network (or if you add a previously existing light bulb that you removed from the network), the light bulb should brighten and dim during the installation process to indicate that it is searching for a network.
Light Bulb Accidentally Removed from Network It is possible for a network light bulb to be accidentally removed from the network. For example, if someone turns power off and on four times consecutively to the light fixture, the attached light bulb will reset and remove itself from the network. If this happens, follow the procedure in the Light Bulb Tasks chapter to add a new light bulb to the network.
to turn the light on and off. Be sure the appropriate light fixtures are left in the on position. If necessary, refer to the section on power failure in the Lighting Kit Overview chapter. • Place remote control at an adequate distance from light bulb. Not only must you ensure the remote control is within range of the nearest network light bulb, you must also ensure it is not too close. Operating the remote control too close to a network light bulb could interfere with the remote control’s signal.
safety information Batteries Use only AA 1.5V alkaline batteries. WARNING: Batteries can explode, or leak, and can cause injury or fire. To reduce this risk: • Carefully follow all instructions and warnings on the battery label and package. • Always insert batteries correctly with regard to polarity (+and -) marked on the battery and the equipment. • Do not short battery terminals. • Do not mix old and new batteries. Replace all of them at the same time with new batteries of the same brand and type.
Indoor Use Only The hardware in your lighting kit should be used only in dry, indoor locations. Do not use the hardware in high-humidity locations such as greenhouses, saunas, washrooms, or patios. Do not use the hardware in locations where it can get wet such as near aquariums or running water. Do Not Disassemble The hardware in your lighting kit has no user-serviceable parts inside. In case of persisting malfunction, please contact Customer Service to arrange for repair at a certified service location.
FCC Federal Communication Commission Interference Statement This equipment has been tested and found to comply with the limits for a Class B digital device, pursuant to Part 15 of the FCC Rules. These limits are designed to provide reasonable protection against harmful interference in a residential installation. This equipment generates, uses and can radiate radio frequency energy and, if not installed and used in accordance with the instructions, may cause harmful interference to radio communications.
Disposing of Your Used Product This product complies with the WEEE Directive (2002/96/EC) marking requirements. The affixed label indicates that you must not discard this electrical / electronic product in domestic household waste. WEEE Product Category. With reference to the equipment types in the WEEE Directive Annex 1, this product is classed as category 3 “IT and Telecommunications Equipment.” DO NOT DISPOSE IN DOMESTIC HOUSEHOLD WASTE.
34
36
quick reference notes Task Steps Add Light Bulb Press and hold Group Number till light indicator begins to flash. Main light indicator will begin to flash when the Remote and Light Bulb are communicating, once the light indicator turns off the process is complete. Remove Light Bulb Press and hold Program button, press the On button, press the Group Number, press the On button, release Program button. Main Indicator Light will flash till the process is complete.
We Know Light ™