
User's Manual


NT210 User’s manual
- 9 -
4.5 Connect the cash drawer
1)Ensure that the printer is powered off
2) Insert the cash drawer cable into the cash drawer interface at the back of printer.
Warning: The cash drawer interface is only used for cash drawer device (telephone line or other
lines are not allowed).
Figure 4.5-1
4.6 Paper roll installation
4.6.1Confirm the print paper
After connecting the power adapter and the interface cable, you can install the media for printing. Confirm
the type of paper used for the printer before printing.
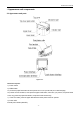
4.6.2 Install/Replace the paper roll
1) Power off the printer;
2) Open the top cover of printer, and then place the paper roll into the paper cabinet (refer to Figure
4.6-1);
3) Close the top cover, and then tear off the surplus paper head and power on the printer, the printer will
enter the waiting status for printing (refer to Figure 4.6-2).
Figure 4.6-1 Figure 4.6-2
Caution:
Make sure that the paper roll is in tighten status, otherwise it may cause paper jamming or other malfunctions;
The paper roll should be placed in the paper cabinet smoothly without tilt, otherwise it may affect the printing.
4.7 Printer self-test
1) Confirm that the paper roll has been installed in the printer and the top cover of printer is closed;
2) Press and hold the feed button while turning on the power switch, and release the button when the
printer starts to feed paper, then the printer will print a self-test sample.