a7 BELL Phones BY NORTHWESTERN BELL PHONES Distributed Exclusively Worldwide by Uncial Enterprises, Inc., Industry, California USA 39765K/08099A-1 www . homophones . com 08089A-1 | @ BELL Phones be BY NORTHWESTERN BELL PHONES Excursion® 39765 Iron mee zal | Ses gn 076: (| WON HITS Congratulations on your selection of the Excursion® 39765 from Northwestern Bell Phones.
Read this manual before attempting to setup or use this instrument. It contains important information regarding safe installation and use. Keep this manual for future reference. Also save the carton, packing and proof of purchase to simplify and accelerate any needed action. If you need assistance or service, call (800) 888-8990 between 8:00 a.m. and 4:30 p.m. Pacific Standard Time, Monday through Friday. You can also visit our web site at: for technical i support and information on our other products.
SAVE THESE INSTRUCTIONS IMPORTANT SAFETY INSTRUCTION! A When using your telephone equipment, basic safety precautions should always be followed to reduce the risk of fire, electric shock, and injury to persons, including the following: 1. Read and understand all instructions. 2. Follow all warnings and instructions marked on the product. 3. Unplug this product from the wall outlet before cleaning. Do net use liquid cleaners or aerosol cleaners. Use a damp cloth for cleaning. 4.
not store this product, or the battery provided with or identified for use with this product, in high-temperature areas. Batteries that are stored in a freezer or refrigerator for the purpose of extending shelf life should be stabilized at room temperature prior to use after cold storage. Disconnect telephone lines before installing batteries.
TABLE OF CONTENTS IMPORTANT SERVICE INFORMATION CARTON CONTENTS IMPORTANT SAFETY INSTRUCTION BATTERY SAFETY INSTRUCTION .. INSTALLATION PRECAUTIONS FCC NOTICE EXCURSIONS 38765 CONTROLS DIAGRAM DESCRIPTION .. . CONTROLS’ LOCATION AND FUNCTION . HANDSET CONTROLS Cordless Telephone HANDSET CONTROLS Answering System .. BASE UNIT CONTROLS Cordless Telephone BASE UNIT CONTROLS Answering System MOUNTING POSITION DESKTOP USE .. coDwmnE®whS WALL USE 14 BELT CLIP INSTRUCTION 18 CONNECTING THE HEADSET .
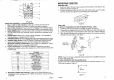
EXCURSION® 39765 CONTROLS DIAGRAM NEW CALL LED Antenna Indicator Tab LED Indicator | ~ J Retainer Sto LCD Display MEME Butting + Bu ten MAR 1.28 FLASH / REMOTE i Ambulant INT COM = Button VOL Button Fh Um Bunion "VOL | [Volume Down) Bunion o SCANNING Button INT COM Button Microphone Button Charge Contacts BASE UNIT (Rear View) DC Adapter ~~ TEL LINE Jack Jack BASE UNIT (Side View) TONE / PULSE ICM REC (TP) Switch Switch i nD RINGER OFF / ON Switch Switch 9 08099A-1 Retainer IN USE { CHARGE MAIL 1.
12. Microphone: Used for speaking with callers. 13. RE /PA (Redial / Pause} Button: Automatically dials the fast phone number dialed up to 31 digits. Also used to insert 4-second delay between dialed numbers in PA BX systems or long distance services. 14. FLASH Button: Momentarily hangs up the phone to regain dial phone or access custom calling features such as Call Waiting or Three-Way Calling provided by your local phone company. 15. C.
(Figure 4) BASE UNIT CONTROLS Answering System 1. MAIL 1, MAIL 2 LED Indicators: Lights up to indicate the presence of message(s) and flashes to indicate it is active and ready to operate. 2. MAIL 1, MAIL 2 Buttons: Press lo play the message(s) on the desired mailbox. Press and hold to record the outgoing message (OGM) on the selected mailbox. 3. MEMO [PERV] Button: Used to record a memo message for yourself or others and also used for two way recording. Skips to the previous message during playback. 4.
1. Drive a screw into each of the holes. Tighten them fo the end of the screw line, only leaving the smooth part of the screw head outside the wall, 2. Hang the unit onto the screws, then slide it down firmly to fasten the base securely. BELT CLIP INSTRUCTION Clamp the belt clip at the back of handset as shown in Figure 8. i Li (Figure 8) CONNECTING THE HEADSET For hands free conversation, a headset (not included) is connected to the headset jack as shown in Figure 9.
3. Connect 4 AAA size 1.5V alkaline batteries {not included) anti the battery 3. Press 2. The unit will announce the default setting of day "Monday" and time compartment . *12 A.M". The unit will prompt “Please enter new day.’ 4. Screw back the cover of the battery compartment. 4. After hearing a long beep, enter the new day (Monday = 1, Tuesday =2, NOTE: The 4 AAA 1.5 alkaline batteries serve as the backup power for saving Wednesday =3, etc.). The unit will then prompt “Please enter new time.