Turbo Stick Vac OWNER’S MANUAL Model EP600 120V., 60Hz., 7.5 Amps. For information or assistance: EURO-PRO Operating LLC 94 Main Mill Street, Door 16 Plattsburgh, NY 12901 Tel.: 1 866 98SHARK (74275) www.sharkvac.
Model EP600 ONE (1) YEAR LIMITED WARRANTY EURO-PRO Operating LLC warrants this product to be free from defects in material and workmanship for a period of one (1) year from the date of the original purchase, when utilized for normal household use, subject to the following conditions, exclusions and exceptions.
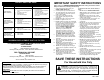
TROUBLE SHOOTING GUIDE PROBLEM POSSIBLE REASON 1. VACUUM WILL NOT OPERATE VACUUM WILL NOT PICK-UP OR SUCTION POWER IS WEAK 2. 3. 4. 1. 2. 3. 4. Power cord not firmly plugged into outlet. No power in wall outlet. Needs servicing. Thermostat has tripped. Dust cup is full. Unit clogged. HEPA-Type Filter needs cleaning or replacing. Debris screen needs cleaning. DUST ESCAPING FROM VACUUM 1. 2. Dust cup is full. Dust Cup is not installed correctly. VACUUM, HOSE OR BRUSHES WILL NOT PICK-UP 1. 2.
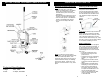
GETTING TO KNOW YOUR SHARK TURBO STICK VAC OPERATING INSTRUCTIONS cont. Replacing The Dust Cup Into The Unit Attaching the Shoulder Strap Use the hooks to attach the shoulder strap to the vacuum cleaner. Connect the dog leash swivel hooks to the eyelets located near the top of the unit handle and at the base of the unit. Adjust the strap as required for comfort. • Hold the dust cup in your hand.
OPERATING INSTRUCTIONS cont. NOTE: Always turn off the power switch and unplug the electrical cord before emptying the Dust Cup. 4. Reassemble the debris screen to the HEPA-Type filter cartridge and replace into dust cup (container). Ensure that the filter assembly is completely seated inside the dust cup (container). 5. Attach the dust cup (container) to the vacuum. Important: Do NOT use the HEPAType filter cartridge without the debris screen in place. Cleaning & Changing the HEPATYPE Dust Cup Filter 1.
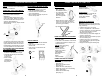
OPERATING INSTRUCTIONS cont. OPERATING INSTRUCTIONS NOTE: Always remove the power plug ATTACHING THE HOSE TO THE MAIN BODY from the wall outlet before assembling or removing accessories. • Press in the pin at the end of the hose (see illustration below). • Insert the hose into its place (see arrow in illustration). • When inserted correctly, the pin will show in the pin hole.