® OPERATOR’S MANUAL MODEL # HDS 5.0/30 Ed / HP-5030D ORDER # 1.575-650.0 To locate your local Kärcher Shark Commercial Pressure Washer Dealer nearest you, visit www.karchercommercial.com or www.karchershark.com 9.800-081.
CONTENTS Introduction 3 Important Safety Information 3-5 Installation 5,7 Component Identification 6 Installation 7 Operating Instructions 8 Detergents & General Operating Techniques 9 Shutting Down & Cleanup 10 Troubleshooting 11-12 Preventative Maintenance 12-13 Maintenance and Service 13-15 Machine Assembly Exploded View 16 Machine Assembly Exploded View Parts List 17 Burner Assembly, Exploded View 18 Burner Assembly Exploded View Parts Lists 19 Warranty Model Number ______
Thank you for purchasing this Pressure Washer. We reserve the right to make changes at any time without incurring any obligation. Owner/User Responsibility: Owner and/or user must study and maintain for future reference the manufacturers’ instructions. The operator must know how to stop the machine quickly and understand the operation of all controls. Never permit anyone to operate the engine without proper instructions.
PRESSURE WASHER OPERATOR’S MANUAL IMPORTANT SAFETY INFORMATION WARNING USE PROTECTIVE EYE WEAR AND CLOTHING WHEN OPERATING THIS EQUIPMENT. WARNING WARNING: High pressure spray can cause paint chips or other particles to become airborne and fly at high speeds. To avoid personal injury, eye, hand and foot safety devices must be worn. 11. Eye, hand, and foot protection must be worn when using this equipment. WARNING: This machine exceeds 85 db appropriate ear protection must be worn.
OPERATOR’S MANUAL Follow the maintenance instructions specified in the manual. PRESSURE WASHER IMPORTANT SAFETY INFORMATION 5 Karcher • HDS 650 • 9.800-081.0 • Rev.
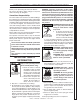
PRESSURE WASHER OPERATOR’S MANUAL COMPONENT IDENTIFICATION CAUTION HOT WATER: Must use insulated spray gun and wand. Pressure Washer 3,000 PSI Maximum (not included) Fresh Water Faucet Pressure Washer Coupler Diesel Fuel Tank Garden Hose (not included) Insulated Wand (not included) Pressure Washer to Inlet Hose Insulated Spray Gun (not included) Inlet Connection Outlet Connection Power Cord High Pressure Outlet Hose (not included) 6 Karcher • HDS 650 • 9.800-081.0 • Rev.
Place machine in a convenient location providing ample support, drainage and room for maintenance. Remove bolts from pallet to foot bracket. Install rubber feet provided as shown on page 16. Placement: Location: Local code will require certain distances from floor and walls. (Two feet away from walls should be adequate.) The location should protect the machine from damaging environmental conditions, such as; wind, rain, and freezing. Allow enough space for servicing the machine.
PRESSURE WASHER OPERATOR’S MANUAL OPERATING INSTRUCTIONS STEP 1: Check fuel tank and pump oil levels on both machines and connect garden hose to pressure washer. CAUTION: Only use fresh water to this machine. STEP 2: Attach high pressure hose between pressure washer and machine. Turn garden hose water on. Additional adapters and couplers may be needed to connect your brand of pressure washer to the machine. STEP 4: For hot water washing, turn the machine burner switch to the ON position.
WARNING WARNING: Some detergents may be harmful if inhaled or ingested, causing severe nausea, fainting or poisoning. The harmful elements may cause property damage or severe injury. STEP 2: With the motor running, pull trigger to operate machine. Liquid detergent is drawn into the machine and mixed with water. Apply detergent to work area. Do not allow detergent to dry on surface.
OPERATOR’S MANUAL PRESSURE WASHER SHUTTING DOWN AND CLEAN-UP STEP 1: If using an optional detergent injector, place the detergent line in a bucket of water allowing detergent to be flushed from system. STEP 2: Turn burner switch off and continue spraying water, allowing the water to cool. After water has cooled to less than 100°F, turn the attached pressure washer off. STEP 3: Turn garden hose water off. Open the spray gun to relieve remaining pressure.
PROBLEM POSSIBLE CAUSE SOLUTION BURNER WILL NOT LIGHT Disconnected or short in electrical wiring All wire contacts should be clean and tight. No breaks in wire. Burner motor thermal protector tripped If tripped, check voltage, connections and extensions for cause. Check fuel pump shaft rotation for binding, causing motor to overheat. On/off switch defective Check continuity through burner switch.
PRESSURE WASHER Troubleshooting Guide TROUBLESHOOTING PROBLEM POSSIBLE CAUSE SOLUTION LOW WATER TEMPERATURE Improper fuel or water in fuel Drain fuel tank and replace with proper fuel. Low fuel pressure Increase fuel pressure. Weak fuel pump Check fuel pump temperature. Replace pump if needed. Fuel filter partially clogged Replace as needed. Soot build up on coils Clean coils with soot remover. Lime build up on coils Clean inside of coils using coil cleaner.
The areas around the machine should be kept clean and free of combustible materials, gasoline and other flammable vapors and liquids. The flow of ventilating air to the burner must not be blocked or obstructed in any manner. MAINTENANCE AND SERVICE Winterizing Procedure: Damage due to freezing is not covered by warranty. Adhere to the following cold weather procedures whenever the washer must be stored or operated outdoors under freezing conditions.
PRESSURE WASHER OPERATOR’S MANUAL MAINTENANCE AND SERVICE Fuel: Use clean fuel oil that is not contaminated with water and debris. Replace fuel filter and drain tank every 100 hours of operation. Use Kerosene No. 1 or No. 2 Heating Fuel (ASTM D306) or diesel only. NEVER use gasoline in your burner tank. Gasoline is more combustible than fuel oil and could result in a serious explosion. NEVER use crankcase or waste oil in your burner. Fuel machine malfunction could result from contamination.
10. Align fuel pump coupler on pump shaft/fan motor. Slide pump into fan motor. Secure pump with the three set screws. 11. Test machine (make sure): Blower motor spins Fuel is on Machine has power to it Switch is on Flow of water through machine Thermostat is turned up Flow switch is adjusted properly 12. When machine is operating properly, turn machine off, tighten front panel, and install hood and 13 self tapping screws with recess washers.
PRESSURE WASHER EXPLODED VIEW 16 22 46 25 55 31 See Burner Assembly For Details OPERATOR’S MANUAL 50 12 27 31 33 35 14 55 39 10 29 28 40 43 41 13 43 4, 51, 52, 53 42 21 29 6 36 45 38 17 11 3 20 9 8 48 24 2 49 26 47 37 44 29 30 23 18 19 54 98000810-2 15 34 7 1 5 32 16 Karcher • HDS 650 • 9.800-081.0 • Rev.
ITEM PART NO. DESCRIPTION QTY ITEM PART NO. DESCRIPTION QTY 9.802-792.0 Nut, Cage, 3/8" x 12 Gauge 4 37 9.802-704.0 Screw, 1/4" 1/2" Hex, Black 1 2 9.802-767.0 Screw, 3/8" x 3/4" Whiz Loc 4 38 9.802-789.0 Nut, 8/32", Keps 2 3 9.802-270.0 Wheel & Tire, 6" Steel Rim 2 39 9.802-775.0 Nut, 1/4" Flange 4 40 9.802-703.0 Bolt, 1/4" x 1-1/2" 2 41 9.802-802.0 Washer, 1/4" Flat 2 42 9.802-754.0 Screw, 1/4" x 1/2" HH, NC 4 43 9.802-775.0 Nut, 1/4" Flange 6 44 9.802-817.
PRESSURE WASHER BURNER ASSEMBLY EXPLODED VIEW 9 4 5 3 6 7 OPERATOR’S MANUAL 8 11 42 12 56 13 31 15 59 14 30 10 60 40 17 38 61 40 21 58 22 37 19 20 40 57 62 23 24 45 25 55 32 26 48 49 41 47 28 43 36 Inlet 51 34 52 46 27 46 50 53 39 29 50 Outlet 54 35 32 33 32 33 41 44 44 18 Karcher • HDS 650 • 9.800-081.0 • Rev.
ITEM PART NO. DESCRIPTION QTY 1 9.802-831.0 Burner, Hotbox, 5.5 GPM 115V1 2 7-46140112 Clamp, Electrode 1 ITEM PART NO. DESCRIPTION 46 9.802-043.0 QTY Elbow, 1/2" JIC x 1/2" Fem, 90° 2 1 3 8.717-935.0 Electrode 2 47 9.803-266.0 Reed, Replacement, MV60 4 8.717-872.0 Elbow 1 48 8.705-974.0 Nipple, 3/8" x 3/8" Hex, Steel 1 8.706-998.0 Connector, 3/8" Anchor 1 8.717-869.0 Ring, Locking 1 6 8.717-932.0 Slide 1 50 9.802-769.0 Screw, 3/8" x 1-3/4" HH, NC 4 7 8.
® Phone: 360-833-1600 fax: 800-248-8409 www.karchercommercial.com WHAT THIS WARRANTY COVERS All Kärcher commercial pressure washers are warranted by Kärcher to the original purchaser to be free from defects in materials and workmanship under normal use, for the periods specified below. This Limited Warranty, subject to the exclusions shown below, is calculated from the date of the original purchase, and applies to the original components only.
® www.karchercommercial.com www.karchershark.com Form HDS 650 # 9.000-081.0 • Revised 5/10a • Printed in U.S.A.