ION P50 ™ CORD-FREE POWERED LIFT-AWAY® IC160 Series • Série • Serie OWNER’S GUIDE GUIDE D’UTILISATION MANUAL DEL PROPIETARIO
IMPORTANT SAFETY INSTRUCTIONS FOR HOUSEHOLD USE ONLY • PLEASE READ CAREFULLY BEFORE USE If the charger plug does not fit fully into the outlet, reverse the plug. If it still does not fit, contact a qualified electrician. DO NOT force into outlet or try to modify to fit. WARNING To reduce the risk of fire, electric shock, injury, or property damage: THE DUOCLEAN® FLOOR NOZZLE, WAND, POD, HANDLE, AND HOSE CONTAIN ELECTRICAL CONNECTIONS: 1.
21. DO NOT use in the following areas: a) Poorly lit areas b) Wet or damp surfaces c) Outdoor areas d) Spaces that are enclosed and may contain explosive or toxic fumes or vapors (lighter fluid, gasoline, kerosene, paint, paint thinners, mothproofing substances, or flammable dust) 22. Turn off the vacuum and remove the battery before any adjustment, cleaning, maintenance, or troubleshooting, such preventative safety measures reduce the risk of starting the appliance accidentally. 23.
ASSEMBLY (Click) (Click) (Click) 1 2 (Click) (Click) (Click) 4 5 1. Insert wand into floor nozzle. 2. Insert handle into wand. 3. Align the bottom of pod onto the rails on the front of the neck of the floor nozzle. Slide pod down the rails until it clicks into place. 4. Connect hose to back of pod, and attach hose clip onto wand. 5. Insert charged battery into pod with the handle toward the back. To ensure proper insertion, the handle on battery must be down.
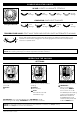
4 WAYS TO CHARGE THE BATTERY To remove the battery for charging, lift the handle on top of the battery and pull up. The battery must be charged before first use. A complete charge takes approximately 3.5 hours. IMPORTANT: When charging, connect the charger to the port first, then plug the charger into wall outlet. OUT OF VACUUM IN VACUUM IN CHARGING CRADLE IN CHARGE & GO DOCK NOTE: Only one charger is provided. NOTE: Not all charging options are available with all configurations.
CHARGE INDICATOR LIGHTS IN USE: LIGHTS ILLUMINATE STEADILY Full Charge Mid Charge Low Charge Needs Charge CHARGING: ONE LIGHT FLASHES TOP OF BATTERY Charge Indicator Low Charge Mid Charge Nearly Full Full Charge TEMPERATURE ISSUE: FIRST AND THIRD INDICATOR LIGHTS ALTERNATE FLASHING If first and third indicator lights flash alternately, the battery temperature is not optimal. Leave battery plugged in and charging will resume when temperature returns to optimal level.
OPERATING THE VACUUM RUNTIMES MODE AND SETTINGS ION POWER ION BOOST UPRIGHT & POWERED LIFT-AWAY® (CARPET) Up to 28 minutes UPRIGHT & POWERED LIFT-AWAY (FLOOR) Up to 28 minutes ABOVE-FLOOR & LIFT-AWAY (WAND OR HANDLE) Up to 50 minutes Up to 18 minutes POD, HANDLE AND WAND ARE DETACHABLE DETACH THE POD Press Lift Away button on handle and lift pod off floor nozzle. DETACH THE WAND Press the Wand Release button until it clicks, then pull up on wand to detach from the floor nozzle.
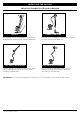
OPERATING THE VACUUM VERSATILE FLOOR-TO-CEILING CLEANING UPRIGHT For cleaning carpets and hard floors. To activate brushroll, step on floor nozzle and tilt handle back. LIFT-AWAY® WITH WAND Use the wand in Lift-Away mode for more reach when cleaning above-floor areas like crown molding or baseboards. UNDER FURNITURE Use Powered Lift-Away® to reach under furniture to clean carpets and hard floors.
MAINTENANCE IMPORTANT: Remove the battery before performing any maintenance. To remove, lift the handle on top of the battery and pull up. EMPTYING THE DUST CUP To remove Dust Cup from pod, pinch and slide side tabs. Tilt dust cup forward, then lift to remove. Press lower release button to open bottom of dust cup. Lint Screen To open top of dust cup, press upper release button and lift handle. Remove debris from Lint Screen.
MAINTENANCE Your vacuum comes equipped with three filters located on the vacuum pod: two pre-motor filters and one HEPA filter to capture and trap dust and debris. CLEANING PRE-MOTOR FILTER (ONCE A MONTH) Perform maintenance on your filters once a month to keep your vacuum's suction power optimal. IMPORTANT: Rinse pre-motor filter and frame with water ONLY. DO NOT use soap. Allow to completely air-dry for at least 24 hours before reinstalling.
MAINTENANCE CLEANING HEPA FILTER (ONCE A YEAR) Perform maintenance on your HEPA filter once a year to keep your vacuum's suction power optimal. IMPORTANT: Rinse HEPA filter with water ONLY. DO NOT use soap. Allow to completely air-dry for at least 24 hours before reinstalling. DO NOT scrub HEPA filter. Pull to Access H EP A HEPA Filter 1. Pull up on HEPA Filter access tab to remove. 2. Rinse filter with water ONLY and let air-dry for 24 hours before reinstalling. 3.
MAINTENANCE CLEANING OR REPLACING BRUSHROLLS BRUSHROLL TURN LOCKS SOFT ROLLER LIFT COVER 1. Using a coin, turn locks counterclockwise to open, then lift off cover to access Brushroll. 2. Use scissors to cut along the groove in the brushroll to remove any string, hair, or debris. 3. Check for blockages in Debris Intake. 4. Replace cover and turn locks clockwise to close. 1. Slide Eject Roller button. 2. To remove Soft Roller, pull out the right end first. 3. Tap loose debris off the Soft Roller.
MAINTENANCE CHECKING FOR BLOCKAGES IMPORTANT: DO NOT use sharp or metal objects to clear blockages. Detach hose from vacuum pod, and check opening on back of pod for blockages. Detach dust cup from vacuum pod. Empty dust cup, remove debris from lint screen, and check for blockages. etach handle from wand and hose from the D vacuum pod, and check openings for blockages. Detach wand from floor nozzle and handle, and check both ends of wand for blockages. Detach wand from floor nozzle.
ADDITIONAL ACCESSORIES AVAILABLE ON SHARKACCESSORIES.
TROUBLESHOOTING LIGHT INDICATOR WHAT IT MEANS Floor and Carpet LEDs flash together Blockage detected. Turn off unit and remove blockage. BOOST LED flashes Unit temperature is high. Turn off vacuum. While unit is cooling, look for blockages and remove any that are found. Filters may also need to be cleaned. See Maintenance section. FIRST and THIRD BATTERY INDICATOR LEDs alternate flashing Battery temperature is not optimal, so charging is temporarily paused.
TROUBLESHOOTING Vacuum is not picking up debris. No suction or light suction. • Ensure handle, hose, dust cup, and wand are all securely connected onto the unit. • Check filters to see if they need cleaning. Follow instructions for rinsing and completely air-drying the filters before reinserting them in the vacuum. • D ust cup may be full; empty dust cup. • Check wand, hose, hose connections, nozzle, and accessories for blockages; clear blockages if required.
FIVE (5) YEAR LIMITED WARRANTY The 5-Year Limited Warranty applies to purchases made from authorized retailers of SharkNinja Operating LLC. Warranty coverage applies to the original owner and to the original product only and is not transferable.
TWO (2) YEAR LIMITED BATTERY WARRANTY The 2-Year Limited Warranty applies to purchases made from authorized retailers of SharkNinja Operating LLC. Warranty coverage applies to the original owner and to the original battery only and is not transferable.
REGISTER YOUR PURCHASE registeryourshark.com 1-800-798-7398 RECORD THIS INFORMATION Model Number: ������������������������ Date Code: ���������������������������� TIP: You can find the model and serial numbers on the QR code label which is located on the bottom of the back of the vacuum pod and battery. Date of Purchase: ���������������������� (Keep receipt) Store of Purchase: ���������������������� TECHNICAL SPECIFICATIONS Voltage: 28.
IMPORTANTES CONSIGNES DE SÉCURITÉ POUR UN USAGE DOMESTIQUE SEULEMENT • VEUILLEZ LIRE ATTENTIVEMENT LES INSTRUCTIONS AVANT D’UTILISER L’APPAREIL Si la fiche d’alimentation du chargeur ne s’insère pas à fond dans la prise de courant, inversez alors le sens de la fiche. Si elle ne s’insère toujours pas, communiquez avec un électricien qualifié. NE FORCEZ PAS pour insérer la fiche dans la prise et ne tentez pas de la modifier pour qu’elle puisse entrer dans celle-ci.
comportement imprévisible, ce qui entraîne un risque d’incendie, d’explosion ou de blessure. BLOC-BATTERIE 27. La batterie est la source d’alimentation de l’aspirateur. Lisez attentivement et respectez les instructions de chargement. 28. Afin d’éviter qu’il ne se mette en marche par erreur, assurez-vous que l’aspirateur est éteint avant de le soulever ou de le transporter. NE TRANSPORTEZ PAS l’appareil avec votre doigt sur le bouton d’alimentation. 29.
ASSEMBLAGE (Clic) (Clic) (Clic) 1 2 3 (Clic) (Clic) (Clic) 4 5 1. Insérez le tube dans le bec pour les planchers. 2. Insérez la poignée dans le tube. 3. Alignez le bas du réceptacle avec les rails situés au devant du col de la buse de plancher. Faites glisser le réceptacle sur les rails jusqu’à ce que vous entendiez un déclic indiquant qu’il est en place. 4. Branchez le tuyau à l’arrière du réceptacle et fixez la pince à tuyau sur le tube. 5.
QUATRE MANIÈRES DE CHARGER LE BATTERIE Afin de retirer la batterie pour la recharger, vous n’avez qu’à soulever la poignée audessus de celle-ci et à tirer. La batterie doit être chargée avant la première utilisation. Il faut compter environ 3,5 heures pour que la charge soit complète. IMPORTANT : Pendant le chargement, branchez le chargeur au port en premier, puis branchez le chargeur dans la prise électrique.
VOYANTS INDICATEURS DE RECHARGE EN COURS D’UTILISATION : LES LUMIÈRES S’ALLUMENT DE MANIÈRE CONSTANTE Complètement chargée LE DESSUS DE LA BATTERIE Indicateur de recharge Chargée à moitié Charge faible A besoin d’être rechargé EN CHARGE : UNE LUMIÈRE CLIGNOTE Charge faible Chargée à moitié Presque complète Complètement chargée PROBLÈME DE TEMPÉRATURE : LE PREMIER ET LE TROISIÈME VOYANTS LUMINEUX CLIGNOTENT EN ALTERNANCE Si le premier et le troisième voyants lumineux clignotent en alternance, la te
FONCTIONNEMENT DE L’ASPIRATEUR DURÉES D’USAGE MODE ET PARAMÈTRES ION POWER ION BOOST POWERED LIFT-AWAYTM VERTICAL (TAPIS) Jusqu’à 28 minutes POWERED LIFT-AWAYTM VERTICAL (PLANCHER) Jusqu’à 30 minutes AU-DESSUS DU SOL ET LIFT-AWAY (TUBE OU POIGNÉE) Jusqu’à 50 minutes Jusqu’à 18 minutes RÉCEPTACLE, POIGNÉE ET TUBE DÉTACHABLES DÉTACHEZ LE RÉCEPTACLE DÉTACHEZ LE TUBE Appuyez sur le bouton Lift-Away sur la poignée et soulevez le réceptacle pour le détacher de la buse de plancher.
FONCTIONNEMENT DE L’ASPIRATEUR NETTOYAGE POLYVALENT DU SOL AU PLAFOND VERTICAL Pour nettoyer les tapis et les planchers durs. Pour activer la brosse rotative, appuyez sur la buse de plancher et inclinez la poignée. LIFT-AWAY® WITH WAND Utilisez le tube en mode Lift-Away afin de pouvoir atteindre des endroits plus élevés que le plancher, comme des moulures couronnées ou des plinthes.
ENTRETIEN IMPORTANT : Enlevez la batterie avant de procéder à tout entretien. Afin de la retirer, vous n’avez qu’à soulever la poignée au-dessus de celle-ci et à tirer. VIDANGE DU RÉCIPIENT À POUSSIÈRE Pour retirer le récipient à poussière du réceptacle, pincez et faites glisser les languettes latérales. Inclinez le récipient à poussière vers l’avant, puis soulevez-le afin de le retirer. Appuyez sur le bouton de dégagement inférieur afin d’ouvrir le bas du récipient à poussière.
ENTRETIEN Votre aspirateur est équipé de trois filtres situés dans le réceptacle l’aspirateur : deux filtres prémoteurs et un filtre HEPA pour capturer et emprisonner la poussière et les débris. NETTOYAGE DU FILTRE PRÉ-MOTEUR (UNE FOIS PAR MOIS) Effectuez l’entretien de vos filtres une fois par mois afin que la puissance d’aspiration de votre appareil demeure optimale. IMPORTANT : Rincez le filtre pré-moteur et le cadre avec de l’eau SEULEMENT. N’UTILISEZ PAS de savon.
ENTRETIEN NETTOYAGE DU FILTRE HEPA (UNE FOIS PAR ANNÉE) Effectuez l’entretien de votre filtre HEPA une fois par année afin que la puissance d’aspiration de votre appareil demeure optimale. IMPORTANT : Rincez le filtre HEPA avec de l’eau SEULEMENT. N’UTILISEZ PAS de savon. Laissez sécher à l’air complètement pendant au moins 24 heures avant de le replacer. NE RÉCUREZ PAS le filtre HEPA. Pull to Access H EP A Filtre HEPA 1. Tirez sur la languette d’accès du filtre HEPA afin de le retirer. 2.
ENTRETIEN NETTOYAGE OU REMPLACEMENT DES BROSSES ROTATIVES BROSSE ROTATIVE TOURNER LES VERROUS ROULEAU DOUX SOULEVEZ LE COUVERCLE 1. Au moyen d’une pièce de monnaie, faites tournez les verrous dans le sens contraire des aiguilles d'une montre, puis soulevez le couvercle afin d’accéder à la brosse rotative. 1. Faites glisser le bouton Eject Roller (éjection du rouleau). 2.
ENTRETIEN VÉRIFICATION DE LA PRÉSENCE D’OBSTRUCTIONS IMPORTANT : NE PAS utiliser d’objets pointus ou en métal pour dégager les obstructions. Détachez le tuyau du réceptacle et vérifiez l’arrière du réceptacle pour voir s’il y a des obstructions. Détachez le récipient à poussière du réceptacle. Videz le récipient à poussière, enlevez les débris du filtre à charpie et vérifiez s’il y a des obstructions.
PLUS DE RENSEIGNEMENTS DISPONIBLES SUR SHARKACCESSORIES.
DÉPANNAGE VOYANT LUMINEUX CE QUE CELA VEUT DIRE L’éclairage DEL pour Floor (plancher) et Carpet (tapis) clignotent ensemble Une obstruction a été détectée. Éteignez l’appareil et retirez l’obstruction. L’éclairage DEL BOOST clignote La température de l’appareil est élevée. Éteignez l’aspirateur. Pendant que l’appareil refroidit, vérifiez s’il y a des obstructions et retirez-les, le cas échéant. Vous pourriez également avoir besoin de nettoyer les filtres. Consultez la section Entretien.
DÉPANNAGE L’aspirateur ne ramasse pas la poussière. Aucune succion ou succion faible. • Assurez-vous que la poignée, le tuyau, le récipient à poussière et le tube soient tous bien branchés à l’appareil. • Vérifiez les filtres pour voir s’ils doivent être nettoyés. Suivez les instructions de rinçage et de séchage des filtres avant de les remettre dans l’aspirateur. • Le récipient à poussière pourrait être plein; videz-le, le cas échéant.
GARANTIE LIMITÉE DE CINQ (5) ANS La garantie limitée de 5 ans s’applique aux achats effectués auprès de détaillants autorisés de SharkNinja Operating LLC. La garantie s’applique uniquement au premier propriétaire et au produit original, et n’est pas transférable.
GARANTIE LIMITÉE DE DEUX (2) ANS SUR LA BATTERIE La garantie limitée de 2 ans s’applique aux achats effectués auprès de détaillants autorisés de SharkNinja Operating LLC. La garantie s’applique uniquement au premier propriétaire et à la batterie originale et elle n’est pas transférable.
ENREGISTREZ VOTRE ACHAT registeryourshark.com 1 800 798-7398 CONSIGNEZ LES RENSEIGNEMENTS CI-DESSOUS Numéro du modèle : �������������������� Code de date : ������������������������� UN CONSEIL : Le numéro de modèle et le numéro de série sont indiqués sur l’étiquette de code QR, située au bas de l’arrière du récipient à poussière et de la batterie.
INSTRUCCIONES IMPORTANTES DE SEGURIDAD PARA USO DOMÉSTICO SOLAMENTE • LEA ESTAS INSTRUCCIONES DETENIDAMENTE ANTES DEL USO Si el enchufe del cargador no entra por completo en el tomacorriente, invierta el enchufe. Si aun así no encaja, comuníquese con un electricista calificado. NO lo fuerce en el tomacorriente ni trate de modificarlo para que encaje.
PAQUETE DE BATERÍA 27. La batería es la fuente de energía de la aspiradora. Lea atentamente y siga todas las instrucciones de carga. 28. Para evitar el inicio involuntario de la aspiradora, asegúrese de que esté apagada antes de levantarla o transportarla. NO transporte el aparato con el dedo apoyado en el botón de encendido. 29. Utilice solo los cargadores YLS0244A o ZD024S332096US de Shark®, y use solo la batería XBAT300.
MONTAJE (Clic) (Clic) (Clic) 1 2 3 (Clic) (Clic) (Clic) 4 5 1. Inserte el vástago en la boquilla de piso. 2. Inserte el mango en el vástago. 3. Alinee la parte inferior del receptáculo en los rieles de la parte delantera del cuello de la boquilla de piso. Deslice el receptáculo en por los rieles hasta que encaje en su lugar. 4. Conecte la manguera a la parte posterior del receptáculo, y coloque la abrazadera de la manguera en el vástago. 5.
4 FORMAS DE CARGAR LA BATERÍA Para extraer la batería para cargarla, levante el mango situada en la parte superior de la batería y tire hacia arriba. La batería debe cargarse antes del primer uso. Una carga completa tarda aproximadamente 3,5 horas. IMPORTANTE: Durante la carga, conecte primero el cargador al puerto y luego enchufe el cargador a la toma de corriente de la pared.
LUCES INDICADORAS DE CARGA EN USO: LAS LUCES SE ILUMINAN CONTINUAMENTE Carga completa PARTE SUPERIOR DE LA BATERÍA Indicador de carga Media carga Carga baja Necesita carga CARGANDO: UNA LUZ PARPADEA Carga baja Media carga Casi llena Carga completa PROBLEMA DE TEMPERATURA: LAS LUCES INDICADORAS PRIMERA Y TERCERA PARPADEANDO ALTERNATIVAMENTE Si las luces indicadoras primera y tercera parpadean alternativamente, la temperatura de la batería no es óptima.
FUNCIONAMIENTO DE LA ASPIRADORA TIEMPOS DE EJECUCIÓN MODO Y AJUSTES ION POWER LIFT-AWAY® VERTICAL Y ALIMENTADA (ALFOMBRA) ION BOOST Hasta 28 minutos LIFT-AWAY VERTICAL Y ALIMENTADA (PISO) Hasta 30 minutos SOBRE EL PISO Y LIFT-AWAY (VÁSTAGO O MANGO) Hasta 50 minutos Hasta 18 minutos RECEPTÁCULO, MANGO Y VÁSTAGO DESMONTABLES SEPARAR EL RECEPTÁCULO Presione el botón Lift Away que está en el mango para desenganchar el receptáculo de la boquilla de piso.
FUNCIONAMIENTO DE LA ASPIRADORA LIMPIEZA VERSÁTIL DE PISO A TECHO VERTICAL Para la limpieza de alfombras y pisos duros. Para activar el rodillo de cepillado, pise la boquilla de piso e incline el mango hacia atrás. LIFT-AWAY® CON VÁSTAGO Use el vástago en modo Lift-Away para obtener más alcance al limpiar áreas que se encuentran sobre el piso, como molduras de pared o zócalos. DEBAJO DE LOS MUEBLES Use el Lift-Away® energizado para alcanzar debajo de los muebles y limpiar alfombras y pisos duros.
MANTENIMIENTO IMPORTANTE: Retire la batería antes de realizar cualquier tipo de mantenimiento. Para quitarla, levante el mango de la parte superior de la batería y tire hacia arriba. VACIADO DEL RECIPIENTE PARA EL POLVO Para quitar del receptáculo el recipiente para el polvo, apriete y deslice las lengüetas laterales. Incline el recipiente para el polvo hacia adelante, luego levántelo para extraerlo. Presione el botón de liberación inferior para abrir la parte inferior del receptáculo para el polvo.
MANTENIMIENTO Su aspiradora viene equipada con tres filtros ubicados en el receptáculo de la aspiradora: dos que protegen al motor y un filtro HEPA para atrapar el polvo y los residuos sólidos. LIMPIEZA DEL FILTRO PREVIO AL MOTOR (UNA VEZ AL MES) Realice el mantenimiento de sus filtros una vez al mes para mantener una óptima potencia de succión de su aspiradora. IMPORTANTE: Enjuague el filtro del motor y el marco SOLAMENTE con agua. NO use jabón.
MANTENIMIENTO LIMPIEZA DEL FILTRO HEPA (UNA VEZ AL AÑO) Realice el mantenimiento de su filtro HEPA una vez al año para mantener la potencia de succión de su aspiradora óptima. IMPORTANTE: Enjuague el filtro HEPA con agua SOLAMENTE. NO use jabón. Deje que se seque totalmente al aire durante 24 horas antes de volver a instalarlos. NO raspe el material del filtro HEPA. Pull to Access H EP A Filtro HEPA 1. Tire hacia arriba de la lengüeta de acceso al filtro HEPA para quitarlo. 2.
MANTENIMIENTO LIMPIEZA O REEMPLAZO DE LOS CEPILLOS GIRATORIOS CEPILLO GIRATORIO GIRE LOS CIERRES RODILLO SUAVE LEVANTE LA TAPA 1. Usando una moneda, gire los cierres en sentido contrario a las manecillas del reloj para abrirlos, luego levante la tapa para acceder al cepillo giratorio. 2. Para quitar hilos, cabellos o residuos del cepillo giratorio, utilice tijeras para cortar a lo largo de la ranura del cepillo giratorio. 3. Verifique si hay obstrucciones en la entrada de escombros. 4.
MANTENIMIENTO CONTROL DE OBSTRUCCIONES IMPORTANTE: NO use objetos afilados o de metal para retirar obstrucciones. Desconecte la manguera del receptáculo de la aspiradora y compruebe que la abertura de la parte posterior del receptáculo no esté obstruida. Desmonte el recipiente para el polvo del receptáculo de aspiración. Vacíe el recipiente, quite los escombros del filtro para pelusas y revise si hay obstrucciones.
HAY ACCESORIOS ADICIONALES DISPONIBLES EN SHARKACCESSORIES.
SOLUCIÓN DE PROBLEMAS INDICADOR DE LUZ QUÉ SIGNIFICA Las luces LED indicadoras de piso y alfombra se encienden juntas en forma intermitente. Se detectó una obstrucción. Apague la unidad y elimine la obstrucción. La LUZ LED parpadea La temperatura de la unidad es alta. Apague la aspiradora. Cuando la unidad se enfríe, compruebe si hay obstrucciones y elimine las que encuentre. Los filtros también pueden necesitar limpieza. Consulte la sección de Mantenimiento.
SOLUCIÓN DE PROBLEMAS La aspiradora no recoge la basura. No hay succión ni succión leve. • Asegúrese de que el mango, la manguera, el recipiente para el polvo y el vástago estén bien conectados a la unidad. • Controle los filtros para ver si es necesario limpiarlos. Siga las instrucciones para enjuagar y secar al aire por completo los filtros antes de volver a colocarlos en la aspiradora. • El recipiente para el polvo puede estar lleno; vacíe el recipiente para el polvo.
GARANTÍA LIMITADA DE CINCO (5) AÑOS La garantía limitada de 5 años se aplica a las compras realizadas a los vendedores minoristas autorizados de SharkNinja Operating LLC. La cobertura de garantía se aplica solo al propietario y al producto originales, y no puede transferirse.
GARANTÍA LIMITADA DE DOS (2) AÑOS DE LA BATERÍA La garantía limitada de 2 años se aplica a las compras realizadas a los vendedores minoristas autorizados de SharkNinja Operating LLC. La cobertura de garantía se aplica solo al propietario original y a la batería original, y no puede transferirse.
REGISTRE SU COMPRA registeryourshark.com 1-800-798-7398 GUARDE ESTA INFORMACIÓN Número de modelo: ��������������������� Código de fecha: ����������������������� CONSEJO: Encontrará los números de modelo y de serie en la etiqueta del código QR, ubicada en la parte inferior trasera del receptáculo y la batería de la aspiradora. Fecha de compra: ���������������������� (conserve el recibo) Tienda de compra: ���������������������� ESPECIFICACIONES TÉCNICAS Voltaje: 28.
NOTES • REMARQUES • NOTAS s h a r kc l e a n .
NOTES • REMARQUES • NOTAS s h a r kc l e a n .
NOTES • REMARQUES • NOTAS s h a r kc l e a n .
NOTES • REMARQUES • NOTAS s h a r kc l e a n .
PLEASE READ CAREFULLY AND KEEP FOR FUTURE REFERENCE. This Owner's Guide is designed to help you keep your vacuum running at peak performance. If you should have a question, please call the Customer Service line at 1-800-798-7398. SharkNinja Operating LLC US: Needham, MA 02494 CAN: Ville St-Laurent, QC H4S 1A7 1-800-798-7398 sharkclean.com Illustrations may differ from actual product.