LIFT-AWAY™ PRO STEAM POCKET® MOP S3901SL OWNER’S GUIDE S3901SL_11_IB_E_120619_1.
IMPORTANT SAFETY INSTRUCTIONS For Household Use Only WHEN USING YOUR SHARK® STEAM MOP, BASIC SAFETY PRECAUTIONS SHOULD ALWAYS BE FOLLOWED, INCLUDING THE FOLLOWING: READ ALL INSTRUCTIONS BEFORE USING YOUR SHARK® STEAM MOP. DANGER OF SCALDING. Please use caution when using the steam mop. The steam emitted from the steam mop is very hot.
12. DO NOT unplug by pulling on power cord. To unplug, grasp the plug not the power cord. Do not use extension cords or outlets with inadequate current carrying capacity. 13. DO NOT put any objects into openings. Do not use with any opening that is blocked. 14. DO NOT put hands or feet under the steam mop. Unit gets very hot. 15. Use ONLY on flat, horizontal surfaces. Do not use on walls, counters or windows. 16.
This appliance complies with the WEEE-Directive 2002/96/EC on the disposal of electrical and electronic equipment (WEEE). This appliance complies with the European directives for electromagnetic compatibility (EMC) 2004/108/EC and its revisions, as well as Low Voltage Directive (LVD) 2006/95/EC and its revisions. This marking indicates that this product should not be disposed with other household wastes throughout the EU.
Contents Thank you for purchasing the Shark® Lift-Away™ Pro Steam Pocket® Mop. Getting Started.................................................................................................... 2 Getting Started With Your Steam Mop................................................................. 3 Using Your Steam Mop......................................................................................... 5 Using Your Carpet Glider..........................................................................
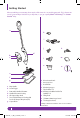
Getting Started When assembling your steam mop there may be a little water in or around the water tank. This is because we test all our steam mops 100% before you buy them, so you get a quality Shark® Lift-Away™ Pro Steam Pocket ® Mop.
Getting Started with Your Steam Mop fig. 1 IMPORTANT: Always make sure the mop is UNPLUGGED from the wall when not in use. Never fill the mop, attach the mop head, change or remove the cleaning pad when the mop is plugged into the wall. To prolong the life of your Shark® Lift-Away™ Pro Steam Pocket ® Mop we recommend using distilled water. Make sure you only add water to the tank. Chemicals or cleaning solution may damage the appliance and could be unsafe for you and your family. fig.
Getting Started with Your Steam Mop - cont’d fig. 3 fig. 5 fig. 6 fig. 4 3 Use the lavender loop on the side of the cleaning pad to slide the mop head into the pad pocket. Then secure the quick fasteners on the top of the pocket to lock in place. (fig. 3) 4 Snap the mop head into the mop body by lining up the groove on the back of the mop body with the groove on the back of the mop head. Push until you hear it latch into place. (fig.
Using Your Steam Mop IMPORTANT: Make sure you do not use the mop without attaching a cleaning pad and adding water to the tank first. When you are using the mop for the first time, it might take longer than the normal 30 seconds to start steaming. fig. 8 fig. 7 NOTE: Sweep or vacuum your floors prior to cleaning with your Steam Mop. 1 Pull and twist the quick release cord holder to unwrap the power cord completely. Plug into a 220-240-volt electrical outlet. (fig.
Using Your Steam Mop - cont’d fig. 10 fig. 9 3 Press the ON/STEAM SETTING button once for DUST setting (DUST lighted setting indicator will flash and turn solid blue when it is ready to use). DUST setting is a light steam for a quick dusting and best dry time. (fig. 9) Press the ON/STEAM SETTING button twice for MOP. MOP setting is for normal, everyday steam cleaning. (fig. 10) Press the ON/STEAM SETTING button three times for SCRUB. SCRUB setting is for heavy cleaning and will leave floors damp.
The Shark® Lift-Away™ Pro Steam Pocket® Mop has three unique steam settings so you can use the perfect amount of steam for the cleaning task at hand. See below for tips on when to use each setting.
Using Your Steam Mop - cont’d 6 When the water tank is empty, the Steam Mop will stop producing steam. You can refill the water tank at any time as long as the mop is unplugged from the outlet. Follow the instructions from page 4. This applies to switching the mop head or the cleaning pad as well. fig. 12 NOTE: Please wait 2-3 minutes for the Steam Mop to cool off before switching the mop head or the cleaning pad. Never leave the Steam Mop with a damp/wet pad on any floor.
Getting Started With Your Removable Handheld Steamer Your Shark® Lift-Away™ Pro Steam Pocket ® Mop is designed to clean surfaces that will withstand high heat and moisture. Do not use on unsealed wood surfaces (especially wooden antique furniture), unglazed ceramic tile, painted surfaces or surfaces that have been treated with wax, oils, varnishes, or shellac. The sheen may be removed by the heat, steam, and friction of the cleaning tools.
Using Your Removable Handheld Steamer with Direct Steam Nozzle Cleaning Tip: The Direct Steam Nozzle creates direct steam spray to clean and sanitise hard to reach nooks & crannies and other places where germs may build up. Use the Direct Steam Nozzle to loosen and dislodge compact dirt often found in corner and tight places where traditional methods and cleaning tools tend to push dirt into, making it tough to reach and clean. Spray direct steam and wipe clean with a wet cloth or paper towel. fig. 17 fig.
Using Your Removable Handheld Steamer with Crevice Tool Cleaning Tip: Crevice Tool is designed for removing stubborn messes in hard-to-reach nooks, corners and in grout where focused scrubbing power may be needed. The Crevice Tool can loosen and dislodge compact dirt often found in corners and tight places where traditional methods and cleaning tools tend to push dirt into, making it difficult to reach and clean. Scrub with the Crevice Tool and wipe clean with a cleaning cloth. fig. 18 fig.
Using Your Removable Handheld Steamer with Window Squeegee Cleaning Tip: To use the window squeegee, work with the vapor jet down using top to bottom movements. To do this without leaving streaks, use lateral movements from the top to the bottom of the surface. fig. 20 fig. 21 C AUTION: Always avoid any sudden changes in temperature to prevent breakage of cracks in windows. 3 To remove the Window Squeegee, press and hold down the Accessory release button. Then slide out the Window Squeegee.
Using Your Removable Handheld Steamer with Accessory Hose fig. 22 fig. 23 1 To use the Accessory Hose, first attach the Accessory Hose to the Handheld Steamer by snapping the Accessory Hose into the main nozzle. (fig. 22) C AUTION: Do not press the steam trigger while attaching or removing the Accessory Hose. C AUTION: Do not use the Accessory Hose without cleaning tools attached. 2 Select the desired cleaning tool for use.
Using Your Removable Handheld Steamer with Flat Scrubber Cleaning Tip: The Flat Scrubber is designed for cleaning a variety of surfaces and is exceptional on those that are large and flat including counter tops, table tops, walls mirrors, windows, stairs, shelves and other similar surfaces. Super absorbent bonnet loosens, lifts, and locks in dirt and grime while sanitising at the same time. fig. 26 fig. 24 fig.
Care of Your Steam Mop fig. 28 fig. 27 fig. 29 fig. 30 AFTER USE AND STORAGE 1 When you have finished using the Handheld Steamer, reattach it to the mop by first placing the bottom of the Handheld Steamer into the cradle of the mop housing. (fig. 27) 2 Then slide the top end of the Handheld Steamer into the mop housing and snap into place. NOTE: Make sure all attachments are removed before reuniting the Handheld Steamer with the Steam Mop. 4 Empty the water tank before storage.
Care of Your Steam Mop - cont. DECALCIFYING YOUR STEAM MOP Calcium and mineral deposits can build up and impact the performance of your steam mop over time. To extend the life of your product we recommend that you use distilled water. 40° fig. 31 fig. 33 fig. 32 CARE OF YOUR CLEANING PADS 1 We recommend washing your cleaning pad separately from other fabrics to avoid picking up lint. Only use liquid detergent (no powder detergent). Do not use any fabric softeners or bleach. Line dry.
Troubleshooting Guide PROBLEM POSSIBLE REASONS & SOLUTIONS The Shark® Lift-Away™ Pro Steam Pocket® Mop will not turn-on. Your steam mop should be securely plugged into a 220-240V~ electrical outlet only. The unit will not make steam. Is there water in the water tank? If not, add water to your steam mop following instructions on page 4. Check your fuse or breaker. If the unit still does not make steam, follow the instructions on page 16 to clean the nozzle.
Notes 18 S3901SL_11_IB_E_120619_1.
Notes 19 S3901SL_11_IB_E_120619_1.
Technical Details Model number: S3901SL 11 Input: 1550 Watts Main unit voltage: 220-240V~, 50/60 Hz COPYRIGHT© EURO-PRO OPERATING LLC 2012 PRINTED IN CHINA S3901SL.E.120619.1 Illustrations may differ from actual product. S3901SL_11_IB_E_120619_1.indd 20 Not to be disposed of with other household waste.