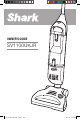
OWNER’S GUIDE SV1100UKJR SV1100UKJR_40_ENG_120124_1.
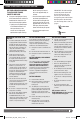
WARNINGS IMPORTANT SAFETY INSTRUCTIONS For Household Use Only WHEN USING YOUR SHARK® CORDLESS VACUUM, BASIC SAFETY PRECAUTIONS SHOULD ALWAYS BE FOLLOWED, INCLUDING THE FOLLOWING: 8 DO NOT use charging adapter with an extension cord. Plug adapter directly and only in a standard (220-240V~, 50/60Hz) electrical outlet. READ ALL INSTRUCTIONS BEFORE USING YOUR SHARK® CORDLESS VACUUM. 9 DO NOT run the vacuum over the charging adapter cord.
CONTENTS 30 DO NOT place vacuum on unstable surfaces such as chairs or tables. 31 Use extra care when cleaning on stairs. 32 DO NOT allow the vacuum to be used as a toy. 33 Close attention is necessary when used by or near children. 34 DO NOT use cordless vacuum cleaner, charging base or charging adapter if it has been dropped, damaged, left outdoors or submerged in water. To avoid the risk of electric shock, do not disassemble or attempt to repair the appliance on your own.
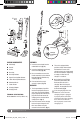
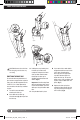
ASSEMBLY B C A b fig. 2 E c F d D G J H a Charging I K fig. 1 VACUUM COMPONENTS ASSEMBLY A Main Body 1 Insert the vacuum body into the motorised brush. (fig. 1a) B Handle C Screw D Dust Cup E Dust Cup Release F Upper Dust Cup Door Release G Lower Dust Cup Door Release H Motorised Brush I Power Button J Charging Adapter K Charging Base TECHNICAL SPECIFICATIONS: Ni-Mh 3000mAh 14.4 V (1.2VDC x 12) 2 Insert the handle pole into the top of the main body. (fig.
USING YOUR SHARK ® CORDLESS VACUUM USE YOUR CORDLESS VACUUM TO CLEAN BARE FLOORS, CARPETS AND RUGS. On this setting, the vacuum will run for approximately 15 minutes. • Press the button again to switch to a lower speed optImised for bare floor cleaning. On this setting the vacuum will run for approximately 22 minutes. The LED lights around the power button will indicate your speed.
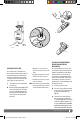
CARE AND MAINTENANCE fig. 6 fig. 8 fig. 5 fig. 7 CAUTION: Remove the unit from the charging stand before any servicing. EMPTYING THE DUST CUP To maintain the best performance of your vacuum, empty the dust cup after every use or as debris approaches the “MAX FILL” line. Never operate the vacuum without the dust cup and filter in place. 1 Turn off the vacuum before removing the dust cup.
fig. 10 fig. 11 fig. 9 fig. 12 CLEANING THE MOTORISED BRUSH AND CLEARING BLOCKAGES CLEANING THE FILTER Your vacuum has a high efficiency dust cup to maintain strong suction by preventing debris from collecting on the filter. To maintain strong suction, it is important to clean the foam filter every month, under normal use. 1 Turn off the vacuum and remove the dust cup. 2 Remove the foam filter (fig. 9) and rinse under water until the water runs clear. (fig.
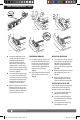
CARE AND MAINTENANCE - cont. fig. 13 fig. 15 fig. 14 fig. 17b fig. 16 fig. 17a 4 Inspect the rotating brush for a build-up of debris. Remove anything wound around the brush by carefully cutting it with scissors. The brush roll is equipped with a raised cutting guide to make inserting scissors easier. Avoid damaging or cutting the bristles. (fig. 13) 5 Use a flashlight to inspect inside the air duct at the bottom of the main body and remove any debris or blockages that may be there.
TROUBLESHOOTING GUIDE & REPLACEMENT PARTS PROBLEM SUGGESTED SOLUTION Vacuum will not operate 1 The battery may be depleted. Charge the vacuum until the complete oval around the power button is illuminated, indicating a complete charge. 2 See “Restarting after a jam” on page 8. Charging indicator does not illuminate 1 Check to see if the charge adapter is plugged in properly to the outlet and to the charge stand. 2 Ensure that the vacuum is properly seated in the charging base.
Notes 10 www.sharkclean.co.uk SV1100UKJR_40_ENG_120124_1.
Notes www.sharkclean.co.uk SV1100UKJR_40_ENG_120124_1.
Distributed by JML JML, Unit 1 Eastside Port of Tyne South Shields NE33 5SP info@JMLgroup.co.uk Freephone 0800 781 7831 www.sharkclean.co.uk Registered address: JML House, NW5 3EG Technical Details Model number: SV1100UKJR PRINTED IN CHINA SV1100UKJR.E.120124.1 Illustrations may differ from actual product. SV1100UKJR_40_ENG_120124_1.