
Product Brochure


7
De-Burr
Pipe 1. clear
of branch
Insertion
depth mark
Insertion
depth mark
Slip End Stop End
Pipe 1
Pipe 1
Pipe 1
Pipe 1
Pipe 2
Pipe 2
Pipe 2
Pipe 2
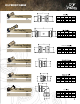
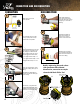
SLIP FEATURE
PROBLEM.
Identify the section to be removed for repair using a SLIP Coupling and if
you are tapping into an existing pipe line using a SLIP Tee.
Mark section to be removed depending on the pipe size as per following;
1-1/4" Pipe repairable section 2-1/2".
1-1/2" Pipe repairable section 2-3/4".
2" Pipe repairable section 3"
(Demonstratedhere)
Nominated repairable section must be removed any smaller section will not provide
room to engage the second pipe and would partially block flow of the branch on a
Tee. Larger sections would create short engagement and installation failure.
1
CUT.
Cut out section using a quality Tuber or Pipe Cutter with a sharp blade.
Remove BURRS and ensure pipe surface is free of scratches and any
debris. It is CRITICAL that BOTH pipes be marked with the correct
insertion depth as listed below;
1-1/4" Pipe Insertion Depth = 2".
1-1/2" Pipe Insertion Depth = 2-1/4".
2" Pipe Insertion Depth = 2-1/2".
(Demonstratedhere)
2
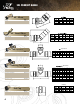
PUSH.
All SLIP Couplings and Tee’s come fitted with an instruction band at the SLIP END
of the fitting stating;
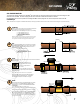
Align pipe 1 with the bore of the SLIP END of the fitting. Insert
pipe 1 while rotating either pipe or fitting until the stop end of the
fitting is clear of pipe 2.
**NOTE-AtthispointtheboreofthebranchoftheTeeiscompletelyblocked.
Engage Shark Shifter De-Mount Tool to the SLIP END of the fitting the
grab ring teeth and now disengaged allowing pipe 1 to be withdrawn.
Shark Shifter can be fitted prior to or after SLIP end if engaged.
SIZE OF PIPE for installation. Size of
section that can be removed. Insertion
mark depth on both pipes. Direction
fitting is to move.
3
DONE.
With the Shark Shifter fitted to the SLIP END withdraw pipe 1 allowing
pipe 2 to engage up to the INSERTION DEPTH MARK and NOT
withdrawing pipe 1 any further than the INSERTION DEPTH MARK,
marked on pipe 1.
**NOTE-Pipeisnowclearofthebranchallowingfullflow.
YoucannowremoveSharkShifterDe-MountToolfromtheSLIPEndofthefitting.
You have now completed a repair or added a new line into an existing
system in minutes. Remember all SharkBite
®
Fittings can be installed
WET or DRY, and suitable for use on COPPER, CPVC and PEX.
**NOTE-PEXPipecanbeused(requiresaSharkBite
®
PEXStiffenerpushed
firmlyintopipe)providedSharkShifterToolisfittedtotheSLIPEndofthefitting
priortopipeinsertionintofitting.
4
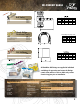
SLIP FEATURE FUNCTION
The SLIP Feature Function is unique to the SharkBite
®
2XL range apart from the largest range of large bore Push-to-Connect Fittings in the Nth
American market, SharkBite
®
2XL SLIP Couplings and ALL Tee’s come with the SLIP Feature Function as standard.
Demonstrated below is the correct procedure for installing SharkBite
®
SLIP Couplings and Tee’s with the Slip Feature Function into a 2"
COPPER Pipe.
NOTE - PEX PIPE can be used (requires a SharkBite
®
PEX Stiffener pre-fitted to pipe) provided the Shark Shifter Tool is fitted to the SLIP End of the fitting prior to pipe insertion into fitting.