
Installation Guide


sharkbite.com 4
Making a SharkBite
®
Connection
The combination of SharkBite push-to-connect ttings and PEX pipe oers the fastest, easiest installation
from meter to xture.
Note: Install SharkBite ttings at least 1 inch apart to enable disassembly of the joint.
Use pipe cutters to cut the pipe between the pointed ends of the
repeating 1 inch SharkBite imprint pattern. The pattern provides
a visual aid to determine if the pipe has been inserted all the
way into the tting. Ensure the pipe is cut square to allow it to be
inserted all the way into the tting.
Ensure the pipe has no rough edges, cuts or abrasions, which can
damage the o-ring and cause the tting to leak.
Step 1
Ensure the support liner inside the tting is in place. The liner
reinforces the wall of the PEX pipe to help prevent collapse of the
pipe wall.
Step 2
Insert the pipe into the tting until the pipe reaches the pipe stop.
Make sure the pointed end of the SharkBite pattern is even with
the end of the release collar. Only when the pipe reaches the pipe
stop has a secure joint been created.
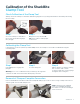
Step 3
Step 4
Place the SharkBite disconnect clip around the pipe with the
non-branded face against the release collar. If using the SharkBite
disconnect tongs, place the teeth around the tting assembly.
The fork end with the SharkBite brand logo should be positioned
around the pipe and the other end around the neck of the tting.
Push the clip against the release collar and pull the pipe with
a twisting action to release the pipe. If using the SharkBite
disconnect tongs, squeeze the tool with one hand and pull the
pipe with a twisting action to release the pipe.
Check the tting and pipe end for damage. The tting and pipe
should be free of damage, foreign objects and marks on the
outside diameter. If the pipe is damaged or marked, then cut and
use a new section of pipe.
Disconnect
Clip
Disconnect
Tong