2-BAY RAID BOX Manual 2-BAY RAID BOX
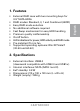
• • • • • • • • • • External RAID case with two mounting bays for 3.5" SATA HDDs RAID modes: Standard, 0, 1 and Combined (JBOD) Easy RAID mode selection No additional software required Fast Swap mechanism for easy HDD handling Premium quality craftsmanship On/off button LED indications for power, HDD activity and RAID mode Pre-installed 70 mm fan Supported operating systems: Win XP/Vista/7 (32-bit and 64-bit) 2. Specifications • • • • • External interface: USB3.0 (downward compatible with USB2.
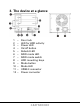
. The device at a glance 1 2 3 4 5 6 7 8 9 10 11 12 – – – – – – – – – – – – Door lock LED for HDD activity Power LED On/off button Rebuild LED RAID mode LED RAID mode switch HDD mounting bays Mode button Mode LED USB3.
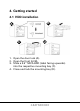
. Getting started 4.1 HDD installation B A C D 1. Open the door lock (A). 2. Open the front lid (B). 3. Slide a 3.5“ SATA HDD (label facing upwards) into the respective mounting bay (C). 4. Close and lock the mounting bay (D).
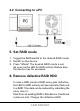
4.2 Connecting to a PC 5. Set RAID mode 1. Toggle the RAID switch to the desired RAID mode. 2. Switch on the device. 3. Press “Mode”. The desired RAID mode is set. As soon as the LED for HDD activity flashes blue the device may be accessed. 6. Remove defective RAID HDD In case a HDD inside a RAID array gets defective, the LED for HDD activity will permanently flash red. In a RAID 1 the data can be restored by rebuilding the array (see 7.). Data from an existing RAID 0, Standard or Combined mode are lost.
7. Rebuild Note: The new HDD must provide at least the same capacity as the replaced one. Do not change the RAID mode prior to the rebuilding. Do not change the HDD order before commencing the rebuild process. 1. Switch off the device. 2. Change the defective HDD. 3. Power on the device, the rebuild procedure will start automatically even when the device is disconnected from your PC. 8. Important notes After 5 minutes of inactivity the device will switch to sleep mode.