Manual
Content 1. 2. 3. 4. 5. 6. 7. Features Specifications Package contents The mouse at a glance Connecting to the PC Installing the software The editor 7.1 Starting the editor 7.2 “Button Setting” window 7.3 Pull down menus 7.3.1 “Advanced” sub menu 7.3.2 “Basic” sub menu 7.3.3 “Additional” sub menu 7.3.4 “Media” sub menu 7.3.5 Profiles 7.4 “DPI Setting” window 7.5 “Color Setting” window 7.6 “Advanced Setting” window 7.
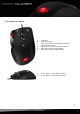
1. Features • • • • • • • • • • • • Avago 9500 V2 Pro Laser sensor 10 programmable switches Programmable 4-way scroll wheel 5 lenticular ceramic slide pads LC display for DPI indication 256 KB internal memory for user profiles Gold-plated USB connector Cable with textile sheathing Weight Tuning System Ergonomic design Rubberized surface for maximum grip Included configuration software 2. Specifications Max. DPI 6,000 Max. acceleration 30 G Mouse weight max.
. The mouse at a glance D B A C E A – LC display B – Left mouse button C – 4-way scroll wheel and middle mouse button (freely programmable) D – Right mouse button (freely programmable) E – DPI selector (freely programmable) F – Game button (freely programmable) F H G G – Thumb button 1 (freely programmable) H – Thumb button 2 (freely programmable) darkglider 4
A A – Slide pads made of ceramic B – Weight Tuning System B darkglider 5
5. Connecting to the PC 1. Plug the mouse’s USB connector to an available USB port of your PC. 2. The operating system will automatically recognize the mouse and install all needed drivers. 3. If your mouse is not recognized, disconnect it and try another of your PC’s USB connectors. 6. Installing the software 1. 2. 3. 4. 5. Before installing the included software, remove all other installed mouse software from your system. Put the included Tools CD into your CD/DVD drive.
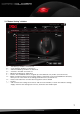
.2 “Button Setting” window E A B C D F G H I J A B C D E F G – – – – – – – “DPI Setting“ window: see below 7.4 “Color Setting“ window: see below 7.5 “Advanced Setting“ window: see below 7.6 “Favorites“ window: see below 7.7 Minimize window/close application Profiles: The DarkGlider can be assigned up to five different user profiles (see below 7.3.
7.3 Pull down menus The pull down menus open up after the respective button is clicked.
7.3.1 “Advanced” sub menu A B C D E F G A B C D E F G – – – – – – – Increase DPI Lower DPI Select next profile Select previous profile Defines the number of left clicks (max. 20) performed after clicking the button Assigns a keyboard letter to the mouse button Starts the macro manager. The DarkGlider can record macros, which contain up to 20 different key strokes. Thus the most common orders and shortcuts can be defined, to increase gaming speed and precision.
7.3.4 “Media” sub menu A B C D E F A B C D E F G – – – – – – – Play/Pause Stop Previous track Next track Increase volume Decrease volume Mute G 7.3.5 Profiles Up to five different profiles can be defined, so the mouse buttons can be easily configured for different games or applications.
7.4 “DPI Setting” window The single DPI steppings are displayed here and can be activated/deactivated.
7.5 “Color Setting” window This dialog allows defining the LED color settings of the mouse.
7.
7.7 “Favorites” window For different programs (games, applications etc.) the respective profile can be assigned.
Legal disclaimer For potential loss of data, especially due to inappropriate handling, SHARKOON assumes no liability. All named products and descriptions are trademarks and/or registered trademarks of the respective manufacturers and are accepted as protected. As a continuing policy of product improvement at SHARKOON, the design and specifications are subject to change without prior notice. National product specifications may vary. The legal rights of the enclosed software belong to the respective owner.