Handbuch Manual Manuel d‘utilisation Guia usario Manuale d´istruzioni Gebruiksaanwijzing Guia usário Instukcja obstugi
Content 1. Features X-Tatic Analog 15 2. Specifications X-Tatic Analog 15 3. Compatibility X-Tatic Analog 15 4. Parts and accessories 16 5. The headset at a glance 17 5.1 The volume controller 18 5.2 The connections 19 6. Connecting the microphone to the headset 19 7. Connecting the headset to a PC or any other analog source 20 8.
Dear customer! Congratulations for purchasing one premium quality SHARKOON product. For a long life time and to take full advantage of this product we recommend that you read this manual completely. Have a good time with our product! SHARKOON Technologies GmbH 1. Features X-Tatic Analog • • • • • • 5.
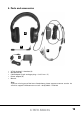
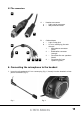
. Parts and accessories A B C D • • • • • X-Tatic Analog 5.1 headset (A) Microphone (B) Cable adapter (9-pin analogue plug > 3 x 3.5 mm / C) Power adapter (D) Manual Note: If you are missing any of the items listed above, please contact customer service via e-mail at support@sharkoon.
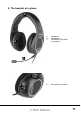
. The headset at a glance A B A – B – C – Headband Headphones Detachable, adjustable microphone D – Microphone connector C D X-TATIC ANALOG 17
5.1 The volume controller A C A B C D C B E A – B C – – D – (E – D Volume adjustment for each channel after pressing the according button (button illuminated) or main volume adjustment respectively (all buttons illuminated) as well as volume on/off (by pressing this controller) Microphone volume (only Xbox 360) Control button for the front, rear and center speaker as well as for the subwoofer (Sub). The volume level is displayed by different colors.
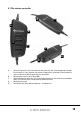
5.2 The connectors A A – a b Headset connectors – 9-pin analog connector – ISO power connector B – a b Cable adapter – 9-pin analog jack – 3.5 mm stereo plug for each channel: 1 – Microphone connector (pink) 2 – Subwoofer connector (orange) 3 – Connector for rear speakers (black) 4 – Connector for front speakers (green) a b B a b 1 2 3 4 6. Connecting the microphone to the headset 1. Insert the microphone’s 3.5 mm stereo plug (fig.
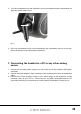
2. Turn the microphone until the indications on the microphone and on the headset are opposite to each other (fig. 3). fig. 3 3. Press the microphone’s plug into the headset’s jack completely and turn the microphone to the front and into the desired position. 7. Connecting the headset to a PC or any other analog source 1. Connect the included power supply to a wall outlet and to the headset’s ISO power connector. 2.
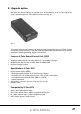
8. Upgrade option We offer you the possibility to upgrade your X-Tatic Analog to an X-Tatic Digital by simply purchasing the X-Tatic Sound Control Unit (fig. 4). fig. 4 This digital control box enables you to extend the functionality of your X-Tatic Analog immensely and to use it e.g. with the Xbox, the Xbox 360, the PS2 and PS3 as well as with other devices providing digital audio output. Features X-Tatic Sound Control Unit (SCU) • • • Supports Dolby Digital 2.0, Dolby Digital 5.
Warning: Xbox, Xbox 360, Xbox Advanced AV Pack, Xbox Communicator, Xbox Live and the respective images/logos are registered trademarks or trademarks of Microsoft Corporation in the U.S. and/or other countries. PlayStation, PlayStation 2, PlayStation 3, PS2, PS3 and the respective images/logos are registered trademarks or trademarks of Sony Computer Entertainment Inc. Dolby, Pro Logic, the double-D symbol and the respective images/logos are registered trademarks or trademarks of Dolby Laboratories.