
Service manual


4
14GT15
14GT20
ADJUSTMENT PRECAUTIONS
This model's setting are adjusted in two different ways: through the I
2
C bus control and in the conventional
analog manner. The adjustments via the I
2
C bus control include preset-only items and variable data.
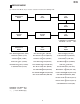
1. Setting the service mode by the microprocessor.
1. Short JA 122 & JA 124 for 1 second and release to switch to the service mode position, and the
microprocessor is in input mode. (Adjustment through the I
2
C bus control). (Use JWS Key to set as
well).
2. Press the CH DOWN / UP key on the remote controller to get ready to select the mode one by one.
3. Press the CH DOWN / UP key on the remote controller to select the modes reversibly one by one.
4. Using the VOLUME UP/ DOWN key on the remote controller, the data can be modified.
5. Short JA 122 & JA 124 for 1 second and release to switch to the normal mode (OFF) position, and the
microprocessor is in out of the service mode.
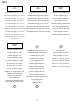
2. Factory Presetting.
1. Short JA 122 & JA 124 for 1 second and release to switch to the service mode position and turn on the
main power switch.Initial values are automatically preset, only when a new EEPROM is used (Judge
with the first 4 bytes ).
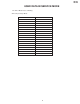
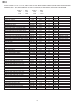
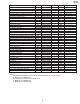
2. The initial data are preset as listed in page 7, 8, & 9.
3. Make sure the data need modify or not (Initial data).
Note: Once the chassis has been assembly together and ready to be POWER ON for the FIRST TIME,
make sure to short JA122 & JA124 to switch to the service mode position first and then turn on the
main power switch (See 2-(1) above).
Precaution: If haven't done this initiation, it may possibly generate excessive Beam current.
3. For reference please check with memory map
(UA1 Series type RH-iX3368CE Attachment)