28JW-73H 32JW-73H COLOUR TELEVISION OPERATION MANUAL PRINTED ON ENVIRONMENTALLY FRIENDLY PAPER
Dear SHARP Customer Congratulations! You are now the proud owner of a SHARP Colour Television Receiver. To ensure proper operation, please read this manual carefully. After reading, keep this manual in a safe place for future reference. TERMS OF GUARANTEE Subject to the conditions listed below Sharp Electronics (U.K.) Ltd.
Safety Precautions This equipment complies with the requirements of Directives 89/336/EEC and 73/23/EEC as amended by 93/68/EEC. To prevent fire or electrical shock, do not use the TV set in an excessively damp place. Never remove the back of the cabinet, as there is high voltage in the TV set. Please call for service. Position the TV set out of direct sunlight and away from heat, as high temperatures can damage the cabinet, CRT, or other electronic parts.
Contents Wide Mode Fast Menu ....................................................17 Audio Adjustments .........................................................19 Features Setting Mode....................................................22 Child Lock (Channel Block) .........................................23 Postcode......................................................................25 VCR Mode ......................................................................26 Other Features .........................
Remote Control 1. 19. 2. 20. TV 1. Stand-by button (TV) Video 2. Power button (VCR) TV 3. 0 ~ 9 digit buttons 4. Flash back button Teletext 5. GREEN button 6. RED button TV 7. Volume DOWN button 8. MENU button 3. Teletext 4. 5. 6. 21. 22. 23. 9. 10. 11. 12. 13. 14. REVEAL button LIST button STORE button CANCEL button HALF PAGE button RESET button Video 15. 16. 17. 18. Rewind/picture search reverse Play button Pause/Still button Stop button TV 19. TV/VIDEO button 20.
Controls & Terminals ■ FRONT TV 1. 2. 3. 4. 5. 6. 7. 8. Main power button Power indicator Remote control sensor Volume DOWN button Volume UP button Channel DOWN button Channel UP button 1 2 4 5 6 7 3 8 Door HOW TO OPEN THE DOOR Press the top of the door, opening it slightly hook your finger inside and pull open. Behind the door 1. 2. 3. 4. 5. 1 S-VIDEO input terminal 2 3 4 5 VIDEO input terminal (PAL/SECAM/NTSC) AUDIO input terminal (left) AUDIO input terminal (right) Headphone jack (3.
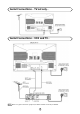
Aerial Connections - TV set only - Aerial Connections - VCR and TV - Note: See on -Typical connections- (page 32) for details of further connection possibilities.
Auto Installation ■ Auto Installation System Your television set is provided with an Automatic Installation System which makes installation easier. This new system is activated when you turn on the TV for the first time. Power indicator Main power button 1. Connect the antenna jack in the antenna input terminal on the rear side of your TV set. Then connect the TV power cable to a 220 ~ 240V a.c. system. SHARP AUTO INSTALLATION 2.
■ Stored programmes When the TV has finished the automatic search, the Stored programmes menu will appear on screen with a list of the channels which have been memorised with the available options: a) Select programme to be edited CH / b) Edit this program RED button c) Go to sorting mode GREEN button d) Delete this program YELLOW button e) Exit this menu BLUE button Stored programmes: Pr 01 Pr 02 Pr 03 Pr 04 Pr 05 Pr 06 Pr 07 Pr 08 Pr 09 Pr 10 CH CH21 CH31 CH41 CH51 CH61 –––– –––– –––– –––– ––
Switching on ■ Main power This TV memorizes the Mode last used when it was switched off. When the main power button ( ) is pressed to turn on the set, the Power indicator will light and the set will resume in either the Stand-by mode or Programme mode, depending upon its condition when it was switched off.
Menu Structures This TV set has a MAIN menu with four basic menus, which permit access to the different functions of the TV. These menus are as indicated below.
TV Channel Setting ■ Auto Channel Preset with Sorting (ACSS: Automatic Channel Sorting System) This function frees you of troublesome channel presetting procedures. Simply follow the instructions below to automatically store all on-air and cable real channels into the programme channel memories. MAIN menu 1. Press the MENU button to see the MAIN menu. 2. Press the BLUE button to see the TUNE menu. TUNE menu 3. Press the Channel UP button CH to select AUTO-TUNE (blue Pr 06 CH21 CHANNEL box).
■ Manual Channel Preset (PRESET USING REAL CHANNEL NUMBERS) 1. Depending on the programme channel you want to preset, press the Single/Double entry button entry. to select single/double digit 2. Select the programme channel number you want to preset with the 0 ~ 9 digit buttons. 3. Press the MENU button to see the MAIN menu. MAIN menu 4. Press the BLUE button to see the TUNE menu. TUNE menu 5.
■ Manual Channel Preset (PRESET USING FREQUENCY TUNING) 1. Depending on the programme channel you want to preset, press the Single/Double entry button entry. to select single/double digit 2. Select the programme channel number you want to preset with the 0 ~ 9 digit buttons. 3. Press the MENU button to see the MAIN menu. MAIN menu 4. Press the BLUE button to see the TUNE menu. TUNE menu 5.
■ After preset has been performed MAIN menu The following features are available for preset channels: Fine tuning When a preset programme channel is not exactly tuned, you can fine tune the channel in this mode. 1. Select the programme channel number you want to tune using the 0 ~ 9 digit buttons. 2. Press the MENU button to see the MAIN menu. 3. Press the BLUE button to see the TUNE menu. 4. Press the Channel DOWN button TUNE menu CH twice to select F-TUNE CHANNEL (blue box).
TV Operation ■ Channel Selection Channel UP/DOWN CH / CH buttons Select the programme channel number you want to see, using the Channel UP/DOWN CH / CH buttons . Pr 01 Pr 02 Pr 03 Pr 04 Pr 05 Pr 06 Pr 07 Pr 08 Pr 09 Pr 10 You can clear the on-screen display by pressing the MENU button . Note: The channels that are in SKIP mode cannot be seen when using this method. Use the 0 ~ 9 digit buttons to display these channels.
Picture Adjustments MAIN menu Picture quality: CONTRAST, COLOUR, BRIGHTNESS, SHARPNESS, NORMALISE, TINT CONTROL, NTSC HUE and ECO MODE are adjustable in this menu. 1. Press the MENU button to see the MAIN menu. 2. Press the RED button to see the PICTURE menu. 3. Press the Channel UP/DOWN buttons CH / CH to select RED PICTURE menu CONTRAST an option from the list: CONTRAST, COLOUR, BRIGHTNESS, SHARPNESS or NORMALISE. COLOUR The selected item will appear on screen in a blue box. BRIGHTNESS 4.
Wide Mode Fast Menu With this menu you can select the width of the picture: AUTO, PANORAMA, FULL, NORMAL, ZOOM 14:9 or CINEMA, by pressing the Wide mode button . Each time you press the Wide mode button picture changes as indicated: , the width of the Wide mode button AUTO * ➔ PANORAMA ➔ FULL ➔ NORMAL ➔ ZOOM 14:9 ➔ CINEMA When you select PANORAMA, ZOOM 14:9 or CINEMA, 4 options appear on the screen. V-SCROLL: Press the RED button menu.
■ Wide Mode (Special detail information) Special detail information about PANORAMA, FULL, NORMAL, ZOOM 14:9 and CINEMA (16:9) . 4:3 PANORAMA The Panorama Mode adapts the broadcast picture to 16:9 format without changing the centre of view. This is especially useful for programmes like the News when the speaker in the centre of the picture needs to be seen clearly. FULL With Full Mode you adapt the picture 16:9 format while also stretching the centre of view.
Audio Adjustments Loudspeakers Sound Volume / Use the Volume DOWN/UP buttons / to increase/decrease the volume level. The volume indicator will appear on the screen. Note: To adjust the headphones volume, see the SOUND menu on page 20. Sound Mute button Press the button to mute the sound. “MUTE” appears on the screen. Press the button again to turn the sound back on. MUTE Sound mode button Press the button to change the sound mode for the speakers. The sound mode will appear on the screen.
■ Sound Setting Mode Sound quality (VOLUME, BASS, TREBLE, BALANCE, NORMALISE, SOUND MODE and SPATIAL EXPANDER) are adjustable in this menu. MAIN menu 1. Press the MENU button to see the MAIN menu. 2. Press the GREEN button to see the SOUND menu. GREEN SOUND menu 3. Press the RED button the GREEN button to select LOUDSPEAKERS or press to select HEADPHONES. 4.
* EFFECTS SPATIAL EXPANDER: The spatial expander effect depends on whether the feed is MONO or STEREO. If the source feed is MONO, it produces a “Pseudo Stereo” effect. If the source feed is STEREO, it produces a spatial expander effect, expanding the stereophonic image. BYPASS: The BYPASS effect deactivates the SPATIAL EXPANDER. Note: The SPATIAL EXPANDER effect does not work with headphones. ** SOUND IDENT. SOUND IDENT.
Features Setting Mode In this mode you can set the ON-TIMER and OFF-TIMER, set the CHILD LOCK, view the all functions implemented in your TV set demonstration and set the POSTCODE. ■ ON TIMER The On-Timer is used to automatically switch on the TV set during the day. 1. Press the MENU button to see the MAIN menu. 2. Press the YELLOW button to see the FEATURES menu. 3. Press the Channel UP/DOWN buttons CH / CH to select an option from the list: ON TIMER, OFF TIMER, CHILD LOCK, DEMO or POSTCODE.
■ Child Lock (Channel Block) You can lock a TV channel to prevent unsupervised TV viewing by following these procedures; the protection can apply to the television itself LOCK ALL or to specific programmes LOCK PROG.. With the CHILD LOCK function, you can also programme a time period during which the TV will be protected. MAIN menu 1. Press the MENU button to see the MAIN menu. 2. Press the YELLOW button to see the FEATURES menu. YELLOW FEATURES menu 3.
LOCK PROGRAMME Select this option to protect the access to separate programmes. 1. Press the MENU button to see the MAIN menu. 2. Select the programme channel number you want to protect using the 0 ~ 9 digit buttons or the Channel UP/DOWN buttons CH . CH / 3. Repeat steps 1. to 4. (page 22) to see the CHILD LOCK menu. 4. Press the Channel DOWN button CH to select LOCK PROG. LOCK PROGRAMME menu (blue background). 5.
■ Postcode This option allows you to set a code, which will be displayed at TV switch on time. There is a password to change the code. 1. Press the MENU button to see the MAIN menu. 2. Press the YELLOW button to see the FEATURES menu. 3. Press the Channel UP button CH to see the POSTCODE menu. POSTCODE menu ENTER PSW (Password) 4. ENTER PSW (Password): enter the 4-digit using the 0 ~ 9 digit buttons. It is indispensable to enter the password in order to continue configuring the postcode.
VCR Mode SHARP VCR can be operated using the TV remote control. Channel UP/DOWN buttons (VCR) CH / These buttons are used for changing channels and setting the timer. Play button Press this button to start playback. Record button Press this button to start recording. If the video cassette is protected against recording, it will be ejected. Stop button Press this button to stop playback or recording. Power button ( VCR) Press this button to turn your VCR on.
Other Features TV/VIDEO button (TV/VIDEO) TV/Video menu With this button you can select either source of input for the TV. 1. When the TV/VIDEO button is first pressed, the TV/Video menu appears and TV mode changes to VIDEO mode. The screen is displayed in the last VIDEO mode. 2. Press the the corresponding COLOUR button to select one of the input sources, as indicated in the diagram. If you press any COLOUR button TV/Video menu will appear again.
TELETEXT Mode What is Teletext? Teletext is an information service, organized like a magazine, which is provided by some television stations in addition to regular television broadcasting. Your television receives special Teletext signals broadcast by a TV station, processes the information and displays it graphically on the screen. News, weather and sports information, stock exchange prices, program previews and closed captioning for the deaf are among the many services available through Teletext.
■ Other Teletext features TEXT/MIX/PICTURE button TV Mode: Press the TEXT/MIX/PICTURE button to select SPLIT SCREEN Mode (Picture & Teletext). This feature allows the user to watch a Teletext page on the right hand side of the screen while on the left hand side is shown the normal TV programme. SPLIT SCREEN Mode: Press the TEXT/MIX/PICTURE button to select the Teletext Mode. TELETEXT Mode: Press the button again to superimpose a Teletext broadcast onto the current TV programme screen (mixed Mode).
SPLIT SCREEN (LIST mode) This feature allows the user to watch a Teletext page (in LIST Mode) on the right hand side of the screen while on the left hand side is shown the normal TV programme. To activate this mode, press any colour button when you are watching a TV programme with Teletext information and the display page will be page memorized in LIST mode (see LIST Mode). To exit from SPLIT SCREEN (LIST Mode) press the MENU button . Note: If there is not TXT transmission, a black box appears.
21-pin Euro-SCART and 21-pin Audio/Video ■ REAR TV 21-pin In/Out 1. 21-pin Audio/Video (AV-2) With PAL/SECAM/NTSC Video Input 2. 21-pin Audio/Video (AV-1) With PAL/SECAM/NTSC/S-Video Input 3. 21-pin Euro-SCART (RGB) With PAL/SECAM/NTSC Video Input. 20 21 18 19 16 17 14 15 12 13 10 11 8 9 6 7 4 5 2 3 21 1 ■ 21-pin Euro-SCART (RGB) 1. Audio right output 8. Audio-video control 15. Red input 2. Audio right input 9. Earth for green 16. Red/Green/Blue control 3. Audio left output 10.
Typical Connections (Videorecorder/Decoder/DVD and TV) through the 21-pin Euro-SCART Please refer to the operation manual of your VCR for details.
Typical connection (VIDEO CAMERA and TV) through the A/V FRONT Note: For further details, please refer to operation manual of your Video camera.
Troubleshooting If the fault cannot be corrected by using this guide, remove the mains plug from the wall socket and contact the dealer or supplier from whom it was purchased. Where this is not possible, please visit our web-site at www.sharp.co.uk/support. Customers without Internet access may telephone 08705 274277 (or (01) 676 0648 if telephoning from Ireland) during office hours.
General Specifications for Television Receiver Item : IC Solid State Colour TV Receiver Models: 28JW-73H, 32JW-73H Receiving Broadcast Standard CCIR TV Standard system PAL- I Receiving Channel VHF : UHF : CATV: Receiving System Sound: Colour System: Field Frequency: Power Source IR A-J (CH 01 - CH 09) CH 21 - CH 69 (I 21 - 69) CC 01 - CC 68 (Hyperband) FM MONO DIGITAL STEREO NICAM PAL (SECAM & NTSC by AV inputs) PAL 50/60 Hz Capability 220V-240V AC 50Hz 28JW-73H 32JW-73H Power Consumption at 2
Index 21-pin Audio/Video......................................................31 21-pin Euro-SCART (RGB) ........................................31 M Main power button .......................................................9 Manual Channel Preset ........................................12, 13 Menu Structures .........................................................10 Mono ..........................................................................19 A Accessories.............................................
SHARP ELECTRÓNICA ESPAÑA, S.A SHARP ELECTRONICS (U.K.) LTD.