SHARP CORPORATION Printed on post-consumer recycled paper. Imprimé sur du papier recyclé. Impreso en papel reciclado. Impresso em papel reciclado pós utilização.
ENGLISH LC-30HV2U LIQUID CRYSTAL TELEVISION ENGLISH OPERATION MANUAL IMPORTANT INFORMATION WARNING: TO REDUCE THE RISK OF FIRE OR ELECTRIC SHOCK, DO NOT EXPOSE THIS PRODUCT TO RAIN OR MOISTURE. The lightning flash with arrow-head symbol, within an equilateral triangle, is intended to alert the user to the presence of uninsulated “dangerous voltage” within the product’s enclosure that may be of sufficient magnitude to constitute a risk of electric shock to persons. CAUTION RISK OF ELECTRIC SHOCK.
IMPORTANT INFORMATION WARNING: FCC Regulations state that any unauthorized changes or modifications to this equipment not expressly approved by the manufacturer could void the user’s authority to operate this equipment. U.S.A ONLY CAUTION: TO PREVENT ELECTRIC SHOCK, MATCH WIDE BLADE OF PLUG TO WIDE SLOT, FULLY INSERT.
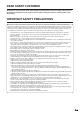
DEAR SHARP CUSTOMER Thank you for your purchase of the Sharp Liquid Crystal Television. To ensure safety and many years of trouble-free operation of your product, please read the Safety Precautions carefully before using this product. IMPORTANT SAFETY PRECAUTIONS Electricity is used to perform many useful functions, but it can also cause personal injuries and property damage if improperly handled. This product has been engineered and manufactured with the highest priority on safety.
IMPORTANT SAFETY PRECAUTIONS • Cleaning—Unplug the AC cord from the AC outlet before cleaning the product. Use a damp cloth to clean the product. Do not use liquid cleaners or aerosol cleaners. • Water and moisture—Do not use the product near water, such as bathtub, washbasin, kitchen sink and laundry tub, swimming pool and in a wet basement. • Stand—Do not place the product on an unstable cart, stand, tripod or table.
IMPORTANT SAFETY PRECAUTIONS • If an outside antenna is connected to the television equipment, be sure the antenna system is grounded so as to provide some protection against voltage surges and built-up static charges.
Contents IMPORTANT INFORMATION ……………………… 1 DEAR SHARP CUSTOMER ………………………… 3 IMPORTANT SAFETY PRECAUTIONS …………… 3 Contents ……………………………………………… 6 Supplied accessories ……………………………… 7 Preparation …………………………………………… 8 Setting the system ……………………………… 8 Inserting the batteries …………………………… 9 Using the remote control unit …………………… 9 Cautions regarding remote control unit …… 9 Part names ………………………………………… 10 Display ………………………………………… 10 AVC System …………………………………… 11 Remote control unit …………………………… 12 Watching TV ………………………
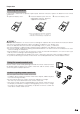
Supplied accessories Make sure the following accessories are provided with the product.
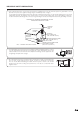
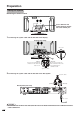
Preparation Setting the system Removing the terminal cover DISPLAY OUTPUT-2 Press down the two upper hooks to remove the cover toward you. DISPLAY OUTPUT-1 AC INPUT 110V–240V 1. Connecting the system cable and the AC cord to the Display Display (rear view) AC cord DISPLAY INPUT2 DISPLAY INPUT1 AC INPUT AC INPUT HEADPHONE DISPLAY INPUT2 DISPLAY INPUT1 (WHITE) Connect the plug into the terminal and secure it by tightning the thumb screws.
Preparation Inserting the batteries If the remote control fails to operate Liquid Crystal Television functions, replace the batteries in the remote control unit. 1 Open the battery cover. 2 Insert the batteries (two “AA” size 3 Close the battery cover. (UM/SUM-3) Alkaline batteries, supplied with the product). _ + + _ • Place the batteries with their terminals corresponding to the (e) and (f) indications in the battery compartment.
Part names Display VOLUME buttons (VOLl/k ) CHANNEL buttons (CHs/r) Remote control sensor OPC sensor INPUT button MAIN POWER button POWER button Sleep timer indicator OPC indicator* POWER indicator *OPC: Optical Picture Control 10
Part names AVC System INPUT 4 terminal (VIDEO) Front view Door knob PC INPUT terminal (ANALOG RGB) STANDBY/ON indicator CLEAR button* INPUT 4 terminals (AUDIO L/R) PC INPUT terminal (AUDIO) MAIN POWER button INPUT 4 terminal (S-VIDEO) How to open the door. * If you’re having problems operating the AVC System and want to return to normal screen, even when it stays on (the indicator lights green), press CLEAR on the AVC System. Pressing CLEAR resets the System as shown below.
Part names Remote control unit Set the mode switch to TV.
Watching TV Simple operations for watching a TV program Basic connection To enjoy a clearer picture, use an outdoor antenna. The following is a brief explanation of the types of connections that are used for a coaxial cable. If your outdoor antenna uses a 75-ohm coaxial cable with an F-type connector, plug it into the antenna terminal at the rear of the AVC System. A • The antenna and the cable converter cannot be connected at the same time.
Watching TV Using Headphones You can use a pair of headphones (3.5 mm ø mini-jack) to listen to the sound. DISPLAY INPUT2 DISPLAY INPUT1 AC INPUT HEADPHONE HEADPHONE Headphones (3.5 mm ø mini-jack) (commercially available) A • When connecting headphones, the sound from the display speakers is muted.
Watching TV Connecting the AC cord Connect the AC cord after all component connections have been completed. Display (bottom view) DISPLAY INPUT2 DISPLAY INPUT1 AC INPUT HEADPHONE AC cord AVC System (rear view) Y ANT-A COMPONENT PR PB Y COMPONENT PR PB INPUT 1 RS-232C INPUT 3 ANT-B DISPLAY OUTPUT-1 DISPLAY OUTPUT-2 HD INPUT INPUT 2 OUT ANT/CABLE 75Ω MONITOR OUTPUT S-VIDEO VIDEO R-AUDIO-L S-VIDEO VIDEO R-AUDIO-L AC INPUT AC cord L • Use only the AC cord provided.
Watching TV Turning on the power Display 1 Press MAIN POWER on the Display. • The POWER indicator on the Display flashes red. 2 Press MAIN POWER on the AVC System. • The System turns the power on. • The POWER indicator on the Display lights up green and the STANDBY/ON indicator on the AVC System lights up in green.
Watching TV Initial setup When you turn on the System for the first time, it will automatically memorize the broadcasting channels where you live. Perform the following steps before you press TV POWER on the remote control unit. 1. Insert the batteries into the remote control unit. (See page 9.) 2. Connect the antenna cable to the AVC System. (See page 13.) 3. Plug in the AC cord to the AC outlet. (See page 15.) Language menu 1.
Watching TV Display Simple button operations for changing channels Using CHa/b on the remote control unit • Press CHa a to increase the channel number. b to decrease the channel number. • Press CHb CH s/r A a/b b • CH s/r on the Display operates the same as CHa on the remote control unit. Channel display TV TV (The image displays an example.
Watching TV Simple button operations for changing volume/sound Display l on the remote control unit Using VOL k/l • To increase the volume, press VOL k. • To decrease the volume, press VOL l. VOL l/k A l kon the Display operates the same as VOL k/l • VOL l/k on the remote control unit.
Watching TV TV TV Using FRONT SURROUND on the remote control unit CBL VCR DVD /SAT /LD /DTV POWER ANT-A/B AV FRONT MODE SURROUND INPUT MTS CC TWIN PICTURE SELECT MODE FREEZE INPUT DISPLAY SLEEP SUB VIEW EDIT/ LEARN 1 2 3 4 5 6 7 8 9 0 100 : off : SRS : FOCUS : FOCUSⴐSRS 20 TWIN CH h produces SRS and FOCUS effects from the speakers. Each time you press FRONT SURROUND, the mode changes among SRS, FOCUS, FOCUS e SRS and off.
Watching TV Setting MTS/SAP stereo mode The System has a feature that allows reception of sound other than the main audio for the program. This feature is called Multi-channel Television Sound (MTS). The System with MTS can receive mono sound, stereo sound and Secondary Audio Programs (SAP). The SAP feature allows a TV station to broadcast other information, which could be audio in another language or something completely different like weather information.
Basic adjustment settings TV/VIDEO mode menu items List of AV menu items to help you with operations. Page 35–36 MENU Power Control Power Save [Standard] No Signal off [Disable] No Operation off [Disable] Description Power Save Save power by decreasing picture brightness. No Signal off System automatically shuts down if no signal inputs for 15 minutes. RETURN System automatically shuts down if No Operation off you do not operate the System for 3 hours.
Basic adjustment settings PC mode menu items List of PC menu items to help you with operations. Page 37 MENU Power Control Power Save [Standard] Power Management [Off] RETURN Description Power Save Save power by decreasing picture brightness. Power Management System automatically shuts down if you set the time. Select mode 1 or mode 2. Page 29 MENU Picture USER Contrast First MENU [+30] 0 Description Contrast Adjusts the picture between light and shade.
Basic adjustment settings Moving the picture on the screen You can move the picture around on the screen. ⴐ Press a/b/c/d to move an image on the screen to the desired position. FLASHBACK VOL CH ⴑ MUTE MENU TV/SAT/DVD RETURN MENU DTV/DVD TOP MENU SOURCE DTV/SAT GUIDE POWER SET/ ENTER DTV/SAT INFO FAVORITE CH A B C D POWER INPUT VOLⴑ VOLⴐ RECEIVER 24 VCR REC A • While pressing a/b/c/d, an on-screen image, “Adjusting Position” displays to the desired position.
Basic adjustment settings EZ Setup You can run EZ Setup again, even after setting up the preset channels. Language setting 1 2 3 Select from among 3 languages: English, French and Spanish. 4 5 6 7 8 9 1 2 0 100 ⴐ ENT MENU Secret No. –––– CH MUTE MENU TV/SAT/DVD DTV/DVD TOP RETURN MENU MENU SOURCE MENU SET/ ENTER 4 Press a/b to select “EZ Setup”, and then press SET/ENTER. • Language menu displays.
Basic adjustment settings Channel setup If initial setup does not memorize all the channels in your region, follow the instructions below to manually memorize the channels.
Basic adjustment settings Saving broadcast TV channels to memory MENU TV TV POWER ANT-A/B AV FRONT MODE SURROUND CH Setup INPUT Air/Cable MTS CC SELECT MODE FREEZE INPUT DISPLAY SLEEP TWIN CH Favorites RETURN EDIT/ 3 LEARN MENU 1 2 4 3 5 7 8 ⴐ 100 [ 2] Skip [Off] MENU MUTE 6 7 8 9 Setup CH ⴑ Air RETURN ENT FLASHBACK VOL 5 CH Memory 9 0 4 Setup CH Setup 6 CH Setup CH Memory Skip MENU TV/SAT/DVD DTV/DVD TOP RETURN MENU MENU Off SOURCE DTV/SAT On
Basic adjustment settings Language setting You can also select a language from the option menu. Select from among 3 languages: English, French and Spanish. ⴐ MENU FLASHBACK Option VOL CH ⴑ Language MUTE [English] 1 2 English Français MENU TV/SAT/DVD DTV/DVD TOP RETURN MENU MENU SOURCE Español 3 DTV/SAT 4 Press a/b to select the desired language listed on the screen, and then press SET/ENTER. 5 Press MENU to exit the menu.
Basic adjustment settings Picture adjustments Adjust the picture to your preference with the following picture settings. TV 1 2 CBL VCR DVD /SAT /LD /DTV TV POWER ANT-A/B AV FRONT MODE SURROUND INPUT MTS SELECT MENU TV/SAT/DVD RETURN MENU DTV/DVD TOP MENU SOURCE Press a/b to select “Picture”, and then press SET/ ENTER. • Picture menu displays. CC TWIN PICTURE Press MENU. 3 4 Press a/b to select a specific adjustment item. 5 Press MENU to exit the menu.
Basic adjustment settings Color temperature TV TV CBL VCR DVD /SAT /LD /DTV POWER ANT-A/B AV FRONT MODE SURROUND Adjust the color temperature to give a better white balance.
Basic adjustment settings 3D-Y/C MENU TV TV CBL VCR DVD /SAT /LD /DTV POWER ANT-A/B AV FRONT MODE SURROUND MTS Advanced CC 3D-Y/C TWIN PICTURE SELECT MODE FREEZE INPUT DISPLAY SLEEP VIEW Provides high quality images with minimal dot crawl and cross color noise. Picture USER INPUT [Standard] Standard SUB TWIN CH EDIT/ LEARN 1 2 3 4 5 6 7 8 9 0 100 ENT CH ⴑ MUTE MENU TV/SAT/DVD RETURN MENU 3 Press a/b to select “Advanced”, and then press SET/ENTER.
Basic adjustment settings Film mode (3:2 pull-down) MENU TV TV CBL VCR DVD /SAT /LD /DTV POWER ANT-A/B AV FRONT MODE SURROUND Picture USER INPUT MTS Advanced CC Film Mode TWIN PICTURE SELECT MODE FREEZE INPUT DISPLAY SLEEP VIEW SUB TWIN CH On EDIT/ LEARN 1 2 3 4 5 6 7 8 9 0 100 ⴐ [On] Off ENT FLASHBACK VOL Automatically detects a film-based source (originally encoded at 24 frames/second), analyses it then recreates each still film frame for high-definition pictu
Basic adjustment settings Cool Climate TV TV CBL VCR DVD /SAT /LD /DTV POWER ANT-A/B AV FRONT MODE SURROUND INPUT MTS CC TWIN PICTURE SELECT MODE FREEZE INPUT DISPLAY SLEEP VIEW SUB TWIN CH MENU EDIT/ LEARN DYNAMIC 1 2 3 4 5 6 7 8 9 0 100 ⴐ Picture Advanced Cool Climate [On] Off On ENT A • Cool climate may cause image noise. If this occurs turn the function “Off”. • Return to the previous menu by pressing MENU RETURN.
Basic adjustment settings Sound adjustment You can adjust the sound quality to your preference with the following settings. TV 1 2 CBL VCR DVD /SAT /LD /DTV TV POWER ANT-A/B AV FRONT MODE SURROUND INPUT MTS PICTURE SELECT SUB MODE FREEZE DISPLAY SLEEP TWIN CH INPUT EDIT/ 2 3 4 5 6 7 8 9 0 100 ⴐ ENT CH ⴑ Press a/b to select a specific adjustment item. 5 Press MENU to exit the menu. Press c/d to adjust the item to your desired position.
Basic adjustment settings Power control Power Control setting allows you to reduce the display brightness to save energy. Power control for AV source TV TV MENU CBL VCR DVD /SAT /LD /DTV POWER ANT-A/B AV FRONT MODE SURROUND Power control INPUT Power Save MTS CC A • “Power Save“ may not activate when setting to “Auto” under bright ambient light conditions.
Basic adjustment settings MENU TV TV CBL VCR DVD /SAT /LD /DTV POWER ANT-A/B AV FRONT MODE SURROUND Power Control INPUT No Operation off MTS Disable CC Enable TWIN PICTURE SELECT MODE FREEZE INPUT DISPLAY SLEEP VIEW SUB 3 EDIT/ LEARN 4 2 3 4 5 6 7 8 9 0 100 5 ENT FLASHBACK VOL CH ⴑ MUTE MENU TV/SAT/DVD RETURN MENU DTV/DVD TOP MENU SOURCE DTV/SAT POWER GUIDE SET/ ENTER DTV/SAT INFO FAVORITE CH 36 VCR REC A B C D POWER INPUT VOLⴑ VOLⴐ RECEIVER
Basic adjustment settings Power control for PC source MENU TV TV CBL VCR DVD /SAT /LD /DTV POWER ANT-A/B AV FRONT MODE SURROUND Power control Power Save INPUT [Save1] Standard MTS CC Power save Save1 TWIN PICTURE Save2 SELECT SUB VIEW MODE FREEZE DISPLAY SLEEP TWIN CH 2 3 4 5 6 7 8 9 0 100 Press MENU. 3 Press a/b to select “Power Save”, and then press SET/ENTER. 4 Press a/b to select the desired mode, and then press SET/ENTER. 5 Press MENU to exit the menu.
Using external equipment You can connect many types of external equipment to your System, like a DVD player, VCR, Digital TV tuner, computer, game console and camcorder. To view external source images, select the input source from INPUT on the remote control unit or on the Display.
Using external equipment Watching a DVD image Connecting a DVD player You can use the INPUT 1 terminal when connecting to a DVD player and other audiovisual equipment. Component video cable (commercially available) AVC System (rear view) Y ANT-A COMPONENT PR PB Y COMPONENT PR PB RS-232C INPUT 3 ANT-B When using component video cable, select “COMPONENT” for “Input Select” in the menu.
Using external equipment Watching a VCR image Connecting a VCR You can use the INPUT 2 terminal when connecting a VCR and other audiovisual equipment.
Using external equipment Watching broadcasts via a Digital TV tuner Connecting a Digital TV tuner You can use the INPUT 3 terminal when connecting a Digital TV tuner and other audiovisual equipment.
Using external equipment Enjoying a game console or viewing camcorder images Connecting a game console or camcorder A game console, camcorder and some other audiovisual equipment are conveniently connected using the INPUT 4 terminals. A • The S-video terminal has priority over the video terminals.
Using external equipment Viewing an image from a computer Connecting a computer Use the PC terminals to connect a computer. A • The PC input terminals are DDC1/2B-compatible. • Refer to page 71 for a list of computer signals compatible with the System. AVC System (front view) RGB cable (commercially available) ø 3.5 mm stereo minijack cable (commercially available) Computer Signal names for 15-pin mini D-sub connecter 5 4 10 15 2 3 13 6 7 8 9 14 Pin No.
Using external equipment Removing the speakers This unit has detachable type speakers. You can detach the system speakers when using external amplifier/speakers. Before attaching/detaching speakers • Before performing work make sure to turn off the System. • Before performing work spread cushioning over a flat surface to lay the Display on. This will prevent it from being damaged. 1 2 Unfasten the screws used to secure the speakers in place. Take hold of the speaker and slowly slide it sideways.
Adjustment settings ⴐ Image position (TV/VIDEO mode only) FLASHBACK VOL CH ⴑ MUTE For adjusting a picture’s horizontal and vertical position. MENU TV/SAT/DVD RETURN MENU DTV/DVD TOP 1 2 MENU SOURCE DTV/SAT GUIDE POWER SET/ ENTER DTV/SAT INFO FAVORITE CH A B C D INPUT VOLⴑ VOLⴐ RECEIVER MENU Option Position H-Pos. [0] –15 +15 V-Pos. [0] –30 +30 Reset Press a/b to select “Option”, and then press SET/ ENTER. 3 Press a/b to select “Position”, and then press SET/ ENTER.
Adjustment settings MENU TV/SAT/DVD DTV/DVD TOP RETURN MENU MENU SOURCE Auto Sync. adjustment (PC mode only) DTV/SAT GUIDE POWER SET/ ENTER For automatically adjusting the computer image. DTV/SAT INFO FAVORITE CH VCR REC A B C D POWER INPUT VOLⴑ VOLⴐ RECEIVER 1 2 Press MENU. 3 Press a/b to select “Auto Sync.”, and then press SET/ENTER. Press a/b to select “Option”, and then press SET/ ENTER. • Auto Sync. starts and “Adjusting the image.” displays.
Adjustment settings INPUT 1 signal menu TV TV CBL VCR DVD /SAT /LD /DTV POWER ANT-A/B AV FRONT MODE SURROUND MENU INPUT INPUT1 SELECT MODE FREEZE INPUT DISPLAY SLEEP [AUTO] COMPONENT SUB VIEW For setting the signal type of external equipment. Input Select CC TWIN PICTURE Input signal setting Option MTS TWIN CH 1 2 AV-Y/C AUTO EDIT/ 3 LEARN 1 2 3 4 5 6 7 8 9 0 100 4 INPUT 3 signal menu 5 MENU Press MENU. Press a/b to select “Option”, and then press SET/ ENTER.
Adjustment settings AV MODE TV TV CBL VCR DVD /SAT /LD /DTV POWER ANT-A/B AV FRONT MODE SURROUND INPUT MTS CC TWIN PICTURE SELECT MODE FREEZE INPUT DISPLAY SLEEP SUB VIEW TWIN CH AV MODE gives you five viewing options to choose from to best match environment of the System, which can vary due to factors like room brightness, type of program watched or the type of image input from external equipment. 1 EDIT/ 1 2 3 4 5 6 7 8 9 0 100 Press AV MODE. • Present AV MODE displays.
Adjustment settings View Modes for 4:3 Programs TV CBL VCR DVD /SAT /LD /DTV TV POWER ANT-A/B AV FRONT MODE SURROUND 1 INPUT MTS • The View Mode menu displays. • The menu lists the view mode options selectable for the type of video signal currently received. CC TWIN PICTURE SELECT MODE FREEZE INPUT DISPLAY SLEEP VIEW SUB EDIT/ MENU TV/SAT/DVD RETURN MENU TWIN CH LEARN Press VIEW MODE. 2 Press VIEW MODE or a/b while the View Mode menu is still on the screen.
Adjustment settings MENU TV/SAT/DVD RETURN MENU Selecting Stretch Mode display (TV/ VIDEO mode only) DTV/DVD TOP MENU SOURCE DTV/SAT GUIDE POWER Select the display type in Stretch Mode. MENU SET/ ENTER DTV/SAT INFO FAVORITE CH Option Stretch Mode [Mode1] VCR REC Mode1 A B POWER INPUT C D VOLⴑ VOLⴐ 1 2 Mode2 3 RECEIVER 4 5 Press MENU. Press a/b to select “Option”, and then press SET/ ENTER. Press a/b to select “Stretch Mode”, and then press SET/ENTER.
Adjustment settings TV TV a View Mode display CBL VCR DVD /SAT /LD /DTV POWER ANT-A/B AV FRONT MODE SURROUND 1280g768 1024g768 INPUT MTS CC TWIN PICTURE SELECT MODE FREEZE INPUT DISPLAY SLEEP VIEW SUB TWIN CH LEARN EDIT/ MENU TV/SAT/DVD RETURN MENU POWER GUIDE SET/ ENTER DTV/SAT INFO FAVORITE CH A B VCR REC C Press VIEW MODE. • The View Mode menu displays. • The menu lists the View Mode options selectable for the type of video signal currently received.
Adjustment settings Audio out MENU TV TV CBL VCR DVD /SAT /LD /DTV POWER ANT-A/B AV FRONT MODE SURROUND Option Audio Out INPUT Fixed MTS CC Variable TWIN PICTURE SELECT VIEW SUB MODE FREEZE DISPLAY SLEEP Allows you to select what controls the audio output. [Fixed] 1 2 TWIN CH INPUT EDIT/ Press MENU. Press a/b to select “Option”, and then press SET/ ENTER. 3 Press a/b to select “Audio Out”, and then press SET/ENTER.
Adjustment settings Closed caption • Your System is equipped with an internal closed caption decoder. Closed caption is the System which allows you to view conversations, narration, and sound effects in TV programs and home videos as subtitles on your Display. • Not all programs and videos offer closed caption. Please look for the “N” symbol to ensure that captions will be shown. • “CC1” or “CC2” displays subtitles of TV dramas and news programs while allowing a full view of the picture.
Adjustment settings Parental control (setting V-CHIP level) V-CHIP is an electronic filtering device built into your System. This tool gives parents a great degree of control over broadcasts accessed by their children. It allows parents to select programs judged suitable for child viewing while blocking ones judged not suitable. It does so automatically once you activate the V-CHIP feature in your Liquid Crystal Television.
Adjustment settings Voluntary movie rating system (MPAA) TV TV CBL VCR DVD /SAT /LD /DTV POWER ANT-A/B AV FRONT MODE SURROUND 1 2 MENU INPUT Setup MTS Secret No. CC –––– • Secret number setting menu displays only when “Secret No.” is set. (See page 58.) • “V-Chip” and “Status” will not be selectable from the menu if you do not first configure your secret number. (See page 58.
Adjustment settings Canadian Rating Systems • The TV rating systems in Canada are based on the Canadian Radio-Television and Telecommunications Commission (CRTC) policy on violence in television programming. • While violence is the most important content element to be rated, the structure developed takes into consideration other program content like language, nudity, sexuality and mature themes.
Adjustment settings Canadian English ratings MENU TV TV CBL VCR DVD /SAT /LD /DTV POWER ANT-A/B AV FRONT MODE SURROUND Parental CTRL INPUT V-Chip MTS CC Canadian English Ratings TWIN PICTURE SELECT SUB VIEW MODE DISPLAY FREEZE TWIN CH E [———] C [———] C8 + EDIT/ LEARN [———] G [———] PG 1 2 3 [———] 14 + [———] 4 5 6 18 + [———] 7 8 9 0 100 RETURN 3 4 5 ENT 6 FLASHBACK VOL 7 CH ⴑ MUTE MENU TV/SAT/DVD RETURN MENU DTV/SAT 8 GUIDE POWER SET/ ENTER DTV/
Adjustment settings Secret number setting for parental control (TV/VIDEO mode only) MENU TV TV CBL VCR DVD /SAT /LD /DTV POWER ANT-A/B AV FRONT MODE SURROUND Setup Parental CTRL INPUT CC Secret No. TWIN PICTURE SELECT VIEW SUB MODE FREEZE DISPLAY SLEEP 1 Allows you to use a secret number to protect certain settings from being accidentally changed. Secret No. MTS TWIN CH Secret No.
Adjustment settings TV TV Secret number setting menu CBL VCR DVD /SAT /LD /DTV POWER ANT-A/B AV FRONT MODE SURROUND MENU INPUT MTS Setup CC Secret No. TWIN PICTURE SELECT MODE FREEZE INPUT DISPLAY SLEEP VIEW SUB –––– Clearing the secret number Allows you to clear your secret number. 1 Press MENU. 2 Press a/b to select “Setup”, and then press SET/ ENTER. • Secret number setting menu displays. TWIN CH 3 EDIT/ LEARN MENU 1 2 3 • Setup menu displays.
Adjustment settings TV TV How to temporarily release the V-CHIP BLOCK CBL VCR DVD /SAT /LD /DTV POWER ANT-A/B AV FRONT MODE SURROUND INPUT MTS • The V-CHIP BLOCK is working and censors a broadcast, “V-CHIP HAS BEEN ACTIVATED.” displays.
Other viewing options Twin picture functions Allows you to display two pictures on the screen at one time. Twin picture in all cases TV TV You can display two same-sized pictures except when inputting from a PC INPUT terminal. CBL VCR DVD /SAT /LD /DTV POWER ANT-A/B AV FRONT MODE SURROUND 1 INPUT MTS TWIN PICTURE SELECT MODE FREEZE INPUT DISPLAY SLEEP VIEW SUB EDIT/ TWIN CH Press TWIN PICTURE. • Twin picture displays and a selected input source image displays.
Other viewing options Learning remote control function You can operate the connected AV products (AV Receiver, Cable Box, SAT tuner, DTV, VCR, DVD, LD) using the learning function for your remote control unit. This remote control unit has the function that can memorize each remote control code. Presetting manufacture codes TV CBL VCR DVD /SAT /LD /DTV TV POWER ANT-A/B AV FRONT MODE SURROUND 1 Slide the Mode switch to match the device to which you want to preset the remote control signal.
Other viewing options Manufacture codes CATV/SAT/ DTV VCR DVD/LD 00 PIONEER1 (CATV) SHARP1 SHARP (DVD) 01 PIONEER2 (CATV) SHARP2 02 JERROLD1 (CATV) 03 CATV/SAT/ DTV VCR DVD/LD 24 SANYO1 PHILIPS (LD) PIONEER (DVD) 25 SANYO2 RCA (LD) SHARP3 PANASONIC (DVD) 26 SANYO3 SONY (MDP) JERROLD2(CATV) PIONEER SAMSUNG (DVD) 27 SONY (BETA) SONY (LD) 04 JERROLD3 (CATV) FISHER SONY (DVD) 28 SONY (VHS) 05 JERROLD4 (CATV) FISHER TOSHIBA (DVD) 29 SONY (8 mm) 06 JERROLD5 (CATV) F
Other viewing options TV TV POWER ANT-A/B AV FRONT MODE SURROUND INPUT MTS CC Receiver control buttons TWIN PICTURE SUB MODE FREEZE DISPLAY SLEEP When a SHARP receiver is connected to the display, the receiver can operate using buttons 1 to 3. When another non-SHARP receiver is connected to the display, the signals for 1 to 3 must first be learned before operating. (See page 62.
Other viewing options Cable control buttons TV TV Mode switch CBL VCR DVD /SAT /LD /DTV POWER ANT-A/B AV FRONT MODE SURROUND INPUT MTS CC TWIN PICTURE SELECT MODE FREEZE INPUT DISPLAY SLEEP SUB VIEW 1 5 EDIT/ LEARN 1 2 3 4 5 6 7 8 9 0 100 ⴐ ENT 1 0–9 Press a button (or buttons) that corresponds to the channel that you wish to watch. 2 CH a/b Press CH a or CH b to tune in a higher or lower channel. 3 SOURCE POWER Turns the cable converter power on and off.
Other viewing options SAT control buttons TV TV Mode switch CBL VCR DVD /SAT /LD /DTV POWER ANT-A/B AV FRONT MODE SURROUND INPUT MTS CC TWIN PICTURE SELECT MODE FREEZE INPUT DISPLAY SLEEP VIEW 1 SUB EDIT/ LEARN 1 2 3 4 5 6 7 8 9 0 100 ⴐ ENT 1 0–9 Press a button (or buttons) that corresponds to the channel that you wish to watch. 2 SOURCE POWER Turns the Satellite broadcast tuner power on and off.
Other viewing options DTV control buttons TV TV Mode switch CBL VCR DVD /SAT /LD /DTV POWER ANT-A/B AV FRONT MODE SURROUND INPUT MTS When the Mode switch is set to CBL/SAT/DTV, the remote control unit buttons will function as shown below. • Operate the tuner using 1 to 10. CC TWIN PICTURE SELECT MODE FREEZE INPUT DISPLAY SLEEP VIEW 1 SUB 2 3 4 5 6 7 8 9 0 100 ⴐ ENT CH ⴑ 0–9 Press a button (or buttons) that corresponds to the channel that you wish to watch.
Other viewing options VCR control buttons TV TV Mode switch CBL VCR DVD /SAT /LD /DTV POWER ANT-A/B AV FRONT MODE SURROUND INPUT MTS CC TWIN PICTURE SELECT MODE FREEZE INPUT DISPLAY SLEEP VIEW SUB EDIT/ 2 3 4 5 6 7 8 9 0 100 ENT FLASHBACK VOL CH ⴑ MENU TV/SAT/DVD DTV/DVD TOP RETURN MENU MENU CH a/b Press to select the channel of the TV tuner on the VCR. 2 SOURCE POWER Turns the power of the VCR on and off. 3 F Set pauses and still pictures.
Other viewing options DVD/LD control buttons TV TV Mode switch CBL VCR DVD /SAT /LD /DTV POWER ANT-A/B AV FRONT MODE SURROUND INPUT MTS CC TWIN PICTURE SELECT MODE FREEZE INPUT DISPLAY SLEEP VIEW SUB EDIT/ 2 3 4 5 6 7 8 9 0 100 1 U Pressing quickly once takes you to the start of the next chapter. Each time you press it, you move ahead to the start of the next chapter. 2 T Pressing quickly once takes you to the start of the chapter currently playing.
Appendix Troubleshooting Problem Possible Solution • No power • Make sure the Display and the AVC System are connected correctly. (See page 8.) • Check if you pressed TV POWER on the remote control unit. (See page 16.) If the indicator on the Display lights up red, press TV POWER. • Is the AC cord disconnected? (See page 15.) • Has the main power been turned on? (See page 16.) • Unit cannot be operated. • External influences such as lightning, static electricity, may cause improper operation.
Appendix Computer compatibility chart Resolution Frequency 640 400 85 Hz 720 400 70 Hz Remarks 85 Hz 640 480 60 Hz 65 Hz Macintosh 13 (67 Hz) 72 Hz 75 Hz 85 Hz 800 600 56 Hz 60 Hz 72 Hz 75 Hz 85 Hz 832 624 74.5 Hz 1024 768 60 Hz Macintosh 16 70 Hz 75 Hz Macintosh 19 85 Hz 1280 768 1280 1024 60 Hz 60 Hz Apple and Macintosh are registered trademarks of Apple Computer, Inc. DDC is a registered trademark of Video Electronics Standards Association.
Appendix RS-232C port specifications Computer Control of the Display • When a program is set, the Display can be controlled from the computer using the RS-232C terminal. The input signal (computer/video) can be selected, the volume can be adjusted and various other adjustments and settings can be made, enabling automatic programmed playing. • Attach an RS-232C cable cross-type (commercially available) to the supplied Din-D/sub RS-232C for the connections.
Appendix Response code format Normal response O K Return code (0DH) Problem response (communication error or incorrect command) E R R Return code (0DH) Command table • About the command except being indicated here, it is outside the guarantee range of operation.
Appendix Specifications Item 30o LIQUID CRYSTAL TELEVISION, Model: LC-30HV2U LCD panel 30o Advanced Super View & BLACK TFT LCD Number of dots 2,949,120 dots (1280 m 3 m 768dots) TV Function TV-standard (CCIR) American TV Standard NTSC System Receiving Channel VHF/UHF VHF 2-13ch, UHF 14-69ch CATV 1-125ch Audio multiplex BTSC System Brightness 430 cd/m2 Lamp life 60,000 hours (at normal mode) Viewing angles H : 170° V : 170° Audio amplifier 10W m 2 Speakers 8cm Ø Terminals AVC Rear
Dimensional drawings Display 12.0/304.5 Unit: inch/mm 21.5/545 3.3/84.5 4.0/101 13.9/354 19.5/497 23.5/598 30.2/766.4 12.0/304.5 39.5/1002.
Dimensional drawings AVC System 1.9/47.5 9.3/235 13.0/330 0.9/23 0.3/8 0.4/10 Unit: inch/mm 2.8/70 16.9/430 12.
HOW TO SET THE FACTORY PRESETS Press and hold down CLEAR on the AVC System while it is in standby mode. Then press POWER button on the Display or TV POWER on the remote control unit to turn the System on. All setting items (except TV channel) return to the factory presetting. A • Running the factory presetting operation also clears the secret number. You can run the EZ Setup again by using the following steps. 1 2 3 4 Turn on the power of the Display and the AVC System. Press MENU.
Calling for Service For location of the nearest Sharp Authorized Service, or to obtain product literature, accessories, supplies, or customer assistance, please call 1-800-BE-SHARP.
VALID IN CANADA ONLY LIMITED WARRANTY Consumer Electronics Products Congratulations on your purchase! Sharp Electronics of Canada Ltd. (hereinafter called “Sharp”) gives the following express warranty to the first consumer purchaser for this Sharp brand product, when shipped in its original container and sold or distributed in Canada by Sharp or by an Authorized Sharp Dealer: Sharp warrants that this product is free, under normal use and maintenance, from any defects in material and workmanship.
SHARP CORPORATION Printed on post-consumer recycled paper. Imprimé sur du papier recyclé. Impreso en papel reciclado. Impresso em papel reciclado pós utilização.