SHARP Display Calibration Utility Version 1.0 OPERATION MANUAL Applicable models (as of November 2021) LCD MONITOR 8M-B32C1 Available models differ according to region.
Contents Introduction......................................................................................................................................................................................3 System Requirements.................................................................................................................................................................3 Installing...................................................................................................................
Introduction This is a software to adjust brightness and color of SHARP monitors using a colorimetric sensor. System Requirements*1 Monitor Resolution of 1366 x 768 or more is required*2 Operating system Windows 10 (64-bit version)*2 Free space on hard drive At least 3 GB (free space separately required for data storage) Interface USB 2.0 (for monitor connection) USB 1.1 (for colorimetric sensor connection) Colorimetric sensor A colorimetric sensor compatible with this software is required.
Installing Install SHARP Information Display Downloader. Download SHARP Display Calibration Utility from SHARP Information Display Downloader. When using SHARP Display Calibration Utility, connect a SHARP monitor to the computer in which SHARP Display Calibration Utility using a commercially available USB cable. When the Information Display Downloader is installed, you can check and download the most recent versions of the software programs.
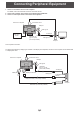
Connecting Peripheral Equipment 1. Connect a colorimetric sensor to the computer. For details, refer to the instruction manual of colorimetric sensor. 2. Connect the computer and a monitor to be adjusted with a USB cable. 3. Connect a video input device to the monitor to be adjusted. Monitor to be adjusted Colorimetric sensor USB port USB Type B To USB port Video input device USB cable (type A - type B) (commercially available) USB Type A Computer This completes connection.
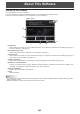
About This Software Starting up the software If any other software is running, close them. To start up the software, double-click the desktop shortcut icon “SHARP Display Calibration Utility”. Once the home screen is displayed, select an operation you want to perform. “Home” screen (7) (6) (1) (2) (5) (3) (4) (1) Calibration Click to select a color mode you want to calibrate (see page 10), configure the colorimetric sensor settings (see page 11), and start “Calibration”. (See page 12.
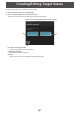
Creating/Editing Target Values Creates a target value file for “Calibration” for user settings. 1. Double-click the shortcut icon on the desktop. 2. Click “Create/Edit target value” on the home screen. “Create a new target value file” and “Edit target value files” are displayed. “Selection for creating/editing target value file” screen (1) (2) (3) (1) Create a new target value file Creates a new target value file. (See page 8.) (2) Edit target value files Edits target value files. (See page 9.
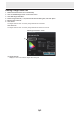
Creating a new target value file 1. Double-click the shortcut icon on the desktop. 2. Click “Create/Edit target value” on the home screen. 3. Click “Create a new target value file”. 4. Create a new target value file. 5. Click “Save”. A new target value file is saved. When “Save” is complete, the application proceeds to the “Edit target value files” screen. “Create a new target value file” screen (7) (6) (1) (5) (4) (2) (3) (1) Chromaticity diagram Color gamut and white point are displayed.
Editing a target value file 1. Double-click the shortcut icon on the desktop. 2. Click “Create/Edit target value” on the home screen. 3. Click “Edit target value files”. 4. Select a target value file (***.cts) from the file selection dialog box, and click “Open”. 5. Edit the target value file. 6. Click “Save”. The target value file which is currently being edited will be overwritten. Click “Save As”. The target value file which is currently being edited will be saved as a new file.
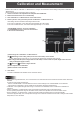
Calibration and Measurement Select a color mode for “Calibration” or “Measurement”, configure the colorimetric sensor settings, and perform “Calibration” or “Measurement”. Install a software for the colorimetric sensor in advance. 1. Connect a monitor to be adjusted to the computer with a USB cable. 2. Double-click the shortcut icon on the desktop. 3. Click “Calibration” or “Measurement” on the home screen. 4. Select a preset or user you want to perform “Calibration” or “Measurement” on.
For the colorimetric sensor, refer to its operation manual. Follow the instructions on the screen of Display Calibration Utility to initialize or install the colorimetric sensor and perform “Calibration” and “Measurement”. When “Calibration” is selected, “Calibration” is performed, and then “Measurement” is performed. When “Measurement” is selected, “Measurement” is performed without “Calibration”. Caution • Do not touch the monitor screen.
“ Start calibration” screen (“Start measurement” screen in the case of measurement) When “Update the date and time of the monitor” is checked, time settings of the computer and monitor will be synchronized. 8. Click “Start”. “Calibration” or “Measurement” starts. Display of the monitor to be calibrated changes. “Calibration in progress” screen (“Measurement in progress” screen in the case of measurement) Calibration in progress Do not touch the colorimetric sensor or display during calibration.
“Calibration complete” screen (“Measurement complete” screen in the case of measurement) (1) ( ) is displayed when succeeded, and ( when failed ) is displayed 9. Click “Calibration results”. Click “Measurement results” in the case of measurement. Results of “Calibration” or “Measurement” are displayed on the following screen. “Calibration results” screen (“Measurement results” screen in the case of measurement) You can compare target values and measured values. 10. Click “Output in CSV format”.
Manual Adjustment Perform manual fine adjustment by watching an actual video displayed on the monitor. 1. Connect a monitor to be adjusted to the computer with a USB cable. 2. Double-click the shortcut icon on the desktop. 3. Click “Manual adjustment” on the home screen. If there is no video signal, input a video signal to the display to be adjusted. 4. Adjust the video manually. Select a “COLOR MODE” you want to adjust to display a video on the monitor with the selected “COLOR MODE”. 5.
Reference Monitor Emulation If there is no colorimetric sensor, perform “Reference monitor emulation” to adjust the color expression of “USER1” and/or “USER2” of color mode to replicate that of HDR video display of the reference monitor. If there is a colorimetric sensor, perform “Calibration” with the target value file with the color gamut set to “Rec.2020 (Ref. monitor)” and the white balance set to “D65(Ref.monitor)”. 1. Connect a monitor to be adjusted to the computer with a USB cable. 2.
Uninstalling the Software Caution • Uninstallation requires administrator privilege. 1. Exit all running software applications. 2. Click the “Start” button, and select “Settings”. 3. Click “Applications”. 4. Select “SHARP Display Calibration Utility”, and click “uninstall”. 5. Follow the instructions on screen. When the “User Account Control” dialog box appears, click “Yes”. This completes the uninstallation process.
DCU V1.