
User Manual


7
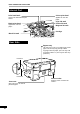
PART NAMES AND FUNCTIONS
The following illustration shows the part names and function of the unit. Before operating, it
is advisable to familiarise yourself with the unit.
The illustration below shows the unit with all the parts installed.
Operation panel
Use this panel to specify
your preferences for
copying and setting up
the unit.
Output tray
The document is
deposited onto the tray
after copying. Pull out
the output tray
extension when using
copy paper longer than
the output tray.
Paper tray
Holds up to 150 paper.
Adjustable to suit a variety
of paper sizes. Load the
paper so that the side to be
copied onto is face down.
Front cover locking knob
Turn this knob to the
right to open the front
cover.
Maintenance cover
Open this cover to
change the ink tanks or
print heads.
Original cover
Open this cover to set
an original for copying.
Display panel
Displays the status of
the unit, setting options
and the number of
copies.
ERROR indicator
Lights up when an error
occurs.
Power button
Press to turn the power
on or off.
Front cover
Open this cover to
change the ink tanks or
print heads.
Scan head locking switch
Lock the scan head when
moving this unit.
Front Side
Paper knob
When copying onto thick paper,
adjust the knob to setting.
(Return the knob to its original
setting after copying.)
Handles
Released
Locked