
user manual


: Jan. 9 2004
1
AR-CF2 ADJUSTMENTS 5 - 1
[5] ADJUSTMENTS
1. Paper width detection level setting (adjustment)
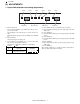
1) Enter the diag mode.
Press and hold PUNCH key and START key, and turn on the
power of the main unit.
The LCD display of the main unit turns on and off, then turns on
again.
Check that LED1 is flashing, and release PUNCH key and START
key.
2) Press START key.
The display changes to the diag mode.
3) Press PUNCH key and STAPLE key to set to the paper width
detection level setting (adjustment) mode.
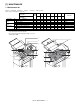
The diag mode is displayed by combination of LED lighting.
: Lighting : OFF
4) Press START key. (The selected diag mode is executed.)
5) Check that LED2 is flashing, and set the paper guide to the max.
width position.
6) Press START key.
7) Check that LED3 is flashing, and set the paper guide to A4R width
position.
8) Press START key.
9) Check that LED4 is flashing, and set the paper guide to A5R width
position.
10) Press START key.
11) Check that LED5 is flashing, and set the paper guide to the min.
width position.
12) Press START key.
When setting (adjustment) is completed normally, LED1 lights up.
When it is failed, LED1 flashes more rapidly.
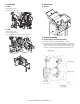
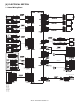
LED 6 LED 5 LED 4 LED 3 LED 2 LED 1
START keyPUNCH key Operator panel STAPLE key
Diag mode
No.
Diag mode LED lighting
11 Paper width detection level
setting (adjustment) mode
654321