
Specifications
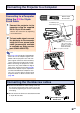
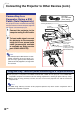


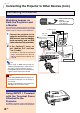

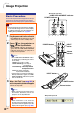
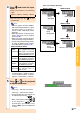
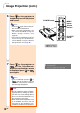

Image Projection
▼Projector indicators
LAMP REPLACEMENT indicator
POWER indicator
POWER button
INPUT
button
INPUT button
POWER button
▼Keycode input box
-34
Volume
buttons
Volume button
Basic Procedure
Connect the required external equipment to the pro-
jector before operating the following procedures.
Details are found in the projector operation manual.
Info
•
The language preset at the factory is English.
If you want to change the on-screen display
to another language, reset the language ac-
cording to the procedure on page 37.
1
Plug the power cord into the wall outlet.
•
The POWER indicator illuminates up in red,
and the projector enters standby mode.
2 Press
on the projector or
on the GyroRemote.
• The POWER indicator illuminates in
green. After the LAMP REPLACEMENT
indicator illuminates, the projector is
ready to start operation.
Note
• The LAMP REPLACEMENT indica-
tor illuminates, indicating the status
of the lamp.
Green: The lamp is ready.
Green blinking: The lamp is
warming up.
Red blinking:
The lamp should
be replaced soon.
Red: The lamp should be
replaced immediately.
• If the power is turned off and imme-
diately switched on again, the LAMP
REPLACEMENT indicator may take
time to illuminate.
3
When “Anti-Theft” (see page 102) is
set, the keycode input box will appear.
• Enter the keycode.
Note
• When entering the keycode, press
the buttons previously set on the
projector or the GyroRemote.
Info
•
When “Anti-Theft” is set, enter the
keycode or the input display will not ap-
pear. Even when the signal is input, the
display will not appear. (See page 102.)