
Specifications


Troubleshooting
-55
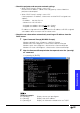
• Check the projector and computer network settings
• When “DHCP Server” setting is set to “OFF”.
Recheck the IP address, subnet mask and gateway values of both the
projector and computer.
• When “DHCP Server” setting is set to “ON”.
Check projector’s IP address, subnet mask and the DHCP assigned start
address.
IP Address : 192.168.150.120
Subnet mask: 255.255.255.0
Assigned start address 192.168.
150.100 Correct
Assigned start address 192.168.
050.100 Wrong
IP address assignation will not be possible if the IP address or DHCP assigned
start address does not match with the subnet mask.
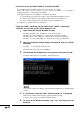
• Check the set values when automatically receiving an IP address from the
DHCP server.
1
Open Command Prompt (MS-DOS Prompt).
Windows 98/98SE: Start →Programs →MS-DOS Prompt
Windows Me: Start→Programs → Accessories→MS-DOS Prompt
Windows 2000: Start→Programs →Accessories→Command Prompt
Windows XP: Start→All Programs →Accessories→Command Prompt
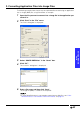
2
After the Command Prompt window has opened, enter the “ipconfig/
all” command.
C:\> ipconfig /all [ENTER]
“ipconfig” example
C:\> ipconfig /? Displays how to use ipconfig.exe
C:\> ipconfig Displays the set IP address.
C:\> ipconfig /all Displays all information related to the set TCP/IP