ENGLISH LC-10A3U Impreso en papel reciclado. Impresso em papel reciclado pós utilização. IMPRESO EN JAPÓN IMPRESSO NO JAPÃO TINS-7386CEZZ FRANÇAIS LC-10A3U MANUAL DE MANEJO MANUAL DE OPERAÇAO LCD COLOR TELEVISION TÉLÉVISION COULEUR À ÉCRAN À CRISTAUX LIQUIDES (LCD) OPERATION MANUAL MODE D’EMPLOI LCD TELEVISION EN COLOR TELEVISOR COLORIDO LCD LC-10A3U PORTUGUÊS ESPAÑOL Printed on post-consumer recycled paper. Imprimé sur du papier recyclé.
ENGLISH LC-10A3U LCD COLOR TELEVISION ENGLISH OPERATION MANUAL
Important Information WARNING: TO REDUCE THE RISK OF FIRE OR ELECTRIC SHOCK, DO NOT EXPOSE THIS PRODUCT TO RAIN OR MOISTURE. The lightning flash with arrowhead symbol, within an equilateral triangle, is intended to alert the user to the presence of uninsulated “dangerous voltage” within the product’s enclosure that may be of sufficient magnitude to constitute a risk of electric shock to persons. CAUTION RISK OF ELECTRIC SHOCK.
CONTENTS Page DEAR SHARP CUSTOMER ............................................................................................................. 5 IMPORTANT SAFETY PRECAUTIONS ....................................................................................... 5,6 SUPPLIED ACCESSORIES ............................................................................................................. 7 PREPARATION ....................................................................................................
DEAR SHARP CUSTOMER Thank you for your purchase of the Sharp LCD Color TV product. To ensure safety and many years of trouble-free operation of your product, please read the Safety Precautions carefully before using this product. IMPORTANT SAFETY PRECAUTIONS Electricity is used to perform many useful functions, but it can also cause personal injuries and property damage if improperly handled. This product has been engineered and manufactured with the highest priority on safety.
IMPORTANT SAFETY PRECAUTIONS (Continued) 17. Servicing—Do not attempt to service the product yourself. Removing covers can expose you to high voltage and other dangerous conditions. Request a qualified service person to perform servicing. 18. Repair—If any of the following conditions occurs, unplug the power cord from the AC outlet, and request a qualified service person to perform repairs. a. When the power cord or plug is damaged. b.
SUPPLIED ACCESSORIES Make sure the following accessories are provided with the product. Wireless Remote Control (×1) ENGLISH Operation Manual (×1) FRAN AIS LC-10A3U LCD COLOR TELEVISION T L VISION COULEUR ¸ CRAN ¸ CRISTAUX LIQUIDES (LCD) OPERATION MANUAL MODE D EMPLOI Printed on post-consumer recycled paper. Imprim sur du papier recycl .
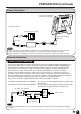
PREPARATION Preparing and Using the Remote Control ■ Use the remote control by pointing it towards the remote sensor window. Objects between the remote control and sensor window may prevent proper operation. Cautions regarding use of remote control ■ Do not expose the remote control to shock. In addition, do not expose the remote control to liquids, and do not place in an area with high humidity. ■ Do not install or place the remote control under direct sunlight. The heat may cause deformation of the unit.
PREPARATION (Continued) Power Connection Connect to the DC input terminal of the product. Plug into AC outlet. Household power outlet To DC input terminal (DC 12V) AC cord AC adapter Notes: ■ ■ ■ Use a commercially available AC plug adapter, if necessary, depending on the design of the wall socket. Always turn the main power switch of the LCD TV set to OFF when connecting the AC adapter. Always unplug the AC adapter from the product and power outlet when not using for long periods of time.
PREPARATION (Continued) Antenna Connections Antennas ■ The antenna requirements for good color television reception are more important than those for black & white television reception. For this reason, a good quality outdoor antenna is strongly recommended. The following is a brief explanation of the type of connections that are provided with the various antenna systems: F-type connector 1.
FRONT AND REAR CONTROL OPTIONS Main unit (front view) Remote sensor window Power/standby indicator (The actual location is not visible) A green indicator lights when the power is on and a red indicator lights when in the standby mode (the indicator will not light when the power is off).
FRONT AND REAR CONTROL OPTIONS (Continued) Main unit (rear view) Adjust the set stand to an angle so that the screen is easily visible. The set stand can be opened up to 80°.
REMOTE CONTROL/BASIC OPERATION MENU POWER MENU POWER CH TV/VIDEO TV/VIDEO VOL − CH (])/([) ]Selects next higher channel [Selects next lower channel VOL + CH FLASHBACK 1 2 3 DISPLAY CHANNEL SELECT 4 5 6 7 8 9 0 100 MUTE FLASHBACK Returns to previous channel DISPLAY Press....Displays receiving channel for 10 seconds. Channel indication reduces in size after about 10 seconds. Press again....
BASIC OPERATION (Continued) Turning on POWER Control section of main unit VOL CH TV/VIDEO 1 Slide the MAIN POWER switch, located on the upper side of the main unit to ON. 2 The Power indicator instantaneously changes from red to green and the main unit is turned on. MAIN POWER ▼ ON-screen display Note: Input mode indication disappears after several seconds. Notes: Power/Standby indicator Switching TV/VIDEO AV1/AV2/TV Mode Turn on the power of the connected video equipment.
BASIC OPERATION (Continued) Sound Volume 1 Press the VOL (+) to increase sound volume. The segment of indicator increases. 2 Press the VOL (–) to decrease sound volume. The segment of indicator decreases. MENU POWER CH TV/VIDEO CH FLASHBACK 1 2 3 4 5 6 7 8 9 DISPLAY MUTE 0 MUTE LCDTV To mute sound 1 Press the MUTE to temporarily turn off the sound. Screen displays MUTE MARK. 2 Press the MUTE or VOL (+)/(–) to turn the sound back to the previous level.
BASIC OPERATION (Continued) Changing the Channels Changing channels using the CHANNEL SELECT on the remote control • To handle the increasing number of channels available, this LCD TV set allows you to select up to 125 positions (Channels 1 to 125). One-digit, two-digit and three-digit methods of selection can be used. Follow the procedure shown below to select channels. MENU POWER CH To select a one-digit channel (e.g., Channel 5): Basically, the 2-digit entry is used.
SELECTING THE MENU ITEMS Selecting a Menu Item • This LCD TV set allows you to adjust the picture and sound, and set the channels and other features using the On Screen Display. Select the desired menu item by following the steps below and then refer to the indicated page for details. MENU POWER MENU CH 1 Press the MENU to display the MENU screen. 2 Press the CH (])/([) to select the desired menu item.
EZ SETUP DURING FIRST POWER ON ■ When you turn on the LCD TV for the first time, it will automatically memorize the broadcasting channels. Please perform the following instructions before you press the power button. (1) Insert the batteries into the remote control. (See page 8) (2) Connect the antenna cable to the TV set. (See page 9 ~ 10) (3) Plug in the AC adapter to the wall outlet.
ADJUSTMENT Adjusting the LANGUAGE Settings The language for the ON SCREEN DISPLAY can be ENGLISH, SPANISH or FRENCH. Setting the ON SCREEN DISPLAY Language. 1 Press the MENU to display the MENU screen. 2 Press the CH (])/([) to move the “>” mark to “SETUP”. MENU POWER TV/VIDEO CH FLASHBACK 1 2 3 4 5 6 7 8 9 (MAIN MENU screen) MENU CH 3 Press VOL (+)/(–) to display SETUP mode, then press CH (])/ ([) to move the “>” mark to “LANGUAGE”.
ADJUSTMENT (Continued) Adjusting the VIDEO ADJUST Settings 1 Press the MENU to display the MENU screen. MENU POWER MENU CH TV/VIDEO (MAIN MENU screen) CH FLASHBACK 1 2 3 4 5 6 7 8 9 DISPLAY CH (])/ ([) 2 Press the CH (])/([) to move the cursor to VIDEO ADJUST. 3 Press the VOL (+)/(–) to display the VIDEO ADJUST Menu screen. 4 Press the CH (])/([) to move the cursor and select the desired adjustment item. All of adjustment item is shown in the diagram on page 21.
ADJUSTMENT (Continued) Adjusting the VIDEO ADJUST Settings (Continued) TV mode Selected item Press the VOL (–). Press the VOL (+). PICTURE Decrease contrast Increase contrast TINT Toward purple Toward green COLOR Lower color intensity Higher color intensity BLACK LEVEL Less bright More bright SHARPNESS Soft picture Sharp picture Selected item Press the VOL (–). Press the VOL (+).
ADJUSTMENT (Continued) Adjusting the PRESET Settings ■ The PRESET items can be set by the user. 1 Press the MENU to display the MENU screen. 2 Press the CH (])/([) to move the cursor to PRESET. 3 Press the VOL (+)/(–) to display PRESET screen. 4 Check the factory setting of each item on the PRESET screen. The user can change the settings by using CH (])/([) and VOL (+) /(–). 5 Press the MENU to return to the main screen.
ADJUSTMENT (Continued) SETUP ■ EZ SETUP By operating the channel presetting functions, you can preset your LCD TV to the desired channels for viewing. 1 Press MENU to display the MENU screen. 2 Press CH (])/([) to move the “>” mark to “SETUP”. MENU POWER MENU CH TV/VIDEO (MAIN MENU screen) CH FLASHBACK 1 2 3 CH (])/ ([) 3 DISPLAY 4 5 6 7 8 9 Press VOL (+)/(–) to display SETUP mode, then press CH (])/ ([) to move the “>” mark to “CH SETTING”.
ADJUSTMENT (Continued) SETUP (Continued) ■ CHANNEL SETTING If EZ SETUP does not memorize all the channels in your region, follow the instructions below to manually memorize the channel. 1 Press MENU to display the MENU screen. 2 Press CH (])/([) to move the “>” mark to “SETUP”. 3 Press VOL (+)/(–) to display SETUP mode. 4 Press CH (])/([) to move the “>” mark to “CH SETTING”. 5 Press VOL (+)/(–) to display CH SETTING mode.
ADJUSTMENT (Continued) SETUP (Continued) ■ Saving broadcast TV channels into memory. 1.1 Press MENU to display the MENU screen, then press CH (])/([) to move the “>” mark to “SET UP”. 1.2 Press VOL (+)/(–) to display SETUP mode, then press CH (])/ ([) to move the “>” mark to “CH SETTING”. 1.3 Press VOL (+)/(–) to display CH SETTING screen. (CH SETTING mode) 1.4 Press CH (])/([) to move the “>” mark to “CH SEARCH”, then press VOL (+)/(–) to display CH SEARCH screen. START 2.1 Press VOL (+).
ADJUSTMENT (Continued) Adjusting the BLUE SCREEN Settings ■ BLUE SCREEN Automatically turns the screen blue if a broadcast signal is not received. 1 Press the MENU to display the MENU screen. 2 Press CH (])/([) to move the “>” mark to “SET UP”. 3 Press VOL (+)/(–) to display SETUP mode. MENU POWER MENU CH TV/VIDEO CH FLASHBACK 1 2 3 4 5 6 7 8 9 CH (])/ ([) (MAIN MENU screen) DISPLAY MUTE 0 (SETUP mode) 4 Press the VOL (+)/(–) to display BLUE SCREEN select mode.
LISTENING WITH A HEADPHONE ■ Plug the headphone mini-plug into the headphone jack located on the rear side of the set. ▼ Screen display Mini-plug Headphone jack Headphone Notes: ■ ■ The headphone is not included in the supplied accessories. No sound will be heard from the main unit speakers when connecting the headphone set. EXAMPLE OF APPLICATION View by mounting the set to the wall using mounting bracket. CAUTION: The thickness and the material of the wall must use plywood or solid wood of 0.5 in.
CONNECTING WITH EXTERNAL DEVICES It is possible to enjoy video and sound by connecting VCR's and home video game systems to the terminals located on the rear of the main unit. When connecting an external device, turn off the power of the main unit and connecting device to prevent any possible damage. Example of external devices that can be connected.
CONNECTING WITH EXTERNAL DEVICES (Continued) Connecting a VCR or home video game system (AV-IN 1/2) S V R L AV-IN 1 Audio AV-IN 2 AUDIO V AV-OUT Connect the video and audio cords correctly.
CONNECTING WITH EXTERNAL DEVICES (Continued) Outputting video and audio (video output) It is possible to output video and audio from the set through the AV output terminal (AV-OUT). S V L R AV-IN 1 AUDIO AV-IN 2 AUDIO V AV-OUT Outputs video and audio Note: ■ When using S-Video input for AV-IN 1, no video output will be made to the AV output terminal, but audio output will be made for connection to external audio systems.
TROUBLESHOOTING ■ Before calling for repair service, check the following items for possible remedies to the encountered symptoms. TV set Problem Sound Picture Picture There is no picture or sound. There is no picture. There is no picture from AV-IN 1. There is no sound. There is no picture or sound, just noise. Check item • Make sure the AC adapter is properly inserted in the power outlet. • Reception other than those of broadcasting stations can be considered.
TROUBLESHOOTING (Continued) Antenna Problem The picture is not sharp. Check item • • • • The reception may be weak. The state of the broadcast may also be bad. Make sure the antenna is facing the right direction. Make sure the outside antenna is not disconnected. The picture moves. The picture is doubled or tripled. The picture is spotted. There are stripes on the screen or colors fade. 32 • Make sure the antenna is facing the right direction.
SPECIFICATIONS ITEMS LCD panel Number of pixels Video color systems Destination TV Standard (CCIR) TV TV Tuning System FUNCTION STEREO EZ SETUP CATV 4-LINE COMB FILTER Brightness Lamp life Viewing angles Audio amplifier Speakers Terminals 10.4” TFT LCD 921,600 pixels VGA N358, N443, PAL, PAL-M, PAL-N, SECAM, PAL-60 USA/Latin A/Twn NTSC/PAL-M/PAL-N PLL 181 ch. AV STEREO Yes 125 ch. Yes 400 cd/m2 60,000 Hours H: 120° V: 100° 1.0 W × 2 1-3/16 × 1-37/64 in.
Calling for Service For location of the nearest Sharp Authorized Service, or to obtain product literature, accessories, supplies, or customer assistance, please call 1-800-BE-SHARP.
LC-10A3U ENGLISH Impreso en papel reciclado. Impresso em papel reciclado pós utilização. IMPRESO EN JAPÓN IMPRESSO NO JAPÃO TINS-7386CEZZ LC-10A3U FRANÇAIS MANUAL DE MANEJO MANUAL DE OPERAÇAO LCD COLOR TELEVISION TÉLÉVISION COULEUR À ÉCRAN À CRISTAUX LIQUIDES (LCD) OPERATION MANUAL MODE D’EMPLOI LCD TELEVISION EN COLOR TELEVISOR COLORIDO LCD PORTUGUÊS LC-10A3U ESPAÑOL Printed on post-consumer recycled paper. Imprimé sur du papier recyclé.